Advertisement
Quick Links
email: info@riverside-furniture.com
Warning :
- Be sure to check all packing material carefully for small parts,
which may have come loose inside the carton during shipment.
- To prevent possible scratches and damage, this furniture MUST
BE ASSEMBLED BY TWO PEOPLE on a soft surface such as
a blanket or carpet.
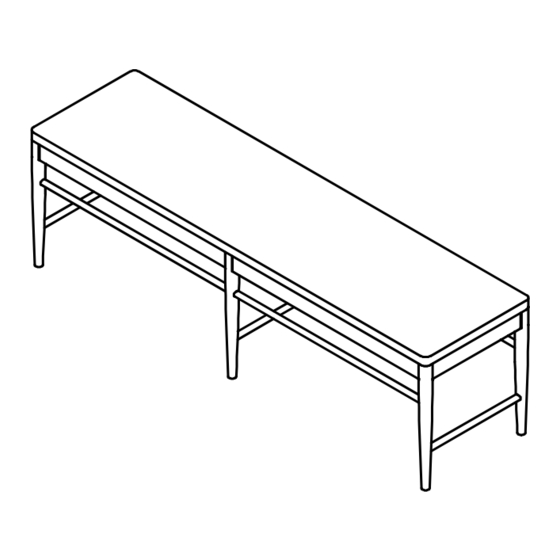
Bench Seat
1 pc.
Long Stretcher
Short Stretcher
4 pcs.
Do not fully tighten the screws.
STEP 1:
Assembly Instructions
Middle Leg
Leg (Left)
2 pcs.
Flat Washer
5/16" x 16*2mm
3 pcs.
Side Leg
Laguna
Dining Room
Leg (Right)
2 pcs.
Spring Washer
5/16''
12 pcs.
Made in Viet Nam
37559
Rush Seat Dining Bench 1in
2 pcs.
Allen Head Bolt
5/16''x 18x2- 1/8"
12 pcs.
12 pcs.
#8x1-1/4 Screw
14 pcs.
Middle Leg
Page 1 of 4
5mm Allen Key
1 pc.
Screw Driver
not included
Advertisement

Related Manuals for Riverside Furniture Laguna Dining Room


Summary of Contents for Riverside Furniture Laguna Dining Room
- Page 1 Laguna Page 1 of 4 Dining Room Made in Viet Nam Assembly Instructions email: info@riverside-furniture.com Warning : - Be sure to check all packing material carefully for small parts, which may have come loose inside the carton during shipment. - To prevent possible scratches and damage, this furniture MUST BE ASSEMBLED BY TWO PEOPLE on a soft surface such as a blanket or carpet.
- Page 2 Laguna Page 2 of 4 Dining Room Made in Viet Nam Assembly Instructions email: info@riverside-furniture.com 37559 - Rush Seat Dining Bench 1in Do not fully tighten the bolts STEP 2: STEP 3:...
- Page 3 Laguna Page 3 of 4 Dining Room Made in Viet Nam Assembly Instructions email: info@riverside-furniture.com 37559 - Rush Seat Dining Bench 1in Do not fully tighten the bolts STEP 4: STEP 5:...
- Page 4 Laguna Page 4 of 4 Dining Room Made in Viet Nam Assembly Instructions email: info@riverside-furniture.com 37559 - Rush Seat Dining Bench 1in Using the Allen key and a Phillips head screw driver, tighten all bolts, then tighten all screws. STEP 6: Complete...
Need help?
Do you have a question about the Laguna Dining Room and is the answer not in the manual?
Questions and answers