Advertisement
Table of Contents
- 1 Components and Hardware List
- 2 Assembly Instructions
- 3 Step 1: Carefully Set the Table Top (A) Upright and Remove the Security Strap
- 4 Step 2: Attach Three Legs to Table Top (A) Using Washers and Bolts
- 5 Step 3: Insert Bottom Shelf (C) into Legs (B) and Attach with Washers and Bolts
- 6 Step 4: Attach Final Leg to Top and Shelf, Adjust Fit and Tighten Bolts
- 7 Step 5: Carefully Set the Assembled Table Upright
- Download this manual
Riverside
email: info@riverside-furniture.com
Components and Hardware List
Table Top
A
1 pc.
Allen Head Bolt
Lock Washer
Ø6 x 45mm
Ø9 x Ø13mm
H1
12 s.
pc
H2
12 s.
Be sure to check all packing material carefully for small parts, which
may have come loose inside the carton during shipment.
Step 1: Carefully set the Table Top (A) upright and remove the security
strap.
A
Step 2: Place the Table Top (A) on its front edge on a clean, soft surface. Attach three legs to the Top
(A) using the Flat washer (H3), Lock washer (H2) and Bolts (H1) as shown in DETAIL A .
Do not fully tighten Bolts until fourth Leg has been attached.
B
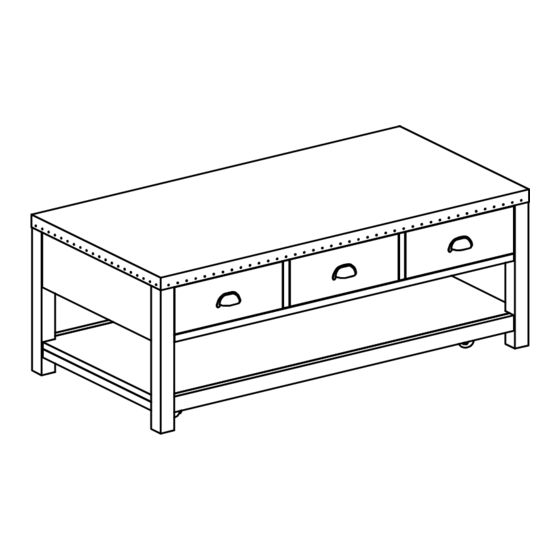
Lift - Top Cocktail Table
FURNITURE
Assembly Instructions
Legs
B
4 pcs.
Flat Washer
Ø8 x Ø20mm
pc
H3
12 s.
pc
H4
Liam
Bottom Shelf
C
1 pc.
Allen Key
4 x 110mm
1 .
pc
A
Made in Viet Nam
#71101
Lift - Top Cocktail Table
CAUTION!
Do not allow children to play on the
mechanized furniture or operate the
mechanism.Top surfaces fold down on
closing, so that a child could possibly
be injured. Always leave furniture in
the closed position when unattended.
To prevent the table from tipping over,
do not place more than 30 pounds
on the top when in the open position.
KEEP HANDS CLEAR OF
MECHANISM.
H1
H2
H4
DETAIL A
B
Page 1 of 2
H3
Advertisement
Table of Contents

Related Manuals for Riverside Furniture Liam 71101


Summary of Contents for Riverside Furniture Liam 71101
- Page 1 Page 1 of 2 Riverside Liam Made in Viet Nam Lift - Top Cocktail Table FURNITURE Assembly Instructions email: info@riverside-furniture.com Components and Hardware List Table Top Legs Bottom Shelf 4 pcs. 1 pc. 1 pc. Allen Head Bolt Lock Washer Flat Washer Allen Key Ø6 x 45mm...
- Page 2 Page 2 of 2 Riverside Liam Lift - Top Cocktail Table Made in Viet Nam FURNITURE Assembly Instructions email: info@riverside-furniture.com Step 3: Insert the Bottom Shelf (C) into the notches of the Legs (B), attaching using the Flat Washers (H3), Lock Washer (H2) and Bolts (H1). As shown in DETAIL B. DETAIL B Step 4: Attach the final Leg to the Top and Shelf as shown in Step 2 and 3.
Need help?
Do you have a question about the Liam 71101 and is the answer not in the manual?
Questions and answers