Advertisement
Quick Links
Advertisement

Subscribe to Our Youtube Channel
Related Manuals for EASY COOPS Chicken Coop Plan 20x40


Summary of Contents for EASY COOPS Chicken Coop Plan 20x40
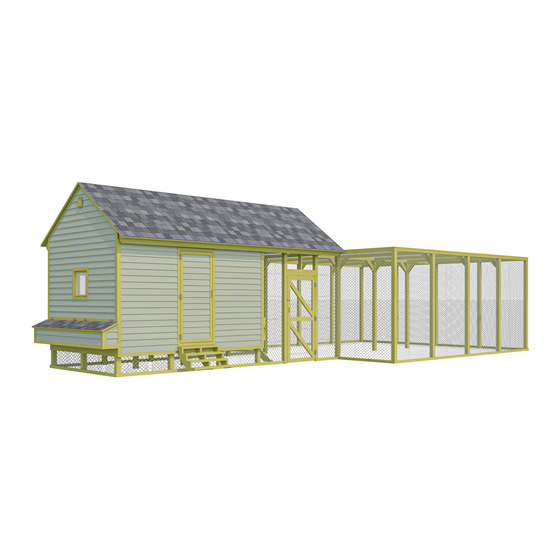
- Page 1 20'x40' Chicken Coop Plan Up to 50 chickens...
- Page 2 Compare Free vs. Premium plan Free plan Premium edition Pages Illustrations for Each Step Print Ready Step By Step Instructions Full Materials and Cuttings List Additional Illustrations Additional Blueprints Tools List Fastening Elements List Technical Support TRY PREMIUM...
-
Page 3: Material List
20´x40´ chicken coop material list Walls Exterior Siding Site Preparation Concrete • Pressure-Treated Lumber • Bricks • Wood siding boards • Top Frame Bottom Frame • Pressure-Treated Lumber • Pressure-Treated Lumber • Plywood Fasteners & Hardware Walls Frames • Corner braces •... - Page 4 STEP 1 Framing the Coop's Floor 1.1 Assemble the frame using 1 1/2" x 7 1/4" pressure-treated lumber. You will need two boards cut to 11'-9 1/4" that will be the rim joists and two boards cut to 8'-6 1/4" that will be the joists.
- Page 5 STEP 2 Framing the Floor 2.1 Assemble the frame using 1 1/2" x 7 1/4" pressure-treated lumber. You will need eight boards cut to 8'-6 1/4" that will be the joist. 2.2 Secure the beams with 3" wood screws. 2.3 Using a speed square or carpenter's square, check the corners to make sure they are 90°.
- Page 6 STEP 3 Assemble Front Wall Frame 3.1 Using 1 1/2" x 3 1/2", 1 1/2" x 5 1/2" and 3 1/2" x 3 1/2" pressure-treated lumber, construct front wall frame using the drawing below as a reference. You will need ten boards cut to 6'-4" and two boards cut to 5'-10 1/2"...
- Page 7 STEP 4 Assemble Back Wall Frame 4.1 Using 1 1/2" x 3 1/2", 1 1/2" x 5 1/2" and 3 1/2" x 3 1/2" pressure-treated lumber, construct back wall frame using the drawing below as a reference. You will need four boards cut to 6'-4", six boards cut to 4'-9", four boards cut to 2'-11 1/2"...
- Page 8 STEP 5 Assemble Left Side Wall Frame 5.1 Using 1 1/2" x 3 1/2", 1 1/2" x 5 1/2" and 3 1/2" x 3 1/2" pressure-treated lumber, construct left wall frame using the drawing below as a reference. You will need six boards cut to 4'-9", two boards cut to 6'-4", two boards cut to 2'-11 1/2", one board cut to 1'-3 1/2"...
- Page 9 STEP 6 Assemble Right Side Wall Frame 6.1 Using 1 1/2" x 3 1/2" pressure-treated lumber, construct right side wall frame using the drawing below as a reference. You will need eight boards cut to 6'-4" that will be studs, one board cut to 1'-2 1/2" that will be chicken door header and two boards cut to 8'-2 1/4"...
- Page 10 STEP 7 Assemble Aviary's Top Frame 7.1 Using and 3 1/2" x 3 1/2" pressure-treated lumber, provide the main top frame for aviary using the drawing below as a reference. You will need two boards cut to 8'-5", two boards cut to 5'-11", one board cut to 8'-2 1/4"...
- Page 11 STEP 8 Assemble the Roof Frame 8.1 Using 1 1/2" x 5 1/2" pressure-treated lumber, cut thirty two rafters 6'-2 3/4" long according to the dimensions in drawings below. 8.2 Using 1 1/2" x 3 1/2" pressure-treated lumber, cut fourteen collar ties 5' long according to the dimensions in drawings below.
- Page 12 STEP 9 Install Plywood for the Roof 9.1 Cut sheets of 5/8" plywood for the roof sheathing using the drawing below as a guide. You will need two 4' x 6'-5 3/4" sheets, four 4' x 8" sheets and four 2'-5 3/4" x 8' sheets. 9.2 Secure the plywood with 2"...
- Page 13 STEP 10 Install Plywood for the Left Wall Nesting Box 10.1 Cut sheet of 5/8" plywood for the nesting box sheathing using the drawing below as a guide. You will need two 1' x 4'-4 3/4" sheets for the floor and six 1'-1 1/2" x 1'-4 1/2" sheets for inner partitions.
- Page 14 STEP 11 Install Plywood for the Back Wall Nesting Box 11.1 Cut sheet of 5/8" plywood for the nesting box sheathing using the drawing below as a guide. You will need two 1' x 4' sheets and one 1' x 3'-9 1/4" sheet for the floor and nine 1'- 1 1/2" x 1'-4 1/2"...
- Page 15 STEP 12 Assemble and Install Front Door 12.1 Build the door frame using 3/4" x 3 1/2" pressure-treated lumber. You will need two boards cut to 5'-11 1/2" that will be the vertical girts, two boards cut to 2'-1/2" that will be the horizontal girts and one board cut to 5'-9"...
- Page 16 STEP 13 Coop's Roof Sheathing Installation 13.1 You will need 265 Sq Ft of building paper and asphalt shingle roofing. 13.2 Cover the plywood and drip edge with building paper. Try to install sheets with 1" overlapping. Use 2" nails to secure the sheets. 13.3 Install asphalt shingle roofing using an industrial stapler.
- Page 17 STEP 14 Assemble and Install Windows You will need to prepare three windows. 14.1 Using 1 1/2" x 1 1/2" pressure-treated lumber, assemble the outer frame for the window as shown in the drawing below. You will need four boards cut to 1'-7 1/2" that will be the vertical and horizontal girts. Cut the recesses in each beam for splicing connection and mill a recess for the glass.
- Page 18 STEP 15 Mesh Wall Installation 15.1 Cover the walls with 1/4" wire mesh with the help of industrial stapler. You will need 1100 sq ft.
- Page 19 STEP 16 Assemble The Roost 16.1 Assemble the roost using 1 1/2" x 1 1/2" and 1 1/2" x 2 1/2" pressure-treated material. You will need four boards cut to 5'-3" that will be the stringers and eight boards cut to 4'-1/2" that will be treads.
-
Page 20: Final Touches
STEP 17 Final Touches Now that your chicken coop is all done, you are ready to decorate it any way you want using your favorite paint, stain, or preservative. - Page 21 Compare Free vs. Premium plan Free plan Premium edition Pages Illustrations for Each Step Print Ready Step By Step Instructions Full Materials and Cuttings List Additional Illustrations Additional Blueprints Tools List Fastening Elements List Technical Support TRY PREMIUM...
- Page 22 For more great HOW-TO plans please visit: https://easycoops.com/ Copyright The text and illustrations that appear here are the exclusive property of shedplans.org and are protected by federal copyright laws. The duplication, sale or distribution of any portion of these plans without prior written consent from the original designer will be subject to the appropriate penalties for copyright infringement.
Need help?
Do you have a question about the Chicken Coop Plan 20x40 and is the answer not in the manual?
Questions and answers