Table of Contents
Advertisement
Quick Links
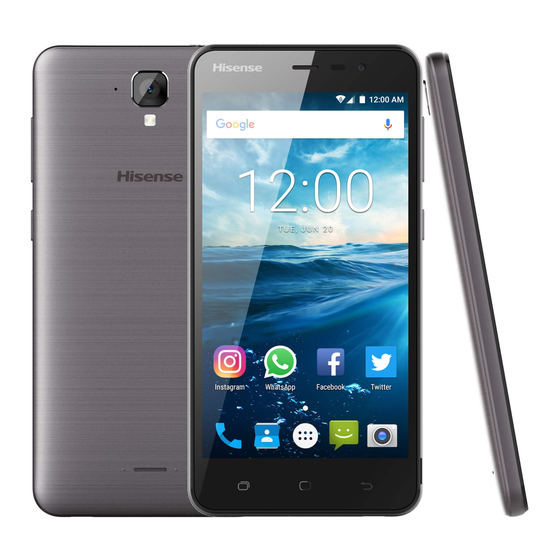
Hisense F10User Manual
Manufactured by Hisense Communications Co.,Ltd.
4G LTEReady
* Please check with your network operator if 4G LTE is
available on your SIM.
5"HD ,13MAF+5MFF
•
Screen displays and
•
illustrations may differ
from those you see on
actual phone.Some of
the contents of this
guide may not apply to
your phone,
depending on the
software and your
service provider. All
information in this
document is subject to
change without notice.
Advertisement
Table of Contents

Subscribe to Our Youtube Channel
Related Manuals for Hisense F10


Summary of Contents for Hisense F10
- Page 1 Hisense F10User Manual Manufactured by Hisense Communications Co.,Ltd. 4G LTEReady * Please check with your network operator if 4G LTE is available on your SIM. 5“HD ,13MAF+5MFF • Screen displays and • illustrations may differ from those you see on actual phone.Some of...
-
Page 2: Table Of Contents
Content Safety Precautions ............1 Medical Device ............2 Road Safety .............. 2 Power Supply & Charging ........3 Hearing Protection ............ 4 Protecting the Environment ........4 Cleaning and Maintenance ........4 Emergency Call ............5 Compliance ......... 错 误 ! 未 定 义 书 签 。 Copyright .............. -
Page 3: Safety Precautions
Safety Precautions Please read the safety precautions carefully to ensure the correct use of your mobile phone. Do not crash, throw, or puncture your mobile phone. Avoid the falling, squeezing, and bending of your mobile phone. Do not use your mobile phone in a moist environment, such as the bathroom. -
Page 4: Medical Device
14. Strictly follow the relevant instructions of this manual while using the USB cable. Otherwise your mobile phone or PC may be damaged. 15. Use a dry soft cloth to clean the product; do not use water, alcohol, detergent or any chemicals. 16. -
Page 5: Power Supply & Charging
governing the use of electronic devices by the driver may be applicable in your country and/or jurisdiction. 3. Give full attention to driving. 4. Pull off the road and park before making or answering a call if driving conditions so require. 5. -
Page 6: Hearing Protection
13. The phone must be disconnected from the supply mains when removing the battery. 14. Battery contains materials which are hazardous and harmful for the environment. 15. Do not plug or unplug USB port with wet hands – risk of electric shock. -
Page 7: Emergency Call
Do not wipe the phone or charger using chemical substance (alcohol benzene), chemical agents or abrasive cleaning agents to avoid damaging its parts or causing a malfunction. You may clean with a slightly damp anti-static soft cloth. Do not scrape or alter the phone case as paint substances may cause an allergic reaction. -
Page 8: Getting To Know Your Phone
Getting to Know Your Phone Phone Overview... - Page 9 Front camera 9.Flashlight Proximity sensor 10.De-noising mike Receiver 11.Speaker 4.Touch screen 12.Volume keys Back key Power key 6.Home key Headset connector Recent key 15.Microphone 8.Camera 16.Micro-USBconnector Key’s function Power key:Press to light up or close the screen, • press and hold to show the pop-up menu to select from Power off/Reboot/Airplane mode.
-
Page 10: Installing The Sim/Sd Card And Battery
calls. WARNING: Placing a heavy object on the phone or sitting on it can damage the LCD and touch screen functions. Do not cover the LCD proximity sensor with protective film. This could cause the sensor to malfunction. Installing the SIM/SD card and battery Before you can start exploring your new phone, you'll need to set it up. - Page 11 2. Please do not remove the Micro-SIM/SD card while the card is in use; otherwise, data loss or damage may occur. Hisense shall not be liable to any loss, including data loss, due to misuse of aMicro-SIM/SD card. 3. Please turn off your mobile phone before replacing or removing its Micro-SIM/SD card.
-
Page 12: Charging The Battery
Charging the Battery Charging Battery 1. Insert the large end of the USB cable into the mobile phone charger and insert the small end into the mobile phone USB slot, while paying attention to the direction. 2. Insert the charger into a 100~240V 50/60Hz outlet to start charging. -
Page 13: Basic Operations
Basic Operations TurningYour Device On/Off Turn on the phone: Press the Powerkey located on the right side of phone and wait for a few seconds until the screen lights up. Note:If the battery is empty, make sure you charge it for at least 30 minutes. - Page 14 The configuration of a Google account is essential to use all the features and services of your Android phone, such as access to Google Play™, synchronization of contacts or your calendar. If you don’t have Gmail or any other Google Account, go ahead and create one.
-
Page 15: Home Screen
Home screen The Home screen is the starting point for many applications and functions, and it allows you to add items like application shortcutsto give you instant access to information and applications. Status Bar: Shows phone's status information including the time, signal strength, battery status, and notification icons. - Page 16 Pending Wi-Fisignal strength notifications & battery status Opening the notifications panel Hold the status bars with your finger, and drag it downwards to open the notifications page. Swipe down it once againto open the notifications panel.From the shortcut menu, you can quickly access to Bluetooth, Wi-Fi, etc.
-
Page 17: Customizingyour Screen
CustomizingYour Screen Long press the blank space of the standby interface, then select “WALLPAPERS”and“WIDGETS”. You can customize your screen by setting the widget and wallpaper. -
Page 18: Access To Applications
Access to Applications You can click the icon to the applications list, click the applications icon to start the application. Main Function Making and Receiving a Call Touch to enter dialer interface on idle screen or main menu screen, touch to open the dial pad, input phone number and click to make a call, click... -
Page 19: Sending Messages
Click “ ”, you can add a new contact to the phone or card. Click on the top of the screen,then input the part of the phone number or name, all the contacts with the information appear. Sending Messages Tap the message icon Click to create a message. -
Page 20: Music
Music Touch the music application icon to enter music player. Camera The camera app is a combination of camera and camcorder.It consists of two cameras: the front camera... -
Page 21: Chrome
(facing you) and the main camera in behind of the phone. Take photos Tap the photo icon 1. Frame your subject on the screen. 2. A green square around the subject indicates that the camera has focused. 3. Tap to take a photo. Your picture will be automatically saved to the Gallery. -
Page 22: Gettingconnected (Connection To Wi-Fi)
When you get access to the network, you may incur additional costs. Consult your local operators for detailed charges. GettingConnected (connection to Wi-Fi) 1. Tap the settings icon. 2. Tap “Wi-Fi” and select on. 3. Touch the desired network you wish to connect. 4. -
Page 23: Important Information
Important Information For an optimal experience, the phone regularly connects to mail and internet servers. This automatically and inevitably generates data exchanges that may be charged in addition to your existing package, or may be deducted from prepaid credit or a prepaid system. To avoid billing problems related to services that use the Internet, it is strongly recommended to have a suitable option which includes unlimited Internet and emails and... -
Page 24: Troubleshooting
Troubleshooting This chapter lists some problems you might encounter when using your phone. Some problems require you to call your service provider, but most are easy to fix yourself. Possible Message Possible causes corrective measures There is no SIM Make sure that SIM card card in the phone the SIM card is... - Page 25 inserted. restrictions. Pre-paid charge Contact service limit reached. provider. Power key Press the Power pressed too key for at least Phone cannot briefly. two seconds. be switched Charge battery. Battery is not Check the charged. charging indicator on the display. Make sure phone Outside is charging at a...
- Page 26 HisenseMexico S. de R. L. de C. V. Boulevard Miguel de Cervantes Saavedra No. 301, Torre Norte, Piso 2. Col. Ampliación Granada. C.P. 11520, Deleg. Miguel Hidalgo. Distrito Federal Tel. 01 (55) 55-31-35-15 BRAND: HISENSE MODEL: Hisense F10 FCC ID: 2ADOBF10...
- Page 27 ELECTRIC CHARACTERISTICS: ADAPTOR BRAND: HISENSE MODEL: A31-501000 INPUT: 100 - 240 V ~ 50/60 Hz 0.15 A OUTPUT: 5.0 V RECHARGEABLE BATTERY BRAND: HISENSE MODEL: LP38250 3.8 V 2380mAh MADE IN CHINA Medical devices Implanted medical devices, such as pacemakers, may be affected by the use of this product.
- Page 28 providing reasonable protection against harmful interference at a residential facility. This equipment generates, uses and may irradiate radiofrequency energy and, if not installed and used in accordance with instructions, it may cause harmful interference to radio communications. However, there is no guarantee that there will not be interferences at a particular facility.
Need help?
Do you have a question about the F10 and is the answer not in the manual?
Questions and answers