Table of Contents
Advertisement
Advertisement
Table of Contents

Related Manuals for GQ Electronics GMC-800


Summary of Contents for GQ Electronics GMC-800
-
Page 1: User Guide
GQ GMC-800 Geiger Counter User Guide GQ Electronics LLC Revision 1.00 Oct-2023... - Page 2 Document Revision History: Re.1.00 ,Oct-2023 GQ Electronics LLC. Initial release for firmware 1.00...
-
Page 3: Table Of Contents
Table of Contents User Guide ..............................1 Table of Contents ............................3 ACKNOWLEDGEMENTS ..........................4 Specifications: ............................5 Packing List: ............................. 6 How it works? ..............................6 Caution ................................6 Background Safe Levels ............................ 6 Hardware setup ............................7 Software set up (optional) ........................7 Verify USB driver installation in Windows (Optional) ................. -
Page 4: Acknowledgements
ACKNOWLEDGEMENTS [TO BE FILLED]... -
Page 5: Specifications
Overview The GQ GMC-800 digital Geiger Muller Counter is specially designed to be a U.S. NRC compliant, portable and convenient device. It can be used in industrial, commercial maintenance, research, evaluation, simulation and other analytical or scientific applications in areas such as industrial plants, public utilities, hospitals, universities, laboratories, and electronic repair shops. -
Page 6: Packing List
After GMC-800 is turned on, it will show the background radiation reading. The background radiation reading (in CPM) indicates the nature radiation detected at that minute. This reading may change from time to time and location to location. -
Page 7: Hardware Setup
4. Now the unit is ready to use. You should see the background CPM rate in absence of a radioactive source. Software set up (optional) Before connecting the GMC-800 Geiger Counter to a computer, download the application software and install driver. -
Page 8: Verify Usb Driver Installation In Windows (Optional)
Verify USB driver installation in Windows (Optional) Once the GMC-800 is connected to a computer, from the device manger, you should see which COM port is assigned to the GMC-800. See the example below. Windows assigned COM5 to the GMC-800 unit in this example. -
Page 9: Gq Gmc Geiger Counter Multi-Function Keys
GQ GMC Geiger Counter Multi-Function Keys The multi-function keys, Key1, Key2, Key3 and Key4 explained: These key’s function will be reassigned dynamically based on the context of the current (sub-) menu being displayed. Key1 1. There are four display modes: Does Rate, Graphic, Dosimeter, History and Menu mode. Pressing the Key1 toggles between these modes. -
Page 10: Popup Windows
Popup Windows The Popup Windows will show the current status/value of selected features. The current status/value can be changed only when it is displayed in the Popup Window and the currently displayed status/value will be stored when the Popup Window has timed out after 3 seconds if no key has been pressed. Graphic User Interface (GUI) Graphic Icons: Battery Status... - Page 11 Graph in past 60 seconds. Graph in past 60 minutes...
-
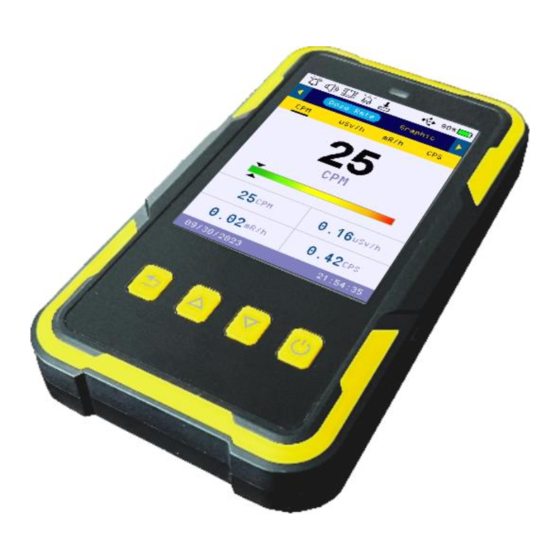
Page 12: Dose Rate Mode
There are four display modes, Dose Rate, Graphic, Dosimeter, History Mode and Menu Mode Dose Rate Mode: Dose Rate in CPM Dose Rate in µ Sv/h Dose Rate in Dose Rate in average CPS per minute Key2 and Key3 toggles between CPM, µSv/h, mR/h and CPS units Navigation keys: Key1: Dose Rate/Graphic/Dosimeter/History Mode Selection Key2: CPM,µ, Sv/h, mR/h, CPS selection... -
Page 13: Graphic Mode
Graphic Mode: Dose Rate in CPM Dose Rate in Sv/h µ Dose Rate in Dose Rate in average CPS per minute Key2 and Key3 toggles between CPM, µSv/h, mR/h and CPS units Navigation keys: Key1: Dose Rate/Graphic/Dosimeter/History Mode Selection Key2: CPM,µ, Sv/h, mR/h, CPS selection Key3: CPM,µ, Sv/h, mR/h, CPM selection. - Page 14 Graphic Mode: Dose in Sv/h Dose in µ Current level in CPM Navigation keys for both modes: Key1: Dose Rate/Graphic/Dosimeter/History Mode Selection Key2: µSv/h, mR/h Key3: µSv/h, mR/h selection. Or hold for 2 seconds to enter menu mode. Key4: Power Off (when hold for 3s)
- Page 15 History Mode: In History mode, the device displays historical data stored in internal flash memory. It start from first timestamp detected and 4 minutes data thereafter. Navigation keys for both modes: Key1: Dose Rate/Graphic/Dosimeter/History Mode Selection Key2: Next timestamp or next four minutes data whichever first occur. Key3: Previous timestamp or previous four minutes data whichever first occur.
-
Page 16: Click Sound
Menu Mode The menu screen shows special function menu items user can select. The left side list is the main menu list and the right-side list is a submenu list corresponding to the main menu highlighted item. Press Key4 to confirm a main menu item first. Then the high-lighted cursor will move to submenu section to let you select. -
Page 17: Alarm
Alarm Turn’s alarm audio On/Off Alarm Threshold The audio alarm will be triggered once the radiation level reaches the preset alarm threshold in CPM. Navigation keys: Key1 : Back Key2: Change the digit value in highlighted position. Key3: Change the digit value in highlighted position. Key4: Confirm and move to next digit. -
Page 18: Beep Volume (Alarm)
Beep Volume (Alarm) Press Key4 to enter and Beep Volume setting mode. Navigation keys: Key1 : Back Key2: Up Key3: Down Final volum will be saved when pop up Window close on 6 seconds times out. Vibration Navigation keys: Key1 : Back Key2, Toggle the On/Off selection Key3: Toggle the On/Off selection... -
Page 19: Display (In Main Menu)
Display (in main menu) Press Key4 to enter submenu Theme Press select button (Key4) to enter them selection mode. There are two display themes. LIGHT mode and DARK mode. Navigation keys: Key1 : Back Key2 and Key3 Toggle between LIGHT and DARK display thems. The system default them is in LIGHT mode. -
Page 20: Dark Theme
Dark Theme Dark Theme provides a function to let user set a preferred font color and graphic color. There are total Press Key4 to select Dark Them in menu to enter Dark Them color selection mode. There are total 65.5K colors can be set from this setting. There are R (red) , G (green) and B (blue) original colors to be combined into a Final new color. -
Page 21: Backlight
Backlight The backlight is to set the LCD brightness. Navigation keys: Key1: Back/Exit Key2: Increase value Key3: Decrease value Power Saving If power saving mode enabled, then the device will deem the LCD backlight and set CPU into power saving mode after 30 seconds idle mode. -
Page 22: Save Data
Save Data Save Data uses to set the frequency of saving data.User can select data saving mode between every second,every minute,every hour and turn off the data saving function. Erase Data Erase Data will completely delete all history data in flash memory. The erasure is permanent, and no way to recovery back. -
Page 23: Set Clock
Set Clock Set Clock Navigation keys: Key1 : Back Key2: Change the digit value in highlighted position. Key3: Change the digit value in highlighted position. Key4: Confirm and move to next digit. Factory Reset Select Key2 and Key3 to select Yes. Press Key4 to confirm. -
Page 24: Calibration
Calibration Press Key 4 to select This menu mainly for qualified calibration facility. User may change the value when needed. Press Key4 to enter each calibration item. Navigation keys: Key1 : Back Key2: Change the digit value in highlighted position. Key3: Change the digit value in highlighted position. -
Page 25: Tube Voltage
Tube Voltage Tube voltage setting is for professional calibration purpose. User may not change it unless instructed by professional. Select Key2 and Key3 to change the value. About About displays device system information. -
Page 26: Gq Gmc Data Viewer Software
Real time monitoring with graphic when it connected with GMC-800 Save the history data in .bin OR .csv MS Excel format. Synchronize the data and time to GMC-800 with computer’s data and time User defined automatic date and time synchronization period. - Page 27 GQ Terminal The GQ Terminal provides an immediate access interface to the GMC-800 communication protocol. Followings are “click to send” commands in software, for unlisted commands user can type into the command box of software: GETVER, GETSERIAL, GETCPM, KEY0, Key1, Key2, Key3, SPEAKER0, SPEAKER1, ALARM0,...
-
Page 28: Online Geiger Counter World Map
The GMCmap accepts any software automatically submitted data. The GQ Geiger Counter Data Viewer software is a tested free software for automatic submit data feature. It can be found and downloaded from GQ Electronics LLC download page Auto Submit Data Protocol In order to use automatically submit data, user has to be registered on GMCmap.com, so that to get a valid... -
Page 29: Applications
Use a standard 14500 (14 x 50.0 mm) 3.6V-3.7V Li battery OR 14500 (14 x 50.0 mm) 3.6V-3.7V rechargeable Li-ion battery. The GMC-800 will operate normally when a non-rechargeable battery is installed. Select the battery type to non-rechargeable battery from the unit menu. -
Page 30: Third Party Software Developers
Third party software developers The GMC-800 is an open application protocol product. Users are encouraged to develop their own software based on the published GQ-RFC1201 protocol. We encourage you to share your generic software with other users. Please contact support@gqelectronicsllc.com if you have any questions.
Need help?
Do you have a question about the GMC-800 and is the answer not in the manual?
Questions and answers