TMQ AP4 Installation And Service Manual
Hide thumbs
Also See for AP4:
- Operation and installation manual (63 pages) ,
- Operation and installation manual (62 pages)

Related Manuals for TMQ AP4


Summary of Contents for TMQ AP4
- Page 1 AU TO P I LOT Installation and Service Manual Unit 18, 17 Rivergate Place Murarrie QLD 4172 T: +61 07 3640 5600 E: tmq@tmq.com.au www.tmq.com.au IMPORTANT: PLEASE RETAIN ON BOARD...
- Page 2 (This page intentionally left blank)
-
Page 3: Table Of Contents
Introduction NMEA Connection Warning Heading Data Connections Overview External Alarm Installation Wiring Connections – Autopilot Operation - Standard AP4 Rear Panel Set (Standby) Examples - Auto Drive Connection Diagrams Power Steering General Information - Drive Units GPS – Waypoint Steering... -
Page 4: Introduction
Extra devices • Control Unit may be connected via the internal • Compass connection strip, for example, GPS • Rudder Feedback Unit compass heading input. • Rudder drive system TMQ AP4 | Revision Date: 01.07.2022 Version 10588 2 of... -
Page 5: Autopilot Operation - Standard
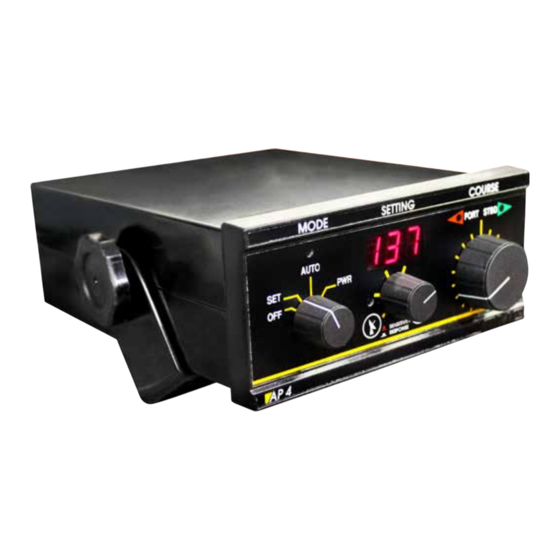
• Auto Mode The autopilot maintains your boat on the selected magnetic course. Course can be set or changed by rotating the Course knob or from a remote steering station. TMQ AP4 | Revision Date: 01.07.2022 Version 10588 3 of 45... -
Page 6: Set (Standby)
• Steering control is deactivated. • Watch timer (if set) • Display shows boat heading • FUS Indicated advises the internal • Boat under manual steering control fuses is open (helm) TMQ AP4 | Revision Date: 01.07.2022 Version 10588 4 of... -
Page 7: Gps - Waypoint Steering
Disengaging GPS Mode • Press the GPS button • GPS light is out • Pilot locks on to current heading of If no GPS data or AP4 does not receive the data • Autopilot maintains lock on the current course •... -
Page 8: Watch Timer Mode
• Press TIMER button again • Press TIMER button again • Display then reverts to normal heading. • Alarm will sound after set time has expired • Press TIMER to reset TMQ AP4 | Revision Date: 01.07.2022 Version 10588 6 of... -
Page 9: Autopilot Operation - Remote Control
AUTO. Remote auto steering will steer modes can be selected. Special also be disengaged by changing remote response mode r-1 must be the position of the AP4 MODE set in AP4. switch TMQ AP4 | Revision Date: 01.07.2022 Version 10588 7 of 45... -
Page 10: Active Remote
The autopilot will return to SET mode. Active Remote Unit • Press STANDBY on active remote • Pilot is now in SET mode. AUTO LED is off • Boat is now steered manually (by helm) TMQ AP4 | Revision Date: 01.07.2022 Version 10588 8 of... - Page 11 To engage power steer mode with • Press AUTO button on active Active Remote Unit remote • GPS light on AP4 light is out • Switch AP4 MODE to SET, AUTO • Pilot locks on to current heading of or PWR boat and is in AUTO mode •...
-
Page 12: Steering Lever & Electric Helm Steering
A jog lever is a device comprising a internal remote modes r-3, r-4, r-5 or lever under spring tension for centre r-6 must be set in AP4 depending on reference and two switches for bi remote control connection. directional control. - Page 13 AP4 in SET AP4 in AUTO • Switch AP4 MODE switch to SET • Switch AP4 to AUTO – at initial • Press jog lever select button switch on the system will operate • Boat is now in AUTO JOG under in normal autopilot control;...
-
Page 14: Sensitivity & Rudder Adjustments
• Rudder Ratio The control in the centre of the AP4 This control adjusts the rudder ratio front panel adjusts both sensitivity which varies the amount of rudder and rudder ratio. The centre position applied for a course error. -
Page 15: Alarms
Alarm pattern is 1 second on, 1 controller. In any other mode, second off until reset. different from auto, the external alarm will be open circuit. From the factory, this alarm mode is OFF. TMQ AP4 | Revision Date: 01.07.2022 Version 10588 13 of 45... -
Page 16: Installation Of Autopilot
The AP4 Autopilot Control system Installation: when packed comprises the following: To reduce the risk of operating • AP4 Main Control Unit – 2 metre problems, all TMQ equipment and power cable cables connected to it should be • Compass, Compass Top Sensor or... -
Page 17: Installation Of Main Control Unit
(3) basic Control Unit configurations: Position & mounting 1. AP4 can be used to control most • Select a dry position brands of drive units or solenoid • Provide access for wiring to rear control valves (hydraulic). System... - Page 18 The green wire is necessary until the arrow faces the positive, and the blue is negative. bow of the boat • Route the cable to the AP4 control position Connect the ELECOM47 to LTW Vessel Bow Connector (Elecom 47) on the back of Unit.
-
Page 19: Installing A Compass Top Sensor
(CTS is central for this autopilot. A compass-top and cable facing aft) sensor (TMQ CTS), or a magnetic • Route the cable to the AP4 control sensor unit (TMQ fluxgate compass - unit position COMMAG), • Plug cable into AP4 compass... -
Page 20: Magnetic Sensor Unit & Compass Top Sensor Interchange
• Rotate compass in bracket until & Compass Top Sensor cable faces towards the stern Interchange • Route the cable to the AP4 Control unit position The magnetic sensor unit (fluxgate • Plug compass cable into AP4 compass) can be interchanged with a autopilot compass top sensor. -
Page 21: Installation Of Rudder Feedback
Note: Do not mount the heavy duty rudder feedback unit upside down. TMQ AP4 | Revision Date: 01.07.2022 Version 10588 19 of 45... - Page 22 • Connect 3 core cable to the RFU using the autopilot terminal strip (RFUH only) • Route the rudder feedback cable to the AP4 position • Connect the RFU cable to the RUDDER socket of the AP4 TMQ AP4 | Revision Date: 01.07.2022 Version 10588 20 of...
- Page 23 Note: DIP 1 Switch 2 is used for heading input from a GPS using the COG information. Normally set to Compass (OFF). Refer “NMEA Connection” Heavy Duty Rudder Feedback Installation Diagram TMQ AP4 | Revision Date: 01.07.2022 Version 10588 21 of 45...
-
Page 24: Installation Of Remote Units
• Install the bracket and attach the remote Steering Levers are normally • Route the cable to the AP4 control mounted in-dash. For a TMQ steering position lever this will require a 90mm hole to •... -
Page 25: Nmea Connection
• Fit selection switch adjacent to of sail trim or net drag, realignment lever (if used) may not be necessary. Check • Route the cable to the AP4 control BEFORE realigning.. position • Plug the cable into the REMOTE socket at the rear of the AP4... -
Page 26: Heading Data Connections
GPS data in NMEA 0183 format as When a TMQ second station display follows: (AP56 *) is used with the AP4, it has • GPS Plotter data – APA, APB or a pre-wired plug to connect to the XTE+BOD for waypoint steering –... - Page 27 • Rotate COURSE knob for the required selection Heading Data Priority S-1 = HDM S-2 = HDT The AP4 is able to operate with both S-3 = HDM with checksum TMQ electronic compass (COMMAG) S-4 = HDT with checksum and NMEA heading data input S-5 = HDM &...
-
Page 28: External Alarm Installation
The external alarm circuit is used to energise the siren direct. For larger units the circuit energises a relay coil with the siren being energised via the relay contacts. TMQ AP4 | Revision Date: 01.07.2022 Version 10588 26 of... -
Page 29: Wiring Connections - Ap4 Rear Panel
2. Blue (Square Wave Drive Signal) 1. GPS In 3. Red 2. GPS Return 4. Yellow 3. Data + Out to TMQ Display or PC 5. Green 4. Negative and Data - common Elecom 47/SAT COMPASS/GYRO 1. 10V+ Red 2. TXD+ Yellow (data from Compass) 3. -
Page 30: Drive Connection Diagrams
Examples - Drive Connection Diagrams TMQ AP4 | Revision Date: 01.07.2022 Version 10588 28 of... -
Page 31: General Information - Drive Units
CIRCUIT – FUSE OR CIRCUIT steering lines BREAKER • A balance line must be connected from autopilot pump reservoir to helm pump reservoir • Replace any vented bung on pump with non vented TMQ AP4 | Revision Date: 01.07.2022 Version 10588 29 of 45... -
Page 32: Commissioning Checks
3. Check rudder limits – adjust only if necessary. See ‘Rudder Limits Settings’ section. 4. Determine vessel heading by a sighting on known heading or compass. 5. Align autopilot magnetic sensor until display reads known heading. TMQ AP4 | Revision Date: 01.07.2022 Version 10588 30 of... -
Page 33: Sea Trials
Check Rudder Drive Speed Note: It is rare for the AP4 heading and boat compass to agree exactly The speed a rudder is moved by on every heading due to magnetic the autopilot drive unit will affect variations on the boat. -
Page 34: Rudder Limits Setting
• Rotate COURSE knob until display The display symbols do not appear reads 924 when AP4 is in the SET mode. • Press TIMER button - display now shows “S_0” • Press TIMER button again TMQ AP4 | Revision Date: 01.07.2022 Version 10588 32 of... - Page 35 When connected to a reverse motor and a problem occurs in this stage, it always displays E1, meaning that the reversing pump is not moving the rudder, or the rudder feed back did not move. TMQ AP4 | Revision Date: 01.07.2022 Version 10588 33 of 45...
-
Page 36: Compass Calibration
If the AP4 compass has inconsistent variation on different headings, the following calibration procedure can be carried out. This procedure should only be done in calm waters with adequate sea room. TMQ AP4 | Revision Date: 01.07.2022 Version 10588 34 of... -
Page 37: Calibrating Tmq Electronic Compass - Elecom
Check alignment of the AP4 compass by steering vessel due North (000 on ships compass) and, if necessary, rotate outer case of AP4 compass in its bracket until heading display reads 000. TMQ AP4 | Revision Date: 01.07.2022 Version 10588 35 of 45... -
Page 38: Ap4 Special Modes
[r-6] = Remote input Rem 1 pin 2. Power Steer default at turn on [r-7] = JOG input with Select push button [r-8] = JOG input with Select push button + power steer in SET TMQ AP4 | Revision Date: 01.07.2022 Version 10588 36 of... - Page 39 2. Usually not used. Decrease the integration (offset) of the XTE error, near to the correct heading (default: 1) TMQ AP4 | Revision Date: 01.07.2022 Version 10588 37 of 45...
-
Page 40: Operating Without Rfu
It provides more “AP4 Special Modes” (display responsiveness when the boat is selection 919). too far from its desired direction. TMQ AP4 | Revision Date: 01.07.2022 Version 10588 38 of... -
Page 41: Following A Track (Waypoint)
This value is adjusted selecting the integral value. Don’t start with special mode 926; too high values, as it will cause hunting around the track line, start with the value 4, for example. TMQ AP4 | Revision Date: 01.07.2022 Version 10588 39 of 45... - Page 42 Therefore, the integral gain (925) was increased until a good result was achieved in the middle of the tide currents. Back to the calm waters, it kept on track as well. TMQ AP4 | Revision Date: 01.07.2022 Version 10588 40 of...
-
Page 43: Optional Extras
May be control of any size vessel with attached directly to the tiller or rudder power steering. Movement to port or quadrant. starboard causes the rudder to follow proportionally. TMQ AP4 | Revision Date: 01.07.2022 Version 10588 41 of 45... -
Page 44: Declaration Of Conformity
Standard(s): EN60945/1997 CEI IEC945/1996 For TMQ International Pty. Ltd. Murarrie Queensland Australia. 1st October, 2021 Aaron Smith, Director, TMQ TMQ AP4 | Revision Date: 01.07.2022 Version 10588 42 of... -
Page 45: Warranty
4. A return address is supplied to enable the equipment to be returned by road freight. Any other means of transport will be charged to the customers account and must be paid in advance. TMQ AP4 | Revision Date: 01.07.2022 Version 10588 43 of 45... -
Page 46: Troubleshooting
• Ram connection on tiller • Special mode r-2 not selected • Broken drive chain or cable • Active remote failure (mechanical drive) • FUS Displayed open Fuse Internal 15A Blade Fuse TMQ AP4 | Revision Date: 01.07.2022 Version 10588 44 of... - Page 47 (This page intentionally left blank)
- Page 48 Unit 18, 17 Rivergate Place Murarrie QLD 4172 T: +61 07 3640 5600 E: tmq@tmq.com.au www.tmq.com.au...
Need help?
Do you have a question about the AP4 and is the answer not in the manual?
Questions and answers