Unitech PA982 User Manual
Ultra rugged mobile computer
Hide thumbs
Also See for PA982:
- Quick reference manual (57 pages) ,
- User manual (35 pages) ,
- Specifications (2 pages)
Table of Contents
Advertisement
Quick Links
Advertisement
Table of Contents

Related Manuals for Unitech PA982


Summary of Contents for Unitech PA982
- Page 1 PA982 Ultra Rugged Mobile Computer User’s Manual 400556G Rev. C...
-
Page 3: About This Manual
About This Manual This manual explains how to install, operate and maintain the PA982 Ultra Rugged Mobile Computer. No part of this publication may be reproduced or used in any form, or by any electrical or mechanical means, without permission in writing from the manufacturer. This includes electronic or mechanical means, such as photocopying, recording, or information storage and retrieval systems. -
Page 4: Laser Information
If the main battery is removed, the backup battery ensures the data on SDRAM is safe for up to 6 hours. To prevent data loss, do not leave the PA982 uncharged with the main battery removed for an extended period. -
Page 5: Storage And Safety Notice
About This Manual Storage and Safety Notice Although charged Lithium-Ion batteries may be left unused for several months, their capacity may be depleted due to build up of internal resistance. If this happens they will require recharging prior to use. Lithium-Ion batteries may be stored at tempera- tures between-20°C to 60°C, however they may be depleted more rapidly at the high end of this range. -
Page 7: Table Of Contents
Charging the Battery with the Docking Station ... 9 Checking the Battery Status ... 10 Connecting the PA982 to a PC... 11 Turning the PA982 on for the First Time... 11 Powering On... 11 Calibrating the PA982 Screen ... 12 Adjusting the Screen Brightness ... - Page 8 Chapter 3 Getting Connected Establishing Device-PC Connection Installing Microsoft ActiveSync ... 19 Connecting the Device to Your Computer ... 20 Using ActiveSync to Exchange Files Infrared Connection ... 22 Bluetooth Connection ... 23 Installing the WLAN Card(Optional) WiFi Connection ... 28 Chapter 4 Barcode Scanner Programs Scanner Settings...
-
Page 9: Getting Started
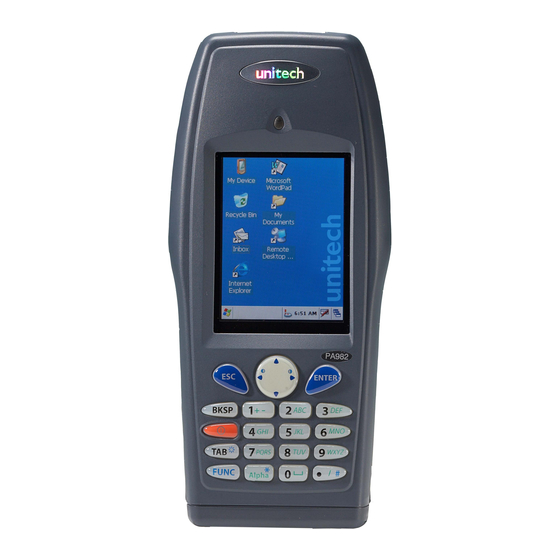
Chapter 1 Getting Star ted Introducing the PA982 Thank you for purchasing the PA982 Ultra Rugged Mobile Computer. Your PA982 was designed for users needing a compact and durable portable computer for data collec- tion and real time transactions. Ultra-rugged Design The unitech PA982 Ultra Rugged Mobile Computer is a compact mobile computing device designed for maximum durability. -
Page 10: Features
Symbol SE1200 support • UNITECH HAMSTER barcode decoder Expansion slot PCMCIA Type II slot Copyright 2006 unitech Electronics Co., Ltd. All rights reserved. unitech is a registered trademark of unitech Electronics Co., Ltd. Wireless connectivity • 802.11b/g (optional) • Bluetooth wireless technology •... -
Page 11: Package Contents
Chapter 1 Getting Started Package Contents After opening the box, ensure the following accessories for the PA982 are present PA982 Terminal Power Adapter and Cable Battery Pack USB Cable Synchronization and Stylus Power Cable (optional) CD-ROM Quick Reference Guide Cradle (optional) -
Page 12: A Tour Of The Pa982
Stylus Desktop cradle connector Copyright 2006 unitech Electronics Co., Ltd. All rights reserved. unitech is a registered trademark of unitech Electronics Co., Ltd. Description Indicates the battery charging and barcode scanning status. Green - Battery is fully charged or barcode scanning process is completed without error. -
Page 13: Back View
Chapter 1 Uses infrared technology to transmit and receive data from other IR-enabled devices. Keypad interface for controlling the PA982. See Using the Harware on page 15 for more information. Displays the applications and data stored on your device. It is touch-sensitive and responds to the stylus or finger. -
Page 14: Setting Up The Pa982
This section explains how to install and charge the battery, how to check battery sta- tus, how to connect the PA982 to a PC, how to turn on the PA982 for the first time, how to install a PCMCIA card, and how to calibrate the screen. -
Page 15: Chapter 1 Getting Started
1. Open the battery compartment by removing the four screws that secure the bat- tery compartment cover (A) and removing the cover (B). Locate the backup battery switch and LCD heater switch and turn them on. 3. Position the battery pack, make sure the battery contacts are aligned with the contacts in the compartment, as shown in the following illustration. - Page 16 4. Place the battery pack into the battery bay and press the battery securely into the compartment. 5. Replace the battery compartment cover and the four compartment screws. Copyright 2006 unitech Electronics Co., Ltd. All rights reserved. unitech is a registered trademark of unitech Electronics Co., Ltd.
-
Page 17: Charging The Battery
Charging the Battery Before using the PA982 for the first time, you need to charge it for about 16 hours. After that, you can charge the PA982 every day to recharge the battery to full capacity. Charge the PA982 using the synchronization power cable or the docking station. -
Page 18: Checking The Battery Status
If the battery level reaches a low status, the device will enter sleep mode and cannot be pow- ered up until the battery is charged. Copyright 2006 unitech Electronics Co., Ltd. All rights reserved. unitech is a registered trademark of unitech Electronics Co., Ltd. Meaning Charging... -
Page 19: Connecting The Pa982 To A Pc
Connecting the PA982 to a PC Use the synchronization power cable to connect the PA982 to a PC to use with Active- Sync. 1. Connect the RS232 connector jack to the PA982 (1). 2. Plug the RS232 serial connector into a serial port on the PC and connect the AC adapter into the RS232 connector (2). -
Page 20: Calibrating The Pa982 Screen
Calibrating the PA982 Screen The calibrate screen automatically appears when the unit is powered-on for the first time or after the system is reset. There are 2 ways to calibrate the screen: A. Press Func Key + ESC Key. 1. Tap Start → Settings, tap the Control Panel tab... - Page 21 The Stylus Settings window appears. This window enables you to calibrate the screen. 3. Tap Recalibrate to calibrate the screen. The align screen window appears. 4. Tap the cross hair firmly and accurately. The cross hair moves to the next location. 5.
-
Page 22: Adjusting The Screen Brightness
Function button [FUNC] to enable the soft keys and pressing the left (decrease brightness) or right (increase brightness) cursor buttons. Copyright 2006 unitech Electronics Co., Ltd. All rights reserved. unitech is a registered trademark of unitech Electronics Co., Ltd. Increase Brightness... -
Page 23: Using The Hardware
Press this key to add punctuation. Using the Alpha Key When the PA982 boots, the default condition is Numeric Mode on. When you toggle to Alpha Mode, the default condition is CAPS mode off. Alpha Mode Press alpha to alpha mode, the default condition is CAPS off. -
Page 24: Using Hotkeys
4. To write data into a field on a form, use the stylus to print the letters or numbers. Copyright 2006 unitech Electronics Co., Ltd. All rights reserved. unitech is a registered trademark of unitech Electronics Co., Ltd. Re-calibrate the touch screen. -
Page 25: Using The Laser Scanner
Using the Laser Scanner The PA982 has an integrated laser scanner which reads all major bar code labels with excellent performance. NOTE: Reading software must be enabled in order to operate the scanner. This can be a user-loaded application or a pre-loaded utility such as Scanner Setting or Scan2key. - Page 26 When Exit and tap OK at the top right. The scanner will be enabled and scans will be directed to the keyboard buffer. Copyright 2006 unitech Electronics Co., Ltd. All rights reserved. unitech is a registered trademark of unitech Electronics Co., Ltd.
-
Page 27: Getting Connected
Getting Connected The unitech PA982 enables users to link to a host computer using an RS-232, IrDA, or WLAN connection for data communication. This chapter provides an overview of PA982 communication options. Establishing Device-PC Connection Installing Microsoft ActiveSync In order to exchange data between your computer and the PA982, Microsoft Active- Sync must be installed on your computer. -
Page 28: Connecting The Device To Your Computer
4. Follow the instructions on the screen to install Microsoft ActiveSync. Connecting the Device to Your Computer 1. After ActiveSync has been installed, connect the PA982 to your PC as described in Connecting the PA982 to a PC on page 11. - Page 29 NOTE: Files created on your computer may need to be converted by Active- Sync so that they can be viewed and edited on your device, and vice versa. To copy files: 1. Connect your device to your computer. 2. In ActiveSync on your computer, click Explore. 3.
-
Page 30: Infrared Connection
Infrared Connection The infrared port allows you to synchronize information with an infrared enabled com- puter. Align the infrared port of your device with the infrared port on the computer. This method is ideal for quickly switching between multiple devices since there are no cables or adapters to change. -
Page 31: Bluetooth Connection
2. Perform the steps below on your device: a. Align the IR port of your PA982 with the IR port on your computer so that they are unblocked and within close range. b. Initiate connection by tapping Start → Settings → Control Panel →... - Page 32 3. Tab Scan Device. 4. Select a device from the list and select Trusted. You are prompted for a passkey. 5. Enter the Passkey. Copyright 2006 unitech Electronics Co., Ltd. All rights reserved. unitech is a registered trademark of unitech Electronics Co., Ltd.
- Page 33 Bluetooth PIN Code Request. 6. Enter the same Bluetooth PIN Code as you entered in step 4. 7. On the PA982 select a device from the list and select Active. 8. On your PC, click ActiveSync→ Connection Setting → Select your BT COM Port →OK...
- Page 34 12. Tap Inquiry. Select the bluetooth device you want to sync. Tap OK. 13. Tap BTActivesync icon again. Tap Sync. 14. Activesync begin. Copyright 2006 unitech Electronics Co., Ltd. All rights reserved. unitech is a registered trademark of unitech Electronics Co., Ltd.
-
Page 35: Installing The Wlan Card(Optional)
Installing the WLAN Card (Optional) You can install an optional Wireless Local Area Network (WLAN) Card in the PA982 to provide wireless network function. Follow these instructions. 1. Remove the two screws securing the WLAN compartment cover. 2. Slide the WLAN card module into the PA982 as shown until the card’s contacts... -
Page 36: Wifi Connection
WiFi Connection Unitech terminals come with built-in RF facility.This chapter guides the user on how to setup the RF setting. 1. Double tap the Summit Client Utility. 2. Under “Main” tab, for Active Profile, select “Third- PartyConfig”. 3. A Power Cycle is required to make settings... - Page 37 4. Tap “OK”. 5. Warm Start the terminal 6. Once the RF card is detected, you will see the RF setting window pop up. 7. Tap “Add New”(Or double tap your preferred network) to add a new SSID. 8. Enter the SSID. Uncheck “The key is provided automatically”.Enter the network key.
-
Page 38: Barcode Scanner Programs
Press [FUNC] + [7] to display the Scanner Control Panel, then tap To Kpd to access Scan2Key set- tings. Copyright 2006 unitech Electronics Co., Ltd. All rights reserved. unitech is a registered trademark of unitech Electronics Co., Ltd. Chapter 4 Barcode Scanner Programs... -
Page 39: Barcode Symbologies
Barcode Symbologies Symbology Enable/ Check Disable Char/Digit verification Bookland EAN YES — Codabar Code 11 — Code 128 — Code 32 — Code 39 Code 93 — Deta Code EAN 128 — EAN 13 EAN 8 Interleaved 2 of Label Code —... -
Page 40: Advanced Settings
You can also assign functions to buttons, config- ure menus, enter owner information, and set up connections. Copyright 2006 unitech Electronics Co., Ltd. All rights reserved. unitech is a registered trademark of unitech Electronics Co., Ltd. -
Page 41: Checking The Main And Backup Battery Status
NOTE: It is necessary to charge the battery when the battery charge reaches below 10%. If the battery does not accept a charge, contact unitech Technical Support. Chapter 2 Advanced Settings Main battery... -
Page 42: Extending Battery Life
Minimizing the use of backlight Changing the Automatic Power Settings The PA982 enters idle mode when there is no task, or all tasks are waiting for input. In the default setting, the PA982 enters User Idle mode when there is no user input after one minute. -
Page 43: Adjusting Backlight Setting
Adjusting Backlight Setting The power consumption of the LCD backlight is high. To conserve battery power, turn off the backlight function if it is not necessary. To change backlight settings: 1. Tap Start → Settings → Control Panel. 2. Tap Backlight. The Backlight screen appears. -
Page 44: Performing A Hardware Reset
Alternatively, to perform a warm boot, lightly press the tip of the stylus to the reset button located on the rear of the PA982. Copyright 2006 unitech Electronics Co., Ltd. All rights reserved. unitech is a registered trademark of unitech Electronics Co., Ltd. -
Page 45: Performing A Cold Boot
Performing a Cold Boot using the Hardware Reset Button The hardware reset button enables you to reset the PA982 in the even that the operating system does not work or boot up. Chapter 2 Advanced Settings... - Page 46 Remove the PCMCIA bay cover and press the white hardware reset button inside the PCMCIA bay with the tip of a screwdriver. Copyright 2006 unitech Electronics Co., Ltd. All rights reserved. unitech is a registered trademark of unitech Electronics Co., Ltd.
-
Page 47: System Specifications
Synchronization and power cable AC/DC power adapter Gun grip handle with internal Li-ion battery Software Microsoft Visual Studio 2005 Microsoft Windows CE 5.0 SDK unitech PA982 SDK VOIP (via 3rd party) Chapter 2 System Specifications Appendix Intel Xscale PXA255 400Mhz...
Need help?
Do you have a question about the PA982 and is the answer not in the manual?
Questions and answers