Table of Contents
Advertisement
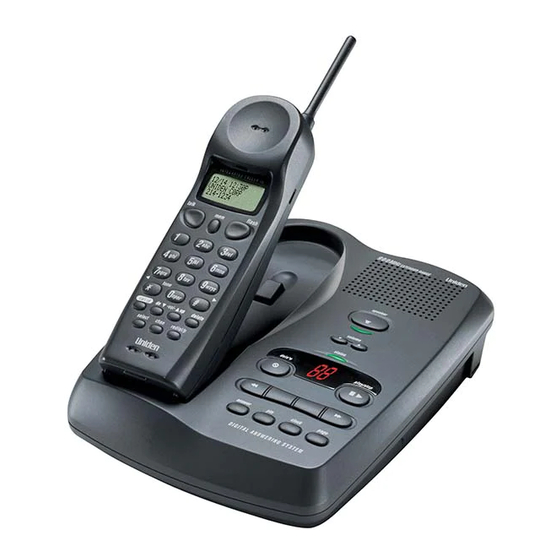
Cordless Telephone
EXAI 7980
Owner's Manual
Thank you for your purchase of the Uniden EXAI 7980 cordless
telephone. Please read this Owner's Manual carefully before
using your cordless telephone to ensure proper use. After read-
ing the manual, please keep it in a safe place and refer to it
when necessary.
©2000 Uniden America Corporation
Advertisement
Table of Contents

Related Manuals for Uniden EXAI7980


Summary of Contents for Uniden EXAI7980
-
Page 1: Cordless Telephone
Cordless Telephone EXAI 7980 Owner's Manual Thank you for your purchase of the Uniden EXAI 7980 cordless telephone. Please read this Owner's Manual carefully before using your cordless telephone to ensure proper use. After read- ing the manual, please keep it in a safe place and refer to it when necessary. - Page 2 Introduction Thank you for choosing the Uniden EXAI 7980 cordless telephone. This phone is designed to exacting standards that provide reliability, long life and outstanding performance. Note: Some illustrations in this manual may differ from the actual unit for explanation purposes.
-
Page 3: Table Of Contents
Erasing a stored name and/or phone number ... 25 Using the Page Feature ...26 Caller ID Features When the telephone rings ...27 Viewing the Caller ID message list... 28 Deleting information from the Caller ID list ...29 Using the Caller ID list ... 31 Calling a party from the Caller ID list ...31... -
Page 4: Read This First
Read this first This cordless telephone must be set up before use. Follow these steps; Step 1 (page 5) Unpack the telephone and accessories. Step 2 (page 6 to 8) Next, choose the best location to set up the base unit. -
Page 5: Step 1: Checking The Package Contents
Step 1 Checking the package contents Make sure you have received the following items in the package. If any of these items are missing or damaged, contact the Uniden Parts Department (see below). • Base unit • Rechargeable battery pack (BT-905) •... -
Page 6: Step 2: Setting Up The Base Unit
Step 2 Setting up the base unit Do the following steps. • Choose the best location • Connect the base unit • Choose the dialing mode Choose the best location Before choosing a location for your new phone, read the INSTALLATION CONSIDERA- TIONS included in the PRECAUTIONS AND IMPORTANT SAFETY INSTRUCTIONS brochure. - Page 7 Place the power cord where it will not create a trip hazard, or where it could become chafed and create a fire or electrical hazard. Connect the telephone line cord to the TEL LINE jack and to a telephone outlet.
-
Page 8: Choose The Dialing Mode
• Place the base unit close to the AC outlet so that you can unplug the AC adapter easily. Tips • If your telephone outlet isn't modular, contact your telephone company for assistance. Choose the dialing mode Depending on your dialing system, set the TONE/PULSE switch as follows:... -
Page 9: Step 3: Preparing The Battery Pack
Step 3 Preparing the battery pack Charge the battery pack for 12-15 hours before connecting the phone line. Press and slide the battery compart- ment cover toward the bottom of the unit. Connect the battery pack connector with the correct polarity (black and red wires), then insert the battery pack into the battery compartment. -
Page 10: Cleaning The Battery Contacts
• Even when the battery pack is not being used, it will gradually discharge over a long period. For optimum performance, be sure to return the handset to the base unit after a telephone call for charging the battery. • The built-in memory backup holds numbers and names stored in the memory for up to 2 minutes, while you replace the battery pack. -
Page 11: Step 4: Setting Caller Id Options
Step 4 Setting Caller ID options There are three Caller ID options, Auto Talk, CIDCW (Caller ID with Call Waiting), and Area Code. Notes • The AutoTalk feature provides a quick and easy way to answer calls. If the phone rings with AutoTalk set to on, simply remove the handset from the cradle. -
Page 12: Entering Your Area Code
Step 4 (continued) Entering your area code Note Skip this step if your calling area requires 10 digit dialing. When you use this phone for the first time, or move to an area that has a different area code, you must enter your area code. This is necessary because the phone must distinguish local or long distance calls to properly dial calls from the Caller ID message list. -
Page 13: Making Calls
Making calls Dialing from standby Other Operations To improve reception To adjust the earpiece volume To temporarily switch to tone dial (When the the base is set to pulse mode) To enter a pause in the dialing sequence Dial the phone number. (up to 32 digits.) Example: Enter 817-858-3300 Press... -
Page 14: Dialing From Talk Mode
Making calls Dialing from talk mode (continued) Pick up the handset. Press setting appear on the display. Dial the phone number. After about 5 seconds, the call-time display appears. Example: Enter 817-858-3300 To hang up, press handset on the base. The call-time will be displayed for about 5 seconds. -
Page 15: Redialing
Press “Talk” appears flashing on the display. Press Press or place the handset on the base to end the telephone call. The call- time will be displayed for about 5 seconds. Press The phone number that was last dialed appears on the display. -
Page 16: Receiving Calls
Note: You must subscribe to Call Waiting service to use this feature. When a call is received during a telephone call already in progress, press switch to the new call. If you also subscribe to Caller ID on call waiting, you will see the name and number of the caller in call waiting (See page 33.) - Page 17 Handset earpiece volume During a telephone call, pressing will change the earpiece volume of the handset. This setting will remain in effect after the telephone call has ended. When you press in Loud mode or press in Normal mode, an error tone...
-
Page 18: Receiving A Call From The Base
Receiving calls Receiving a call from the base Base ringer switch To turn off the ringer, set the ringer switch to the off position. This switch turns the base ringer on or off. Base speaker volume To control the speaker volume of the base, adjust the as desired. -
Page 19: Storing Phone Numbers And Names
Memory storing You can store up to 10 phone numbers in the dial memory. Storing phone numbers and names Press When an empty memory location is selected, “Store Name” is displayed. The cursor flashes indicating that the display is ready for the name to be entered. - Page 20 Memory storing Use the The name cannot exceed 16 characters. • Use the • Use the • Use the Press Number” is displayed. The cursor “Store flashes indicating that the display is ready for the number to be entered. Use the keypad, keys to enter the phone number.
-
Page 21: Making Calls With Memory Dialing
Memory dialing Making calls with memory dialing Dialing from standby Press , “Talk” momentarily flashes on the display and the volume setting appears. Then the displayed number is dialed. Notes • To cancel memory selection, press returns to standby. • Whenever you are using a menu screen, you must press a key within 20 seconds or the phone will return to standby. -
Page 22: Memory Dialing
Memory dialing Display a Programmed Number Press , then use the and the number displays. Program name Note When the stored phone number has 15 or more digits, the first 14 digits of the phone number are displayed. Dialing from talk mode (continued) keys to toggle between the name Program number... -
Page 23: Editing A Stored Name And/Or Phone Number
Memory editing Editing a stored name and/or phone number Press the "Edit Memory", then press The following screen appears. The cursor flashes indicating that the display is ready for the name to be edited. When a name has not been stored, the cursor appears at the beginning of the second line. - Page 24 Memory editing Use the number keypad, the phone number. The phone number cannot exceed 16 digits. (See page 20.) When the phone number is not to be edited, skip this step. Press The handset beeps and displays the confirma- tion screen. The memory storage is complete. For example if you store a name and number into memory location number 1, the display shows Memory 1 stored...
-
Page 25: Erasing A Stored Name And/Or Phone Number
Memory erasing Erasing a stored name and/or phone number Press to move the pointer down to “Delete Memory” . Press . The following confirmation screen appears. Press to move the pointer to “Yes”. Press A tone sounds and the memory is deleted. The following screen appears. -
Page 26: Using The Page Feature
Using the Page Feature To locate the handset (while it’s off the base) Press on the base. The handset beeps for 60 seconds. Press any key except handset to cancel the page. on the... -
Page 27: Caller Id Features
• If you answer a call before the Caller ID message is received (Example: before the second ring), the Caller ID message will not appear. • When the call is received via a telephone company that does not offer Caller ID service, the caller's phone number and name do not appear. -
Page 28: Viewing The Caller Id Message List
The Caller ID list stores information for up to 30 incoming calls - even unanswered calls. Note If a call comes in via a telephone system that does not offer Caller ID service, no information is stored. Long Distance call settings and cancellation... -
Page 29: Deleting Information From The Caller Id List
• While using the “ Delete Message ? ” screen, if no key is pressed for more than 20 seconds, an error tone sounds and the telephone returns to standby. • If you get an incoming call, the deleting operation is canceled and the telephone returns to standby so you can answer the call. - Page 30 • While using the “ Delete All ? ” screen, if no key is pressed for more than 20 seconds, an error tone sounds and the telephone returns to standby. • If you get an incoming call, the deleting operation is canceled and the telephone returns to standby so you can answer the call.
-
Page 31: Using The Caller Id List
Caller ID (continued) Using the Caller ID list Calling a party from the Caller ID list You can place a call from the Caller ID list. The EXAI 7980 stores up to 30 messages. Long Distance calls Pressing while the incoming call information is displayed (in step 2) will place a “1”... -
Page 32: Storing Caller Id Messages In Memory
• If no key is pressed for more than 20 seconds, an error tone sounds and the telephone returns to the standby mode. • If there is an incoming call or page, memory storage is canceled and the telephone is set to the incoming call or page. -
Page 33: Using "Caller Id With Call Waiting" Service
The “Call waiting” service can also be used independently. Please contact your telephone company for details. When a new incoming call arrives during your current telephone call, the phone number appears. (The name of the new caller is displayed, depending upon the telephone service.) -
Page 34: Setting The Clock
Using the answering machine Setting the clock The answering machine’s clock starts when the AC adapter cord is plugged in. Notes • You can hear the current time set by pressing • If a call comes in during clock setting, start over after the call. •... -
Page 35: Recording The Greeting
Using the answering machine Recording the greeting You can record a personalized greeting or use the pre-recorded message. Microphone The base microphone is located under the phone. Position yourself as near Note to the base as possible. Changing the greeting You can change from the pre-recorded greeting to your own recorded greeting or vice versa. -
Page 36: Turning The Answering Machine On And Off
Using the answering machine Turning the answering machine on and off Check the LED display to see if the answering machine is on or off. If the LED display is on, the unit is on and ready to take messages. If the LED display is off, it will not take messages. -
Page 37: Setting Maximum Recording Time For Incoming Messages
Using the answering machine Setting maximum recording time for incoming messages You can select the maximum recording time by sliding the REC TIME switch on the base unit to one of the following positions: (continued) 1 minute 4 minutes ANN : Announce only Note If you set the switch to ANN,... -
Page 38: Playing Recorded Messages
Using the answering machine Playing recorded messages You can listen to the message at the base unit. To stop playback, press To repeat the message, press within 2 seconds after the current message has started. If you press after 2 seconds, the current message is repeated from the beginning. -
Page 39: Deleting Recorded Messages
Using the answering machine Deleting recorded messages To delete individual messages, press or before the next message begins. You will hear a confirmation tone when the deletion is completed. To delete all messages, first, make sure all new messages are played. Then press and hold at the base until you hear a long beep. -
Page 40: Leaving A Voice Memo
Using the answering machine Leaving a voice memo You can record a memo by using the base unit, as a reminder to yourself or as a message for someone else in the household. A memo is stored and played back like any other incoming message, and the LED display will light to indicate that a message has been received. -
Page 41: Recording A Phone Conversation (2-Way Rec)
• The recorded conversation must be at least 2 seconds long, or it will be automatically deleted. • The telephone beeps intermittently to alert the parties that the conversation is being recorded. • You cannot use 2-way REC when you using the speakerphone. -
Page 42: Selecting A Pin Code
Using the answering machine Selecting a PIN code To play your messages from a remote location, you will need to enter a two-digit Personal Identification Number (PIN) code (00-99). To select a PIN, perform the follow- ing steps: (continued) On the base, press and hold A beep sounds, and the LED displays ‚‚. -
Page 43: Remote Access Away From Home
You can operate your answering system from a remote location using any touch-tone telephone. Use this function to check for recorded messages, to play or delete messages, even to record a new outgoing message, and to monitor sounds in the room. -
Page 44: Remote Room Monitor
You can call your answering system from any touch-tone phone and monitor sounds in the room where your base unit is installed. Call your telephone number. During the outgoing message playback, press The answering system begins announcing the time and day stamp. -
Page 45: Additional Information 3-Way Conversation
Additional information 3-way conversation The Uniden EXAI 7980 permits 3-way conversations between the handset, base, and outside line. When speaking on the handset When speaking on the base Press on the base to join the 3-way conversation. Press on the base to hang up. -
Page 46: Changing The Digital Security Code
Normally, setting the code is not necessary. The first time you charge your handset, the security code is automatically set. (See page 4.) In the rare situation that you suspect another cordless telephone is using the same security code, you can change the code. Note If the handset battery pack is completely discharged or the battery pack removed, the digital security code will be lost. -
Page 47: Mounting The Base Unit On A Wall
Additional information Mounting the base unit on a wall [Standard wall plate mounting] This phone can be mounted on any standard telephone wall plate. 2, 3, 4, 5, 6, 7 (continued) Snap the wall mount adapter into the notches on the base. - Page 48 Insert two mounting screws into the wall, (with their appropriate anchoring device), 3-15/16 inches apart. Allow about 3/16 of an inch between the wall and screwheads for mounting the phone. Refer to steps 1 through 9 on pages 47 to 48 to mount the telephone.
-
Page 49: Installing The Beltclip
Press down until it clicks. Headset installation Your phone may be used with an optional headset, the Uniden HS910. To use this feature, simply plug the headset plug into the headset jack. Your phone is ready for hands-free conversation. -
Page 50: Note On Power Sources
With normal usage, your battery should last about one year. Please contact your place of purchase for a replacement battery, or contact the Uniden Parts Department for genuine Uniden parts. Power Failure During the period that the power is off, you will not be able to make or receive calls with the telephone. -
Page 51: Troubleshooting
• Make sure that you are not too far from the base. • Check both ends of the base unit telephone line cord. • Make sure the AC adapter is plugged into the base unit and wall outlet. - Page 52 Additional information Symptom The answering system does not work. The answering system does not answer calls. Messages are incomplete. After a power failure, the greeting is deleted. No sound on the base unit speaker during call monitoring or message playback. (continued) Suggestion •...
- Page 53 1-800-297-1023 PLEASE DO NOT RETURN THIS PRODUCT TO THE PLACE OF PURCHASE. Our Uniden representatives will be happy to help you with any matters regarding the operation of this unit, available accessories, or any other related matters. Thank you for purchasing a Uniden product.
-
Page 54: Index
Index 0 - 9 3-way conversation...45 Answering machine Changing the greeting ...35 Deleting recorded messages...39 Leaving voice memo...40 Playing a recorded messages ...38 Recording a phone conversation ...41 Recording the greeting ...35 Remote access away from home..43 Remote room monitor ...44 Screening incoming calls ...39 Selecting a PIN code...42 Setting the clock ...34... - Page 56 Uniden America Corporation 4700 Amon Carter Boulevard Fort Worth, TX 76155 Covered under one or more of the following U.S. patents: 4,511,761 4,523,058 4,797,916 5,426,690 4,595,795 Printed in China UCZZ01271BZ...
Need help?
Do you have a question about the EXAI7980 and is the answer not in the manual?
Questions and answers