Table of Contents
Advertisement
Quick Links
Advertisement
Table of Contents

Related Manuals for Franke FIH3210


Summary of Contents for Franke FIH3210
- Page 3 1. Foreword 1. This appliance is for household use only. Do not use outdoors. 2. This appliance is not intended for use by persons (including children) with reduced physical, sensory or mental capabilities, or lack of experience and knowledge, unless they have been given supervision or instruction concerning use of the appliance by a person responsible for their safety.
- Page 4 8. This appliance as well as the cooking utensils used and the surface of the appliance can become very hot, do not touch the hot surface of the hob. 9. Metallic objects such as knives, forks, spoons and lids should not be placed on the hotplate since they can get hot.
-
Page 5: Care And Cleaning
2. Care and Cleaning What? How? Important! Everyday soiling 1. Switch the power to the • When the power to the cooktop is switched off, there will be no ‘hot on glass cooktop off. (fingerprints, 2. Apply a cooktop cleaner while surface’... -
Page 6: Hints And Tips
3. Hints and Tips Problem Possible causes What to do The induction hob No power. Make sure the induction hob is cannot be turned on. connected to the power supply and that it is switched on. Check whether there is a power outage in your home or area. -
Page 7: Failure Display And Inspection
Pans do not become The induction hob cannot Use cookware suitable for induction hot and appears in detect the pan because it is not cooking. See section ‘Choosing the the display. suitable for induction cooking. right cookware’. The induction hob cannot Centre the pan and make sure that detect the pan because it is too its base matches the size of the... -
Page 8: Product Introduction
No Auto-Recovery Ceramic plate temperature sensor F3/F6 failure- -short circuit. (F3 for 1#,F6 for2#) Check the connection or replace the Ceramic plate temperature sensor ceramic plate temperature sensor. F4/F7 failure--open circuit. (F4 for 1#,F7 for2#) Ceramic plate temperature sensor F5/F8 failure—invalid . -
Page 9: Operation Of Product
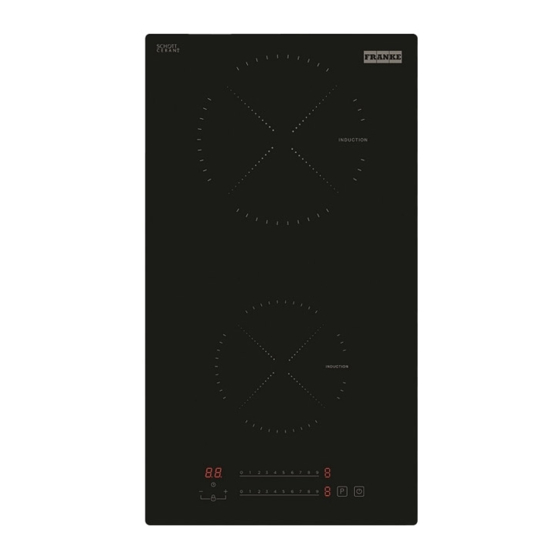
2. Boost control 3. Timer plus regulating control 4. Timer minus regulating control 5. Lock control 6. Power slider control 7. Power slider control Cooking Hob FIH3210 Cooking Zones 2 Zones Supply Voltage 220-240V~ 50 60Hz Installed Electric Power 3500W Product Size L×W×H(mm) - Page 10 Only use cookware with a base suitable for induction cooking. • Look for the induction symbol on the packaging or on the bottom of the pan. • You can check whether your cookware is suitable by carrying out a magnet test. Move a magnet towards the base of the pan.
- Page 11 Touch the ON/OFF control After power on, the buzzer beeps once, all displays show “–” or “– –”, indicating that the induction hob has entered the state of standby mode. Place a suitable pan on the cooking zone that you wish to use.
- Page 12 Touching the heating zone selection control that you wish to switch off. Turn the cooking zone off by touching the slider to left. Make sure the display shows “0”. Turn the whole cooktop off by touching the ON/OFF control. Beware of hot surfaces H will show which cooking zone is hot to touch.
- Page 13 Touching the "Boost" control to cancel the Boost function, then the cooking zone will revert to its original setting. The function can work in any cooking zone. The cooking zone returns to its original setting after 10 minutes. If the original heat setting equals 0, it will return to 9 after 10 minutes. You can lock the controls to prevent unintended use (for example children accidentally turning the cooking zones on).
-
Page 14: Using The Timer As A Minute Minder
a) Using the Timer as a Minute Minder If you are not selecting any cooking zone Make sure the cooktop is turned on. Note: you can use the minute minder even if you’re not selecting any cooking zone. Touch “+” the controls of the timer. The minder indicator will start flashing and “10”... -
Page 15: Setting The Timer To Turn One Cooking Zone Off
b) Setting the timer to turn one cooking zone off Set one zone Touching the heating zone slider control Set the time by touching the or control of the timer Hint: Touch the “-“ or “+” control of the timer once will decrease or increase by 1 minute. -
Page 16: Cancel The Timer
Other cooking zone will keep operating if they are turned on previously. set more zones: The steps for setting more zones are similar to the steps of setting one zone; When you set the time for several cooking zones simultaneously, decimal dots of the relevant cooking zones are on. -
Page 17: Heat Settings
7. Heat Settings The settings below are guidelines only. The exact setting will depend on several factors, including your cookware and the amount you are cooking. Experiment with the induction hob to find the settings that best suit you. Heat setting Suitability •... - Page 18 Under any circumstances, make sure the Induction cooker hob is well ventilated and the air inlet and outlet are not blocked. Ensure the Induction cooker hob is in good work state. As shown below Note: The safety distance between the hotplate and the cupboard above the hotplate should be at least 760mm.
- Page 19 • The work surface is square and level, and no structural members interfere with space requirements. • The work surface is made of a heat-resistant and insulated material. • If the hob is installed above an oven, the oven has a built-in cooling fan. •...
- Page 20 Fix the hob on the work surface by screw 4 brackets on the bottom of hob(see picture) after installation. Adjust the bracket position to suit for different table top thickness. TABLE TABLE B ACKET B ACKET Under any circumstances, the brackets cannot touch with after installation (see picture) 1.
- Page 21 5. To avoid any damage, the sandwich layer and adhesive must be resistant to heat. 6. A steam cleaner is not to be used. This hob must be connected to the mains power supply only by a suitably qualified person. Before connecting the hob to the mains power supply, check that: 1.
- Page 22 This appliance is labeled in compliance with European directive 2012/19/EU for Waste Electrical and Electronic Equipment (WEEE). By ensuring that this appliance is disposed of correctly, you will help prevent any possible damage to the environment and to human health, which might otherwise be caused if it were disposed of in the wrong way.
Need help?
Do you have a question about the FIH3210 and is the answer not in the manual?
Questions and answers