Advertisement
Table of Contents
Advertisement
Table of Contents

Related Manuals for Creality CR-Scan Ferret 3D Pro


Summary of Contents for Creality CR-Scan Ferret 3D Pro
-
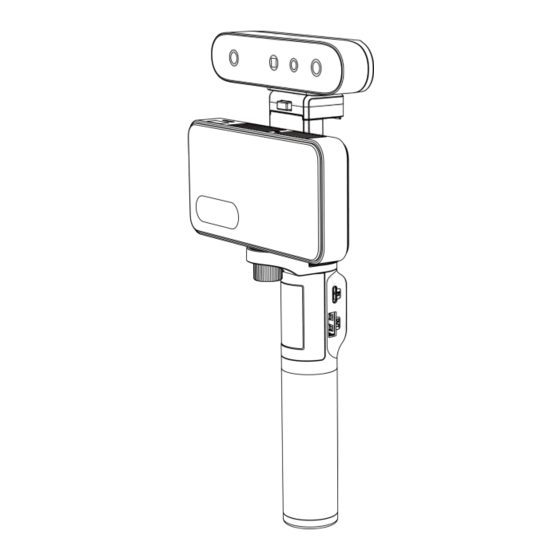
Page 1: Cr-Scan Ferret 3D (Pro) Scanner
CR-Scan Ferret 3D (Pro) Scanner User Manual Small Build Great Capture... -
Page 2: Table Of Contents
Catalogue CR-Scan Ferret 3D (Pro) Scanner............................1 User Manual ....................................1 Small Build Great Capture ............................... 1 1. Introduction ...................................3 2. Specification ..................................4 3. Packing List ....................................5 4. Device Attachment................................6 5. Operating Systems ................................8 6. Workflows ....................................10 7. Guide for Scanning................................11 8. -
Page 3: Introduction
1. Introduction CR-Scan Ferret (Pro) is a consumer-grade digital 3D scanning product equipped with a dedicated depth ASIC chip and a high-resolution optical system. With advanced optical technology and intelligent algorithms, the scanner can achieve excellent scanning results in both dimly lit rooms and strong lighting environments. -
Page 4: Specification
2. Specification Technology Infrared Binocular Stereo Working Distance 150mm – 700mm Single Capture Range 820mm x 560mm@700mm Single Frame Precision Up to 0.1mm Minimum Point 0.16mm Distance/Resolution Minimum Scan Volume 15×15×15 cm Visual Tracking Geometry/Texture Scanning Speed Up to 30fps Color Model Color Camera Resolution 1080p@30fps... -
Page 5: Packing List
3. Packing List 1. Rechargeable Battery Grip * 7. Data Cable for Wireless Bridge 2. 3D Scanner Body 8. Tilt Adjuster 3. Wireless Bridge 9. Y Cable for Android Phone 4. Tripod 10. USB Cable for Computer 5. Phone Holder 11. -
Page 6: Device Attachment
Device Attachment Connecting 3D Scanner Body to PC via USB cable Turntable mode installation PC connection Connecting 3D Scanner Body to Phones via Wi-Fi Handheld mode installation with Wireless Bridge Wireless Bridge connection Connect the Smartphone to the Wireless Bridge: 1) Connect the Wireless Bridge to the scanner and Rechargeable Battery Grip, wait a few seconds until the LED become blue. - Page 7 3) Wait a few seconds for the scanner to be connected. Agree to grant all permissions requested by the app. Wireless Bridge LED Indicator No light: Power OFF Green light: Power ON Yellow light: Firmware updating Red light: Initializing/Error Blue light: Wi-Fi ready Connecting3D Scanner Body to Android Phones via USB cable USB cable connection to Android Phones Handheld mode installation without Wireless Bridge...
-
Page 8: Operating Systems
11 or later only supports device connectivity ( via Wi-Fi ) iOS: iOS 15 or later RAM: 4G or more Note: for better scanning performance, PC is recommended. Software&firmware link: Creality Google Play App Store https://www.creality.c https://play.google. https://apps.apple.com om/pages/download- com/store/apps/det /us/app/creality-scan/i cr-scan-ferret ails?id=com.creality. - Page 9 Android phone processor with Wi-Fi 6 Qualcomm MediaTek HiSilicon Samsung Dimensity 9200 Kirin9000/9000E Exynos 1080 Snapdragon 8 Gen2 Dimensity 9000(+) Kirin990 5G Snapdragon 8 Gen1(+) Snapdragon 888(+) Dimensity 8200 Kirin985 Snapdragon 870 Dimensity 8100 Snapdragon 865 (+) Dimensity 1300 Snapdragon 855 Dimensity 1200 (Only for Samsumg s10) Snapdragon 7 Gen1...
-
Page 10: Workflows
6. Workflows Scan Workflows (for APP) 4 steps to get a vivid mode (for PC): Step1: Device Connect the USB cable to the computer and then to the scanner. Connecting the scanner to a USB 3.0 port is highly recommended for faster data transfer. -
Page 11: Guide For Scanning
Guide for Scanning Settings before scan: Recommended objects Size: 15x15x15 cm³ ~ 200×200×200 cm³ Object: Normal, Face and Body Normal: Designed to scan normal objects. According to the target object, it is divided into large object( ×200×200 cm ), medium object (25×25×25~50×50×50 cm ) and small object (15 50×50×50~200 ³... - Page 12 Accuracy: Fast and Hi-Quality Fast: Faster scanning, the accuracy is relatively good with faster scan and processing speed to get a remarkable models. Fast is default for body scanning. Hi-Quality: Added to meet users' needs for higher-precision data capturing. In Hi-Quality mode, the processing time for point cloud optimization/mesh/texture operations will be relatively longer.
- Page 13 Scanning troubleshooting/Tips Case Troubleshooting/Tips Backtrack to the previous scanned area and hold for a few Tracking lost second to resume tracking. Try enable ‘Delete flat base’ at the bottom left corner while scanning. Scan your model until majority of the model turns green for Complex shape better quality.
-
Page 14: Guide For Windows & Mac Software
8. Guide for Windows & Mac Software Guide for Beginner ① Guide for Beginner: Display the guidance for a beginner to use the scanner. Confirm "Device is connected" After opening Creality Scan, confirm the device connection status. - Page 15 When launch the Creality Scan software, the device UI is shown to users. ① Main Menu: Include three function modules which are “Device”, ”Scan” and “Process”. ② System Setting: Specify language; guide for beginner; link to this manual online; firmware.
- Page 16 ② Folder Path: Display the file folder of the model to be saved. Change as needed. ③ Project Settings ④ Import an external model: Import a 3D model in .PLY, .OBJ or .STL formats into Creality Scan to view. Icon : Select file.
- Page 17 Preview After specifying the Object, Size, Feature, Accuracy, Color Mapping and Turntable options, press to enter the scanning page. The left area of the 3D Model Preview window shows the distance. Place the scanner at an "Optimal distance" from the object and try to maintain it during scanning. When click the on the Project Setting UI, the scan UI is shown to users.
- Page 18 Icon : Deleting all the point clouds which have been stored. Icon : Deleting the entire project to start over from device UI. ⑦ Status Bar: Display the device connection and project settings. Adjust the Exposure in IR Camera Adjust the Sun Icon on the IR camera display.
- Page 19 If the point cloud is desired, click Complete icon , then click "Yes" button in the popup to complete scanning. After this, users will enter the Process page to further process the data. Optimize Point Cloud The next step is to optimize the scanned 3D point clouds to obtain a better point cloud model. There are two ways to achieve this function.
- Page 20 ① 3D Model Preview Window: Display the 3D model data that will be captured when scanning starts or all of the data that has been captured after scanning has started. The view of the model may be dragged or zoomed in the 3D Model preview area by the mouse (Left Mouse Button: Rotate the model; Wheel: Zoom in/out).
- Page 21 Edit Point Cloud ① Tools Bar: Display the edit tools. Icon lasso select. Icon rectangle select. Icon delete. Delete the points which are selected. Icon undo. Recover the points which are deleted. Prompt: Display the mouse operation prompt. ② Meshing Click to start converting the scanned point cloud data into a mesh.
- Page 23 Color Mapping The Color Mapping function only applies to scan mode with the "Color" option selected. Click to apply texture to the model. Export Click to export the 3D model. Select a destination folder, input a file name and select a file format (ply, obj &...
- Page 24 Import historical project Click after importing the historical project, select the folder named AlgoDir of the target project, and click the "select folder" button to import.
-
Page 25: Guide For App
9. Guide for APP Home Page: The main area of the home page displays a list of historical models. Top Bar Functions: ● Setting Button Setting Page In the setting page, information of scanner is delivered to help better utilization. ●... - Page 26 ● Device Connection Function Used to display the connection status of the scanner, with red frame indicating disconnection and green frame indicating a connected device. Users can click on this area to view the version of firmware(FW). ● Configuration Function : In this area, users can access the scanning configuration options and view the current selection.
- Page 27 The home page will automatically detect the firmware version of the scanner and Wireless Bridge after the device is connected. If the device version is lower, a pop-up window will prompt you to update. During the Wireless Bridge upgrade process, the indicator light in the Wireless Bridge changes as follows: blue ->...
- Page 28 Preview The preview phase mainly provides RGB images/depth images, IR images, and real-time point clouds for preview, alignment, and judgment of the current point cloud quality. The RGB/depth preview window and IR preview window provide nine squares for alignment of the scanner's field of view. It is recommended to keep the scanning portion in the center area of the preview window.
- Page 29 Normal exposure Under exposure The RGB/depth preview window supports adjusting the RGB exposure mode (auto/manual, default auto). If you find that RGB is overexposed or too dark, you can appropriately adjust the exposure level. This preview window also supports the display of depth images, which can be superimposed on RGB images by adjusting the depth translucency.
- Page 30 Depth Diagram Scanning The main body of the page is a 3D rendering area, and the scanning phase is used to display a point cloud. The point cloud is divided into two parts, one is the current frame, and the other is the scanned point cloud. The current frame in red indicates poor point cloud quality, and the current frame in green indicates successful tracking and registration.
- Page 31 Area A This section mainly displays the current process stage. Click Next to proceed to the next stage of processing. Home button, used to leave the scanning process and return to the home page. Area B mainly displays the preview area of scanning. This section is the same as the preview stage, and includes an IR preview window (above) and an RGB/depth preview window (below).
- Page 32 Good scanning indicated by Quality Color Poor scanning indicated by Quality Color...
- Page 33 Optimization This stage is used to optimize scanned point clouds and display them. Point cloud optimization and subsequent stages automatically save model related results. The 3D rendering area is used to display the model. The display mode supports solid color display mode, and the delivery method is the same as described in the scanning section.
- Page 34 :Erase Mode. This mode supports swipe with one finger to select the points to delete. The eraser can be adjusted in size. :Rotate Mode. This mode supports swipe with one finger to delete the point cloud. All modes support dragging with two fingers after a long press and pinching/spreading with two finger to zoom.
- Page 35 Meshing This stage is used to show the model after meshing. If user chooses no color mode, this stage is the last stage of the process. Color Mapping The last step of the scanning process is the generation and display of the mapped model.
-
Page 36: Faqs
10. FAQs 1. Can the scanner scan small objects? It is recommended to scan objects from 15cm-200cm. If you have extensive experience in scanning and high-end equipments (PC or smart phones), you can try to scan such objects. 2. Why I get the message that the scanning hit the limited "Ceiling reach!" or "Scanned frames limit reached"... - Page 37 7. How long can the charging handle support continuous scanning? It can support more than two hours of continuous scanning by directly using the charging handle. Generally speaking, the scanning time of small and medium-sized objects is within 5min, that is, the charging handle can support 20 to 30 small and medium-sized objects.
- Page 38 15 What precautions should be taken when upgrading the firmware of the Wireless Bridge? Please ensure that the Rechargeable Battery Grip providing power to the Wireless Bridge has a battery level greater than 50% (with at least 2 lights on) before performing the firmware upgrade. It is important to avoid power interruptions during the firmware upgrade process, as it can lead to damage to Wireless Bridge.
Need help?
Do you have a question about the CR-Scan Ferret 3D Pro and is the answer not in the manual?
Questions and answers
keine daten übertragung per email von handy auf pc sind zu groß
You can transfer large files from your phone to your PC using the Creality CR-Scan Ferret 3D Pro by connecting via Wi-Fi 6 if you are using an iPhone 11 or later. If using an Android phone, ensure it has USB 3.0 or higher and runs Android 11-13, as Android 10 does not support USB connectivity. If USB transfer is not available, consider using wireless transfer methods.
This answer is automatically generated
daten übertragung per email von handy auf pc
The document does not provide specific steps for transferring data from a mobile phone to a PC using email. However, it mentions that sharing models and projects involves compressing the data and sharing it with other apps. You can compress the model or project data, attach it to an email, and send it to your PC. Once received, unzip the file on your PC and follow the "Importing historical projects" section in the guide for Windows & Mac software for further processing.
This answer is automatically generated