Table of Contents
Advertisement
Advertisement
Table of Contents

Related Manuals for Akaso BRAVE 7 LE


Summary of Contents for Akaso BRAVE 7 LE
- Page 1 BRAVE 7 LE A C T I O N C A M E R A V1.8...
-
Page 2: Table Of Contents
Contents What's in the Box Your Brave 7 LE Getting Started Overview of Modes Customizing Your Brave 7 LE Connecting to the AKASO GO App Playing Back Your Content Deleting Your Content Offloading Your Content Maintaining Your Camera Maximizing Battery Life... -
Page 3: What's In The Box
What's in the Box Brave 7 LE Waterproof Case Battery Charger Battery USB Cable Remote Control Remote Control Bandage Helmet Mount 1 Helmet Mount 2 Strap x 1 Buckle Mount J-Hook Mount E Mount C Mount D Mount F Mount... -
Page 4: Your Brave 7 Le
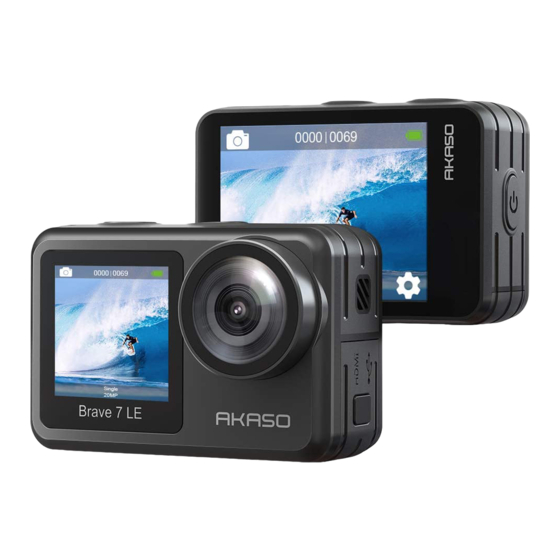
Your Brave 7 LE 14 5 Micro HDMI Port Shutter / OK Button USB / External Mic Port Mode / Exit Button Lens Front Screen Speaker... - Page 5 Touch Screen 1/4-Inch Nut Hole Charging Indicator Battery Cover Working Indicator Memory Card Slot Power / Wifi Button Note: The camera does not record sounds when it is in the waterproof case.
- Page 6 01:19:42 Normal 4K30 Mode Battery Status Recording Time/Photos Remaining Audio Recording Playback Zoom Level Current Shooting Mode Settings When the camera is turned on, swipe your finger from the bottom to the top of the screen to easily access the shortcut menu to adjust settings including resolution, quality, and image stabilization.
- Page 7 When the camera is on the preview screen, swipe down to access the shortcut menu. From there, you can quickly lock the screen and turn off the camera. By tapping the Lock icon, you can lock the screen in seconds. To unlock the screen, simply swipe right. Additionally, you can quickly turn off...
-
Page 8: Getting Started
Getting Started Welcome to your AKASO Brave 7 LE. To capture videos and photos, you need a memory card to start recording (sold separately). Memory Cards Please use brand name memory cards that meet these requirements: • U3 • Capacity up to 64GB Note: 1. -
Page 9: Overview Of Modes
Overview of Modes There are 6 modes of this camera: Video, Photo, Playback, System Setup, Video Setup, and Photo Setup. Video Mode Video Mode is the default mode when you turn on the camera.When the camera is in Video mode, press the shutter button to record video.To stop recording video, simply press the shutter button again. -
Page 10: Customizing Your Brave 7 Le
Customizing Your Brave 7 LE Video Shortcut Menu 1. Normal Video Default setting is Normal Video. 2. Loop Record: 1 Min/3 Min/5 Min Default setting is 1 Min. To enter the Photo Setup mode, you can press the Mode button 4 times or tap the Photo Setup icon on the settings screen. - Page 11 Photo Shortcut Menu 1. Single Photo Default setting is Single Photo. 2. Burst Photo: 3 shots/7 shots/15 shots/30 shots Default setting is 3 shots. In this mode, when you press the Shutter button, the camera will continuously capture photos at the set shot per second. So it is perfect for capturing fast-moving activities. 3.
- Page 12 2. Voice Record: Off/On Default setting is On. When Voice Record is disabled, the camera will record video without audio. You can choose to turn it on or off. 3. Image Stabilization: Off/On Default setting is Off. Electronic Image Stabilization (EIS2.0) can efficiently smooth out the lens shakes, resulting in smooth and clear videos.
- Page 13 level. However, exposure lets you select an area that you want the camera to prioritize when determining exposure. This setting is particularly useful in shots where an important region might otherwise be over or underexposed. 8. Metering: Center/Multi Default setting is Multi. The metering mode refers to the way in which a camera determines exposure.
- Page 14 when determining exposure. This setting is particularly useful in shots where an important region might otherwise be over-or underexposed. 5. Metering: Center/Multi Default setting is Multi. The metering mode refers to the way in which a camera determines exposure. 6. Date Stamp: Off/Date/Date&Time Default setting is Date&Time.
- Page 15 5. Distortion Calibration: Off/On Default setting is Off. This setting corrects the fisheye effect that can occur in wide-angle shots, resulting indistortion-free images. 6. Driving Mode: Off/On Default setting is Off. If you turn on Driving Mode and connect camera with car cigarette lighter, the camera will turn on automatically if you start your car and will turn off...
- Page 16 12. Date&Time: MM/DD/YY 13. Language: English/ Deutsch/ Français/ Italiano/Español/Português/日本語 Default setting is English. 14. Format Card: Yes/No Default setting is No. To keep your memory card in good condition, reformat it on a regular basis. Reformatting erases all of your content, so be sure to offload your photos and videos first.
-
Page 17: Connecting To The Akaso Go App
App Store or Google Play to your smartphone first. When your camera is connected to the AKASO GO app, you can control it to capture, or change the its settings using your phone. You can also live preview, playback, download, edit , and share videos via this app. -
Page 18: Playing Back Your Content
4. Confirm to delete the selected files or all files. 5. To exit the Playback mode, tap the Return icon or press the Mode button. Deleting Files on the AKASO GO App 1. Open the AKASO GO app, then connect it to your camera. -
Page 19: Offloading Your Content
1. Please do not alter Wifi settings or disconnect from the app during the download progress. 2. If you cannot download videos or photos to your iPhone via the app, please enter your phone’s Settings page → Privacy→ Photos, find "AKASO GO", and select "All photos". -
Page 20: Maintaining Your Camera
Maintaining Your Camera Please follow these guidelines to get the best performance from your camera: 1. For best audio performance, shake the camera or blow on the mic to remove debris from the microphone holes. 2. To clean the lens, wipe it with a soft, lint-free cloth. Do not insert foreign objects around the lens. -
Page 21: Remote Control
6. Avoid environments with strong static or magnetic fields; these can compromise the battery’s protective unit, posing safety risks. 7. If the battery emits an odor, overheats, changes color, gets distorted, or exhibits any anomalies, discontinue use and remove it immediately from the camera or the battery charger whether it is being used, charged, or stored. - Page 22 Burst Photo To capture burst photos, first verify the camera is in Burst Photo mode, then press the photo button. The camera will emit a shutter sound indicating the completion of the shot. Time Lapse To capture time lapse photos or videos, first verify the camera is in Time Lapse mode, then press the photo or video button.
- Page 23 3. Lift the PCB board and slide out the battery, as shown in the picture. Note: Do NOT rotate the PCB board to avoid reversing the camera and video button functions. 4. Install the new battery, keeping the “+” pole facing up. 5.
-
Page 24: Mounting Your Camera
Mounting Your Camera Attach your camera to helmets, gear and equipment. Open Close Push Note: Push and make sure that there is no gap between the waterproof strips of the waterproof case. -
Page 26: Contact Us
Contact Us For any inquiries about AKASO products, please feel free to contact us. We will respond within 24 hours. Tel: (888) 466-9222 (US) Email: cs@akasotech.com Web: www.akasotech.com...
Need help?
Do you have a question about the BRAVE 7 LE and is the answer not in the manual?
Questions and answers