Table of Contents
Advertisement
Available languages
Available languages
Advertisement
Chapters
Table of Contents

Related Manuals for Akaso Brave 7


Summary of Contents for Akaso Brave 7
- Page 1 USER MANUAL AKASO Brave 7 Action Camera v1.0...
- Page 2 01 - 23 25 - 46 47 - 69 70 - 92 93 - 115 116 - 138 日本語...
-
Page 3: Table Of Contents
CONTENTS What’s in the Box Your Brave 7 Getting Started Overview of Modes Customizing Your Brave 7 Connecting to the App Playing Back Your Content Deleting Your Content Offloading Your Content Maintaining Your Camera Maximizing Battery Life Battery Storage and Handling... -
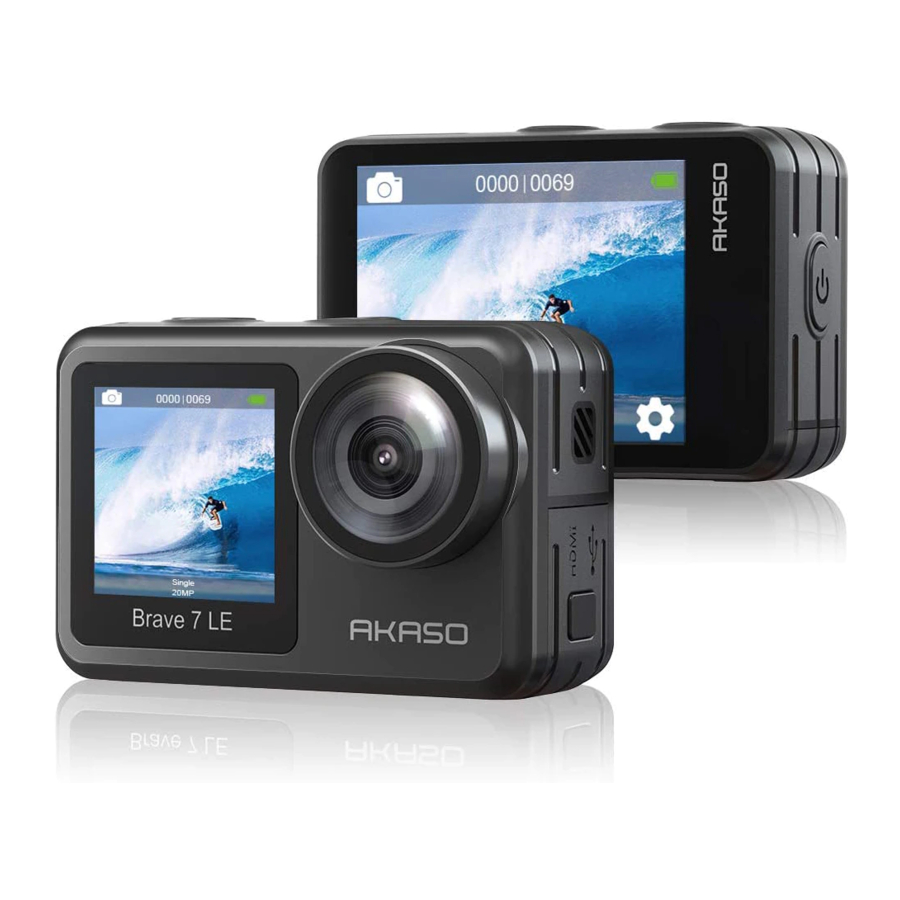
Page 4: What's In The Box
Mount 3 Mount 4 Mount 5 Mount 6 Mount 7 Mount 8 Camera Frame Charger Helmet Mounts USB-C Cable Battery Remote Wrist Strap Tethers Lens Cloth Bandages for Remote Quick Start Guide AKASO Brave 7 Action Camera Quick Start Guide... - Page 5 YOUR BRAVE 7...
- Page 6 Touch Screen Power/Shutter/OK Button Up Button Front Screen Down Button Wifi Indicator Speaker Charging Indicator USB-C Port Working Indicator microSD Slot Battery Door Lens Note: The camera does not record sound when it is in the waterproof case.
- Page 7 01:19:42 Video 4K30 Mode Current Shooting Mode Recording Time/Photos Remaining Battery Status Audio Recording microSD Card Album Settings Swipe down to open Quickmenu You can quickly lock your screen or power off your camera on the Quickmenu. Press the Shutter button to unlock your screen. Lock PowerOff...
- Page 8 Swipe up to open mode settings You can quickly adjust the resolution, EIS and other settings on this shortcut menu. Swipe your finger across the screen to scroll through the options. Resolution 4K30 2.7K30 Average Center Meter Tap the Current Shooting Mode area You can enter the video or photo shortcut menu and switch to different shooting modes by tapping the mode icon.
-
Page 9: Your Brave
GETTING STARTED Welcome to your AKASO Brave 7 Action Camera. To capture videos and photos, you need a microSD card to start recording (sold separately). MicroSD Cards Please use brand name memory cards that meet these requirements: • microSD, microSDHC or microSDXC •... -
Page 10: Overview Of Modes
Turning On and Off Wifi Turn on the camera, press and hold the Up button to turn on Wifi. The Wifi name and password will appear on the screen. Press again the Up button again to turn off Wifi. OVERVIEW OF MODES You can choose different modes from the Video or Photo Shortcut menu when you tap the Current Shooting Mode area on the screen. - Page 11 Long Exposure Long exposure means using a long-duration shutter speed to sharply capture the stationary elements of images while blurring, smearing, or obscuring the moving elements. CUSTOMIZING YOUR BRAVE 7 Video Settings 1. Resolution: 4K30/2.7K30/1080P60/1080P30/720P120/720P60/720P30 Default setting is 4K30. Note: When capturing video at high resolutions or high frame rates in warm ambient temperatures, the camera may become warm and use more power.
- Page 12 3. Video Encode: H.264/H.265 Default setting is H.264. Video encode is basically a process of converting a given video input into a digital format that is compatible with most types of Web players and mobile devices. 4. Loop Recording Time: Off/3 Min/5 Min/7 Min Default setting is Off.
- Page 13 11. Exposure Value: -2/-1/0/+1/+2 Default setting is 0. EV (Exposure Value) is just to measure any change of exposure. This setting is particularly useful in shots where an important region might otherwise be over- or underexposed. 12. White Balance: Auto/Tungsten/Fluorescent/Daylight/Cloudy/Dawn Default setting is Auto.
- Page 14 4. Time Lapse Duration: Close/5 Min/10 Min/15 Min/20 Min/30 Min/60 Min Default setting is Close. 5. Burst Photo: 12M/10M/8M/5M/3M/ Default setting is 12M. 6. Burst Photo Type: 3 shots/5 shots/10 shots/15 shots per second You can adjust the number of burst photos taken per second. 7.
- Page 15 Voice Commands Descriptions AKASO Power Off Camera starts recording video AKASO Video Start Camera stops recording video AKASO Stop Video Camera takes a single photo AKASO Take Photo Turn on Wifi AKASO Wifi On AKASO Turn Off Wifi Turn off Wifi...
- Page 16 Note: 1. If you are recording a video, you must stop recording before issuing a new command. 2. When controlling the action camera using voice commands, • Please speak at a normal speed. No need to deliberately slow down. • Please put stress at the end of the sentence. 2.
- Page 17 8. Auto Low Light: On/Off Default setting is Off. Auto Low Light mode will automatically adjust settings according to lighting conditions to achieve the best low light performance. Even if you move back and forth between bright and dark environments, you do not need to manually adjust the camera settings.
- Page 18 18. Power Frequency: 50Hz/60Hz Default setting is 60Hz. 19. Format Card: Cancel/Confirm To keep your microSD card in good condition, reformat it on a regular basis. Reformatting erases all of your content, so be sure to offload your photos and videos first.
-
Page 19: Connecting To The App
2. Connect the Wifi “Brave 7” and enter the password in your smartphone Wifi setting. 3. Open the AKASO GO app, tap “+” icon on the upper right corner. Add “Brave 7” and click “Live Preview”. - Page 20 Please enter Wi-Fi name and password (Pay attention to capitalization) Brave7_ Please e.. 1234567890 Connecting...
-
Page 21: Playing Back Your Content
5. To exit Album, tap the Return icon. Deleting Files on the AKASO GO App 1. Open the AKASO GO app. Connect the camera with the app. 2. Tap Playback icon to see all the videos and photos. 3. Select the photo or video you want to delete. -
Page 22: Offloading Your Content
file explorer. Offloading Your Content to Smartphone 1. Open the AKASO GO app. Connect the camera with the app. 2. Tap Playback icon to see all the videos and photos. 3. Select the photo or video you want to download and then tap the More icon in the right upper corner, and choose Download. -
Page 23: Maximizing Battery Life
MAXIMIZING BATTERY LIFE If the battery reaches 0% while recording, the camera will save the file and power off. To maximize battery life, follow these guidelines when possible: • Turn off Wireless Connections. • Capture video at lower frame rates and resolutions. •... -
Page 24: Remote
REMOTE You can check the shooting mode, recording status, battery status, SD card status from the screen of the remote. Turn on the Remote Control setting on the camera and press the power button on the remote, it will automatically be connected to the action camera. -
Page 25: Mounting Your Camera
MOUNTING YOUR CAMERA Attach your camera to helmets, gear and equipment. -
Page 26: Contact Us
CONTACT US For any inquiries with AKASO products, please feel free to contact us, we will respond within 24 hours. E-mail: cs@akasotech.com Tel: (888) 466-9222 (US) Mon-Fri (except holiday) 9am-5pm (EST) Official website: www.akasotech.com The microSD, microSDHC, microSDXC and SD marks and logos are trademarks of... - Page 27 INHALT Was ist in der Box Dein Brave 7 Loslegen Übersicht der Modi Anpassen Ihrer Brave 7 Verbindung zur App herstellen Wiedergabe Ihrer Inhalte Löschen Sie Ihre Inhalte Entladen Ihrer Inhalte Wartung Ihrer Kamera Maximierung der Akkulaufzeit Batterielagerung und-handhabung Fernbedienung...
-
Page 28: Was Ist In Der Box
Befestigung 1 Befestigung 2 montieren Befestigung 3 Befestigung 4 Befestigung 5 Befestigung 6 Befestigung 7 Befestigung 8 Kamerarahmen Ladegerät Batterie Fernbedienung Helm Anschlüsse USB-C Kabel Armband für Bandagen Kabel Linsentuch Fernbedienung Quick Start Guide AKASO Brave 7 Action Camera Kurzanleitung... -
Page 29: Dein Brave 7
DEIN BRAVE 7... - Page 30 Einschalt/Shutter/OK-Taste Touchscreen Hoch Taste Frontscheibe Runter Taste Wifi Indicator Lautsprecher Ladestandanzeige USB-C-Anschluss Arbeitsindikator microSD Schlitz Batterietür Linse Hinweis: Die Kamera nimmt keinen Ton auf, wenn sie sich im wasserdichten Gehäuse befindet.
- Page 31 01:19:42 Video 4K30 Modus Aktueller Aufnahmemodus Aufnahmezeit / Verbleibende Fotos Batteriestatus Audio Aufnahme microSD-Karte Album Einstellungen Wischen Sie nach unten, um das Schnellmenü zu öffnen Sie können Ihren Bildschirm schnell sperren oder Ihre Kamera im Schnellmenü ausschalten. Drücken Sie den Auslöser, um den Bildschirm zu entsperren. Lock PowerOff...
- Page 32 Wischen Sie nach oben, um die Einstellungen für den Öffnungsmodus zu öffnen In diesem Kontextmenü können Sie die Auflösung, den EIS und andere Einstellungen schnell anpassen. Wischen Sie mit dem Finger über den Bildschirm, um durch die Optionen zu scrollen. Resolution 4K30 2.7K30...
-
Page 33: Loslegen
LOSLEGEN Willkommen zu Ihrer AKASO Brave 7 Action Kamera. Zum Aufnehmen von Videos und Fotos benötigen Sie eine microSD-Karte, um die Aufnahme zu starten (separat erhältlich). MicroSD-Karten Bitte verwenden Sie Markenspeicherkarten, die diese Anforderungen erfüllen: • microSD, microSDHC oder microSDXC •... -
Page 34: Übersicht Der Modi
Modi wechseln Schalten Sie die Kamera ein und streichen Sie mit dem Finger über den Bildschirm, um zwischen Video- und Fotomodus zu wechseln. Weitere Aufnahmemodi stehen im Kontextmenü zur Verfügung, wenn Sie auf dem Bildschirm auf den Bereich "Aktueller Aufnahmemodus" tippen. Wifi... - Page 35 Standbild Drücken Sie im Standbildmodus den Auslöser, die Kamera nimmt Videos auf und nimmt in bestimmten Intervallen Standbilder auf. Fahrmodus Wenn Sie den Fahrmodus einschalten und die Kamera mit einem Zigarettenanzünder im Auto verbinden, schaltet sich die Kamera automatisch ein, wenn Sie Ihr Auto starten, und aus, wenn Sie Ihr Auto anhalten.
-
Page 36: Anpassen Ihrer Brave 7
ANPASSEN IHRER BRAVE 7 Video-Einstellungen 1. Auflösung: 4K30/2.7K30/1080P60/1080P30/720P120/720P60/720P30 Die Standardeinstellung ist 4K30. Hinweis: Wenn Sie Videos mit hohen Auflösungen oder hohen Bildraten bei warmen Umgebungstemperaturen aufnehmen, wird die Kamera möglicherweise warm und verbraucht mehr Strom. 2. Bildstabilisierung: Aus/Ein Die Standardeinstellung ist Aus. - Page 37 6. Zeitrafferintervall: 0,2 Sek/0,3 Sek/0,5 Sek/1 Sek/2 Sek/5 Sek/10 Sek/30 Sek/1 Min Die Standardeinstellung ist 0,5 Sek. Das Zeitrafferintervall ist die Zeit, die zwischen zwei Aufnahmen in einer Zeitraffersequenz vergeht. 7. Zeitrafferdauer: Schließen/5 Min/10 Min/15 Min/20 Min/30 Min/60 Min Die Standardeinstellung ist Schließen. 8.
- Page 38 14. Szene: Auto/Reiten/Schneeansicht/Nachtszene Die Standardeinstellung ist Auto. 15. Filter: Natürlich/Schwarz&Weiß/Sepia/Retro/Wunderschön/Warm/Code/Rot/ Grün/Blau Die Standardeinstellung ist Natürlich. Fotoeinstellungen 1. Auflösung: 20M/16M/12M/10M/8M/5M. Die Standardeinstellung ist 20M. 2. Selbstauslöser: 1 Sek./3 Sek./5 Sek. /10 Sek./30 Sek Die Standardeinstellung ist 3 Sek. 3. Zeitrafferintervall: 3 Sek./5 Sek./10 Sek./30 Sek./1 Min Die Standardeinstellung ist 3 Sek.
- Page 39 9. Belichtungswert: -2/-1/0/+1/+2 Die Standardeinstellung ist 0. EV (Exposure Value) dient nur zur Messung einer Änderung der Exposition. Diese Einstellung ist besonders nützlich bei Aufnahmen, bei denen ein wichtiger Bereich ansonsten über- oder unterbelichtet sein könnte. 10. Belichtungszeit: Aus/2 Sek./5 Sek./10 Sek./30 Sek./60 Sek Die Standardeinstellung ist Aus.
- Page 40 Wenn Sie die Sprachsteuerung einschalten, wird das Sprachsteuerungssymbol auf dem Bildschirm angezeigt. Sprachbefehle Beschreibungen AKASO Ausschalten Starten Sie die Videoaufnahme AKASO Video Start Stoppen Sie die Videoaufnahme AKASO Video stoppen Mach ein einzelnes Foto AKASO Foto machen AKASO Wifi EIN AKASO Wifi...
- Page 41 4. Angle: 170°/140°/110°/70° Die Standardeinstellung ist 170°. Der Winkel bezieht sich darauf, wie viel der Szene (gemessen in Grad) durch das Kameraobjektiv aufgenommen werden kann. Der Winkel von 170° erfasst den größten Teil der Szene, während der Winkel von 70° den geringsten erfasst. 5.
- Page 42 10. WDR: Ein/Aus Die Standardeinstellung ist Aus. 11. Sprache: English/ Deutsch/Français/ Español/Italiano/日本語/简体中文/繁體中文 12. Datumsformat: YYYY/MM/DD 13. Datum einstellen: Sie können das Datum der Kamera einstellen. 14. Zeit einstellen: Sie können die Zeit der Kamera einstellen. 15. Datumsstempel: Aus/Datum&Uhrzeit/Datum Die Standardeinstellung ist Datum und Uhrzeit. Aktivieren Sie den Datumsstempel.
-
Page 43: Verbindung Zur App Herstellen
Filter und Weißabgleich VERBINDUNG ZUR APP HERSTELLEN Bitte laden Sie die AKASO GO App zuerst im App Store oder bei Google Play herunter und installieren Sie sie. Mit der AKASO GO App können Sie Ihre Kamera mit einem Smartphone oder Tablet fernsteuern. - Page 44 WLAN einzuschalten. Der Wifi-Name und das Passwort werden auf dem Kamerabildschirm angezeigt. 2. Öffnen Sie die AKASO GO App und tippen Sie oben rechts auf das Symbol “+“. Fügen Sie "Brave 7" hinzu und klicken Sie auf "Live Preview". 3. Geben Sie den korrekten WLAN-Namen der Kamera ein und klicken Sie auf “Kamera verbinden“.
-
Page 45: Wiedergabe Ihrer Inhalte
Dateien zuerst auf einen Computer übertragen. Durch das Übertragen wird auch Speicherplatz auf Ihrer microSD-Karte für neue Inhalte frei. Anzeigen von Dateien auf Ihrem Brave 7 Schalten Sie die Kamera ein und tippen Sie auf das Album-Symbol auf der linken Seite des Bildschirms, um das Album aufzurufen. -
Page 46: Löschen Sie Ihre Inhalte
5. Um das Album zu beenden, tippen Sie auf das Symbol “Zurück“. Löschen von Dateien in der AKASO GO App 1. Öffnen Sie die AKASO GO App. Verbinden Sie die Kamera mit der App. 2. Tippen Sie auf das Wiedergabesymbol, um alle Videos und Fotos anzuzeigen. -
Page 47: Wartung Ihrer Kamera
WARTUNG IHRER KAMERA Befolgen Sie diese Richtlinien, um die beste Leistung Ihrer Kamera zu erzielen: 1. Für eine optimale Audioleistung schütteln Sie die Kamera oder blasen Sie auf das Mikrofon, um Schmutz von den Mikrofonlöchern zu entfernen. 2. Um die Linse zu reinigen, wischen Sie sie mit einem weichen, fusselfreien Tuch ab. Führen Sie keine Fremdkörper um das Objektiv ein. -
Page 48: Fernbedienung
• Bewahren Sie Ihre Batterie nicht mit Metallgegenständen wie Münzen, Schlüsseln oder Halsketten auf. Wenn die Batterieklemmen mit Metallgegenständen in Kontakt kommen, kann dies zu einem Brand führen. • Nehmen Sie keine unbefugten Änderungen an der Kamera vor. Dies kann die Sicherheit, die Einhaltung gesetzlicher Vorschriften und die Leistung beeinträchtigen und zum Erlöschen der Garantie führen. -
Page 49: Montage Ihrer Kamera
MONTAGE IHRER KAMERA Befestigen Sie Ihre Kamera an Helmen, Ausrüstung und Geräten. -
Page 50: Kontaktiere Uns
KONTAKTIERE UNS Bei Fragen zu AKASO-Produkten können Sie sich gerne an uns wenden. Wir werden uns innerhalb von 24 Stunden bei Ihnen melden. E-Mail: cs@akasotech.com Offizielle Website: www.akasotech.com Die Marken und Logos microSD, microSDHC, microSDXC und SD sind Marken von... - Page 51 CONTENIDO Qué hay en la caja Su Brave 7 Cómo Comenzar Resumen de Modos Personalizar su Brave 7 Conexión a la APP Reproducción de su contenido Eliminar su contenido Descarga de su contenido Mantenimiento de su cámara Maximizando la vida de la batería Almacenamiento y manipulación de baterías...
-
Page 52: Qué Hay En La Caja
Monte 6 Monte 7 Monte 8 Marco de la cámara Cargador Monturas de casco Cable USB-C Batería Remoto Correa de muñeca Vendajes Ataduras Paño de lente para control remoto Quick Start Guide AKASO Brave 7 Action Camera Guía de inicio rápido... -
Page 53: Su Brave 7
SU BRAVE 7... - Page 54 Pantalla Táctil Botón de Encendido/Obturador/OK Botón Arriba Pantalla frontal Botón Abajo Indicador de Wifi Altavoz Indicador de carga Puerto USB-C Indicador de trabajo Tapa de la batería Ranura microSD Lentes Nota: La cámara no graba sonido cuando está en la carcasa impermeable.
- Page 55 01:19:42 Video 4K30 Modo Modo de disparo actual Tiempo de grabación/Fotos restantes Estado de la batería Grabación de audio Tarjeta microSD Álbum Configuraciones Desliza hacia abajo para encender el menú rápido Puede bloquear rápidamente la pantalla o apagar la cámara en el menú rápido. Presione el botón del obturador para desbloquear la pantalla.
- Page 56 Desliza hacia arriba para encender la configuración del modo Puede ajustar rápidamente la resolución, EIS y otras configuraciones en este menú de acceso directo. Deslice el dedo por la pantalla para desplazarse por las opciones. Resolution 4K30 2.7K30 Average Center Meter Toque el área del modo de disparo actual Puede ingresar al menú...
-
Page 57: Cómo Comenzar
CÓMO COMENZAR Bienvenido a su AKASO Brave 7. Para capturar video y fotos, necesita una tarjeta de micro SD para empezar a grabar (vendida por separado). Tarjeta microSD Por favor use tarjetas de memoria de marca que cumplan con estos requisitos: •... -
Page 58: Resumen De Modos
Modos de Cambio Encienda la cámara, deslice el dedo por la pantalla para cambiar entre el modo de video o foto. Hay más modos de captura disponibles en el menú de acceso directo cuando toca el área Modo de captura actual en la pantalla. Encendido y Apagado de Wifi... -
Page 59: Personalizar Su Brave 7
La exposición prolongada significa usar una velocidad de obturación de larga duración para capturar con nitidez los elementos estacionarios de las imágenes mientras se difuminan, difuminan u oscurecen los elementos en movimiento. PERSONALIZAR SU BRAVE 7 Ajustes de Video 1. Resolución: 4K30/2.7K30/1080P60/1080P30/720P120/720P60/720P30 La configuración predeterminada es 4K30. - Page 60 2. Estabilización de Imagen: Apagado/Encendido La configuración predeterminada es Apagado. Esta configuración ajusta el metraje para compensar el movimiento durante la captura. El resultado es un metraje más fluido, especialmente en actividades con movimiento relativamente pequeño pero rápido, como ciclismo, motociclismo y usos portátiles.
- Page 61 8. Foto fija: 4K30 La configuración predeterminada es 4K30. 9. Tiempo de foto fija: 3 Seg/5 Seg/10 Seg/30 Seg La configuración predeterminada es 3 Seg. La cámara toma fotos automáticamente en un momento específico durante la grabación de video. 10. Grabación de audio: Encendido/Apagado La configuración predeterminada es Encendido.
- Page 62 Configuración de Fotos 1. Resolución: 20M/16M/12M/10M/8M/5M La configuración predeterminada es 20M. 2. Autodisparador: 1 Seg/3 Seg/5 Seg/10 Seg/30 Seg La configuración predeterminada es 3 Seg. 3. Intervalo de lapso de tiempo: 3 Seg/5 Seg/10 Seg/30 Seg/1 Min La configuración predeterminada es 3 Seg. El intervalo de lapso de tiempo es el tiempo que pasa entre dos disparos en una secuencia de lapso de tiempo.
- Page 63 AKASO Power Off AKASO Video Start La cámara comienza a grabar video AKASO Stop Video La cámara deja de grabar video AKASO Take Photo La cámara toma una sola foto AKASO Wifi On Enciende Wifi AKASO Turn Off Wifi Apagar Wifi...
- Page 64 Nota: 1. Si está grabando un video, debe detener la grabación antes de emitir un nuevo comando. 2. Al controlar la cámara de acción mediante comandos de voz. • Por favor habla a velocidad normal. No es necesario reducir la velocidad deliberadamente.
- Page 65 7. Reducción del ruido del viento: Encendido/Apagado La configuración predeterminada es Apagado. Active la reducción de ruido del viento, puede reducir el ruido a un nivel aceptable. 8. Auto Luz baja: Encendido/Apagado La configuración predeterminada es Apagado. El modo Auto Luz baja ajustará automáticamente la configuración según las condiciones de iluminación para lograr el mejor rendimiento con poca luz.
- Page 66 16. Salvapantallas: Apagado/1 Min/3 Min/5 Min La configuración predeterminada es 1 Min. La salvapantalla ayuda a apagar la pantalla después de un período de inactividad para ahorrar batería. Para volver a encender la pantalla, presione cualquier botón o toque la pantalla de la cámara. 17.
-
Page 67: Conexión A La App
1. Encienda la cámara, mantenga presionado el botón Arriba para encender Wifi. El nombre y la contraseña de Wifi se mostrarán en la pantalla de la cámara. 2. Conecte el Wifi "Brave 7" e introduzca la contraseña en la configuración de Wifi de su smartphone . - Page 68 Please enter Wi-Fi name and password (Pay attention to capitalization) Brave7_ Please e.. 1234567890 Connecting...
-
Page 69: Reproducción De Su Contenido
5. Para salir del Álbum, toque el icono Volver. Eliminación de archivos en la aplicación AKASO GO 1. Encende la aplicación AKASO GO. Conecte la cámara con la App. 2. Toque el ícono de reproducción para ver todos los videos y fotos. -
Page 70: Descarga De Su Contenido
Descarga de su contenido a Smartphone 1. Encende la aplicación AKASO GO. Conecte la cámara con la APP. 2. Toque el ícono de reproducción para ver todos los videos y fotos . 3. Seleccione la foto o el video que desea descargar y luego toque el ícono Más en la esquina superior derecha y elija Descargar. -
Page 71: Maximizando La Vida De La Batería
MAXIMIZANDO LA VIDA DE LA BATERÍA Si la batería alcanza el 0% durante la grabación, la cámara guardará el archivo y se apagará. Para maximizar la vida útil de la batería, siga estas pautas cuando sea posible: • Apague las conexiones inalámbricas. •... -
Page 72: Remoto
REMOTO Puede verificar el modo de disparo, el estado de grabación, el estado de la batería, el estado de la tarjeta SD desde la pantalla del control remoto. Active la configuración del control remoto en la cámara y presione el botón de encendido en el control remoto, se conectará... -
Page 73: Montaje De Su Cámara
MONTAJE DE LA CÁMARA Sujete su cámara a cascos, equipos y equipo. -
Page 74: Contáctenos
CONTÁCTENOS Para cualquier consulta sobre los productos AKASO, sin duda en contactarnos, le responderemos dentro de las 24 horas. E-mail: cs@akasotech.com Sitio web oficial: www.akasotech.com The microSD, microSDHC, microSDXC and SD marks and logos are trademarks of SD-3C, LLC. - Page 75 CONTENU Qu'y a-t-il dans la Boite Votre Brave 7 Commencer Vue d'Ensemble des Modes Personnalisation de Votre Brave 7 Connexion à l'Application Repassez votre contenu Supprimez Votre Contenu Déchargez Votre Contenu Entretenez Votre Caméra Maximisez la Durée de Vie de la Batterie Stockage et Manipulation de la Batterie Télésystème...
-
Page 76: Qu'y A-T-Il Dans La Boite
Montage 5 Montage 6 Montage 7 Montage 8 Cadre de la caméra Chargeur Support de casque Cable USB-C Batterie Télécommande Dragonne pour Bandages Attaches Tissu de lentille télécommande Quick Start Guide AKASO Brave 7 Action Camera Guide de Démarrage Rapide... -
Page 77: Votre Brave 7
VOTRE BRAVE 7... - Page 78 Bouton d'Alimentation/Obturateur/OK Écran Bouton Haut Écran Avant Bouton Bas Indicateur de Wifi Diffuseur de Son Indicateur de Charge Port USB-C Indicateur de Travail Fente microSD Porte de Batterie Lentille Remarque: L'appareil photo n'enregistre pas le son lorsqu'il se trouve dans le boîtier étanche.
- Page 79 01:19:42 Video 4K30 Mode Mode de Prise de Vue Actuel Durée d'Enregistrement/Photos Restantes État de la Batterie Enregistrement Audio La Carte microSD Repasser Réglages Balayez vers le bas pour ouvrir le menu rapide Vous pouvez verrouiller rapidement votre écran ou éteindre votre caméra dans le menu rapide.
- Page 80 Balayez vers le Haut pour Ouvrir les Paramètres du Mode Vous pouvez régler rapidement la résolution, l'EIS et d'autres paramètres dans ce menu contextuel. Faites glisser votre doigt sur l'écran pour faire défiler les options. Resolution 4K30 2.7K30 Average Center Meter Appuyez sur la Zone Mode de Prise de Vue Actuel Vous pouvez accéder au menu de raccourcis vidéo ou photo et passer à...
-
Page 81: Commencer
COMMENCER Bienvenue sur votre caméra d'action AKASO Brave 7. Pour capturer des vidéos et des photos, vous avez besoin d'une carte microSD pour démarrer l'enregistrement (vendue séparément). Cartes microSD Veuillez utiliser des cartes mémoire de marque répondant à ces exigences: •... -
Page 82: Vue D'ensemble Des Modes
Modes de Commutation Allumez l'appareil photo, faites glisser votre doigt sur l'écran pour basculer entre le mode vidéo ou photo. D'autres modes de prise de vue sont disponibles dans le menu contextuel lorsque vous appuyez sur la zone Mode de prise de vue actuel à... - Page 83 Photo Fixe En mode photo fixe, appuyez sur le bouton de l'obturateur, l'appareil photo enregistre des vidéos et prend des photos fixes à des intervalles spécifiques. Mode de Conduite Si vous activez le mode conduite et connectez l'appareil photo à un allume-cigare de voiture, l'appareil photo s'allumera automatiquement si vous démarrez votre voiture et s'éteindra si vous arrêtez votre voiture.
-
Page 84: Personnalisation De Votre Brave 7
PERSONNALISATION DE VOTRE BRAVE 7 Paramètres Vidéo 1. Résolution: 4K30/2.7K30/1080P60/1080P30/720P120/720P60/720P30 Le paramètre par défaut est 4K30. Remarque: Lors de la capture vidéo à des résolutions élevées ou à des fréquences d'images élevées dans des températures ambiantes chaudes, la caméra peut devenir chaude et consommer plus d'énergie. - Page 85 6. Intervalle de Temps: 0,2s/0,3s/0,5s/1s/2s/5s/10s/30s/1min Le réglage par défaut est 0,5 sec. L'intervalle de temps est le temps qui s'écoule entre deux prises dans une séquence time-lapse. 7. Durée du Temps Écoulé: Fermé/5 min/10 min/15 min/20 min/30 min/60 min Le paramètre par défaut est Fermé. 8.
- Page 86 14. Mètre: Centre/Moyenne/Spot Le paramètre par défaut est Moyenne. Le mode de mesure fait référence à la manière dont un appareil photo détermine l'exposition. 15. Scène: Auto/Équitation/Vue Neige/Scène de Nuit Le paramètre par défaut est Auto. 16. Filtre: Naturel/Noir Et Blanc/Sépia/Rétro/Magnifique/Chaud/Froid/Rouge/Vert/Bleu Le paramètre par défaut est Naturel.
- Page 87 7. Scène: Auto/Peinture Claire Le paramètre par défaut est Auto. 8. Format de Sortie: JPG/JPEG + PNG Le paramètre par défaut est JPEG. 9. Valeur d'Exposition: -2/-1/0/+1/+2 Le paramètre par défaut est 0. EV (valeur d'exposition) sert uniquement à mesurer tout changement d'exposition. Ce paramètre est particulièrement utile dans les prises de vue où...
- Page 88 Lorsque vous activez la commande vocale, l'icône de commande vocale apparaît à l'écran. Commande Vocale Descriptions AKASO Éteindre AKASO Commencer la Vidéo La caméra commence à enregistrer la vidéo AKASO Arrêter la Vidéo La caméra arrête d'enregistrer la vidéo AKASO Prendre un Photo L'appareil photo prend une seule photo AKASO Wifi...
- Page 89 5. Mode de Plongée: Ouvert/Fermé Le paramètre par défaut est Fermé. Activez le mode plongée, il peut compenser le manque de lumière rouge dans les scènes sous-marines. Le mode plongée est conçu pour être utilisé dans les eaux tropicales et bleues, optimisé pour une utilisation entre 10 et 80 pieds. 6.
- Page 90 11. Langue: English/ Deutsch/Français/ Español/Italiano/日本語/简体中文/繁體中文 12. Format de Date: AAAA/MM/JJ 13. Régler la Date: Vous pouvez régler la date de la caméra. 14. Régler l'heure: Vous pouvez régler l'heure de la caméra. 15. Cachet Date: Fermé/Date et heure/Date Le paramètre par défaut est Date et heure. Activez le cachet de date, cet appareil photo ajoute un cachet de date aux vidéos et aux photos que vous prenez.
-
Page 91: Connexion À L'application
1. Allumez la caméra, appuyez et maintenez le bouton Haut pour activer le Wifi. Le nom et le mot de passe Wifi seront affichés sur l'écran de la caméra. 2. Connectez le Wifi «Brave 7» et entrez le mot de passe dans le paramètre Wifi de votre smartphone. - Page 92 Please enter Wi-Fi name and password (Pay attention to capitalization) Brave7_ Please e.. 1234567890 Connecting...
-
Page 93: Repassez Votre Contenu
5. Pour quitter Album, appuyez sur l'icône Retour. Suppression de Fichiers sur l'application AKASO GO 1. Ouvrez l'application AKASO GO. Connectez la caméra à l'application. 2. Appuyez sur l'icône de lecture pour voir toutes les vidéos et photos. 3. Sélectionnez la photo ou la vidéo que vous souhaitez supprimer. -
Page 94: Déchargez Votre Contenu
Plus dans le coin supérieur droit et choisissez Télécharger. Remarque: Si vous ne pouvez pas décharger de vidéos ou de photos sur iPhone ou iPad, allez dans Paramètres → Confidentialité → Photos, trouvez «AKASO GO» et sélectionnez «Lire et écrire». -
Page 95: Maximisez La Durée De Vie De La Batterie
MAXIMISER LA DURÉE DE VIE DE LA BATTERIE Si la batterie atteint 0% pendant l'enregistrement, l'appareil photo enregistre le fichier et s'éteint. Pour maximiser la durée de vie de la batterie, suivez ces instructions lorsque cela est possible: • Désactivez les connexions sans fil •... -
Page 96: Télésystème
TÉLÉMANIPULATION Vous pouvez vérifier le mode de prise de vue, l'état d'enregistrement, l'état de la batterie, l'état de la carte SD à partir de l'écran de la télécommande. Activez le réglage de la télécommande sur la caméra et appuyez sur le bouton d'alimentation de la télécommande, elle sera automatiquement connectée à... -
Page 97: Montage De Votre Caméra
MONTAGE DE VOTRE CAMÉRA Attachez votre caméra aux casques et aux équipements. -
Page 98: Contactez-Nous
CONTACTEZ-NOUS Pour toute demande concernant les produits AKASO, n'hésitez pas à nous contacter, nous vous répondrons dans les 24 heures. E-mail: cs@akasotech.com Site Officiel: www.akasotech.com The microSD, microSDHC, microSDXC and SD marks and logos are trademarks of SD-3C, LLC. - Page 99 CONTENUTI Cosa c'è nella scatola La Sua Brave 7 Iniziare Panoramica delle modalità Personalizzare la Sua Brave 7 Connessione all'app Riproduzione dei Suoi contenuti Cancellare i Suoi contenuti Scaricare i Suoi contenuti Manutenzione della fotocamera Ottimizzazione della durata della batteria...
-
Page 100: Cosa C'è Nella Scatola
Supporto fisso 6 Cornice della Supporto fisso 7 Supporto fisso 8 Caricabatterie fotocamera Casco Supporto fisso USB-C Cavo Batteria Telecomando Cinghia da polso Pastoie Panno per lenti Bende per telecomando Quick Start Guide AKASO Brave 7 Action Camera Guida Rapida... -
Page 101: La Sua Brave 7
LA SUA BRAVE 7... - Page 102 Pulsante di Scatto/Energia/OK Touch Screen Pulsante Su Schermo anteriore Pulsante Giù Indicatore di Wifi Altoparlanti Indicatore di Carica Porta USB-C Indicatore di Lavoro Slot microSD Porta Della Batteria Lente Nota: La fotocamera non registra il suono quando è nella custodia impermeabile.
- Page 103 01:19:42 Video 4K30 Modalità Modalità di scatto corrente Tempo di registrazionee/Foto rimanenti Stato della batteria Registrazione audio microSD Scheda Album Impostazioni Scorrere verso il basso per aprire Menu rapido È possibile bloccare rapidamente lo schermo o spegnere la fotocamera Menu rapido. Premi il pulsante Otturatore per sbloccare lo schermo.
- Page 104 Scorrere verso l'alto per aprire le impostazioni della modalità È possibile regolare rapidamente la risoluzione, l'EIS e altre impostazioni in questo menu di scelta rapida. Fai scorrere il dito sullo schermo per scorrere le opzioni. Resolution 4K30 2.7K30 Average Center Meter Toccare l'area Modalità...
-
Page 105: Iniziare
INIZIARE Benvenuto nella tua action cam AKASO Brave 7. Per catturare video e foto, è necessaria una scheda microSD per avviare la registrazione (venduta separatamente). MicroSD Schede Utilizzare schede di memoria di marca che soddisfano questi requisiti: • microSD, microSDHC o microSDXC •... -
Page 106: Panoramica Delle Modalità
Accensione e spegnimento del Wifi Accendere la fotocamera, tenere premuto il pulsante Su per accendere Wifi. Il nome e la password Wifi appariranno sullo schermo. Premere nuovamente il pulsante Su di nuovo per disattivare il Wifi. PANORAMICA DELLE MODALITÀ È possibile scegliere diverse modalità dal menu di scelta rapida Video o Foto quando si tocca l'area Modalità... -
Page 107: Personalizzare La Sua Brave 7
Esposizione lunga significa utilizzare una velocità dell'otturatore di lunga durata per catturare nitidamente gli elementi fissi delle immagini sfocando, imbrattando o oscurando gli elementi in movimento. PERSONALIZZARE LA SUA BRAVE 7 Impostazioni Video 1. Risoluzione: 4K30/2.7K30/1080P60/1080P30/720P120/720P60/720P30 L'impostazione predefinita è 4K30. - Page 108 3. Codifica Video: H.264/H.265 L'impostazione predefinita è H.264. La codifica video è fondamentalmente un processo di conversione di un dato ingresso video in un formato digitale compatibile con la maggior parte dei tipi di lettori Web e dispositivi mobili. 4. Tempo di registrazione in loop: Off/3 Min/5 Min/7 Min L'impostazione predefinita è...
- Page 109 10. Registrazione Audio: On/Off L'impostazione predefinita è On. 11. Valore di Esposizione: -2/-1/0/+1/+2 L'impostazione predefinita è 0. EV (Valore di esposizione) è solo per misurare qualsiasi cambiamento di esposizione. Questa impostazione è particolarmente utile negli scatti in cui una regione importante potrebbe altrimenti essere sovraesposta o sottoesposta.
- Page 110 3. Intervallo lasso di tempo: 3 Sec/5 Sec/10 Sec/30 Sec/1 Min L'impostazione predefinita è 3 Sec. L'intervallo lasso di tempo è il tempo che trascorre tra due scatti in una sequenza lasso di tempo. 4. Durata lasso di tempo: off/5 Min/10 Min/15 Min/20 Min/30 Min/60 Min L'impostazione predefinita è...
- Page 111 La fotocamera avvia la registrazione del video AKASO Iniziare Video Camera si ferma la registrazione video AKASO Fermare Video La fotocamera scatta una singola foto AKASO Fare Foto AKASO Wifi Attivo il Wifi Attiva il Wifi AKASO Disattiva il Wifi Disattiva il Wifi...
- Page 112 Nota: 1. Se si sta registrando un video, è necessario interrompere la registrazione prima di emettere un nuovo comando. 2. Quando si controlla la action cam utilizzando i comandi vocali. • Si prega di parlare a velocità normale. Non c'è bisogno di rallentare deliberatamente.
- Page 113 7. Riduzione del rumore del vento: On/Off L'impostazione predefinita è off. Attivare la riduzione del rumore del vento, può abbassare il rumore a un livello accettabile. 8. Luce scarsa automatica: On/Off L'impostazione predefinita è Off. La modalità Luce scarsa automatica regola automaticamente le impostazioni in base alle condizioni di illuminazione per ottenere le migliori prestazioni in condizioni di scarsa illuminazione.
- Page 114 16. Salvaschermo: Off/1 Min/3 Min/5 Min L'impostazione predefinita è 1 Min. Lo salvaschermo aiuta a spegnere il display dopo un periodo di inattività per risparmiare la durata della batteria. Per accendere di nuovo il display, premere un pulsante qualsiasi o toccare lo schermo sulla fotocamera. 17.
-
Page 115: Connessione All'app
1. Accendere la fotocamera, tenere premuto il pulsante Su per accendere Wifi. Il nome e la password Wifi verranno visualizzati sullo schermo della fotocamera. 2. Collegare il Wifi “Brave 7” e inserire la password nel vostro ambiente Wifi smartphone. 3. Aprire l'app AKASO GO, toccare l'icona "+" nell'angolo in alto a destra. - Page 116 Please enter Wi-Fi name and password (Pay attention to capitalization) Brave7_ Please e.. 1234567890 Connecting...
-
Page 117: Riproduzione Dei Suoi Contenuti
5. Per uscire da Album, toccare l'icona Retur. Cancellare i file sul AKASO GO App 1. Aprire l'applicazione AKASO GO. Collegare la fotocamera con l'app. 2. Toccare l'icona Riproduzione per vedere tutti i video e le foto. 3. Selezionare la foto o il video che si desidera eliminare. -
Page 118: Scaricare I Suoi Contenuti
Scarica. Nota: Se non è possibile scaricare i video o le foto su iPhone o iPad, vai a Impostazione → Privacy → Foto, trova "AKASO GO" e selezionare "leggere e scrivere". MANUTENZIONE DELLA FOTOCAMERA... -
Page 119: Ottimizzazione Della Durata Della Batteria
OTTIMIZZAZIONE DELLA DURATA DELLA BATTERIA Se la batteria raggiunge lo 0% durante la registrazione, la fotocamera salverà il file e si spegnerà. Per massimizzare la durata della batteria, segui queste linee guida quando possibile: • Disattivare le connessioni wireless • Cattura video con frame rate e risoluzioni inferiori •... -
Page 120: Telecomando
TELECOMANDO È possibile controllare la modalità di scatto, lo stato di registrazione, lo stato della batteria, lo stato della scheda SD dallo schermo del telecomando. Attivare l'impostazione del telecomando sulla fotocamera e premere il pulsante di accensione sul telecomando, verrà automaticamente collegato alla action cam. Schermo Porta micro USB Pulsante Modalità... -
Page 121: Montaggio Della Fotocamera
MONTAGGIO DELLA FOTOCAMERA Attacca la tua fotocamera a casco, equipaggiamento e attrezzatura. -
Page 122: Contattaci
CONTATTACI Per qualsiasi domanda sui prodotti AKASO, non esitate a contattarci, risponderemo entro 24 ore. E-mail: cs@akasotech.com Sito ufficiale: www.akasotech.com The microSD, microSDHC, microSDXC and SD marks and logos are trademarks of SD-3C, LLC. - Page 123 コンテンツ パッケージ詳細 Brave 7 はじめに モードの概要 Brave 7 のカスタマイズ アプリに接続する コンテンツの再生 コンテンツの削除 コンテンツのオフロード カメラのメンテナンス バッテリー寿命を最大化 バッテリーの保管と取り扱い リモート カメラの取り付け お問い合わせ...
- Page 124 パッケージ詳細 ハンドルバー/ マウント 1 マウント 2 Brave 7 ポールマウント マウント 3 マウント 4 マウント 5 マウント 6 マウント 7 マウント 8 カメラフレーム 充電器 ヘルメッ トマウント USB Type-Cケーブル 充電器 リモート リストストラップ テザー レンズクロス 固定バンド リモート用 Quick Start Guide AKASO Brave 7 Action Camera 取扱説明書...
-
Page 125: Brave 7
BRAVE 7... - Page 126 タッチスクリーン 電源/シャッタ/OKボタン アップボタン フロントスクリーン ダウンボタン Wifiインディケータ スピーカー 充電インジケーター USB Type-Cポート 作業インジケーター バッテリードア microSDスロッ ト レンズ ご注 : 防水ケースを装着する場合は録音できません。...
- Page 127 01:19:42 Video 4K30 ビデオ/写真モード 現在の撮影モード 残りの録画時間/写真の枚数 電量 録音 microSDカード リプレイ 設定 下にスライ ドしてクイックメニューを開く クイックメニューで画面をロックしたり、 カメラの電源を切ったりすることができます。 シャ ッターボタンを押して画面をアンロックします。 Lock PowerOff...
- Page 128 上にスライ ドしてモード設定を開く 解像度、 EISなどの設定を迅速に調整することができます。 画面上でスライドして選択肢を 切り替えます。 Resolution 4K30 2.7K30 Average Center Meter 現在の撮影モードエリアをタップする モードアイコンをタップすると、 動画や写真のショートカッ トメニューに入り、 さまざまな 撮影モードに切り替えることができます。 Video Photo Video Photo Video Slow Mtion Time Lapse Photo Self Timer Burst Photo Time Lapase Long Exposure Wifi Still Photo Driving Mode WiFi 前後スク...
-
Page 129: はじめに
はじめに AKASO Brave 7へようこそ。 ビデオや写真を保存するには、 別売のmicroSDカード一枚を 準備するが必要です。 microSDカード 次の要件を満たすブランド名のメモリカードを使用してください : • microSD, microSDHC or microSDXC • Class 10 またはUHS-I定格 • 最大容量512GB (FAT32) ご注意 : 1. microSDカードを使用する前に、 カメラでフォーマッ トする必要があります。 また、 microSDカードの良好状態に保つために、 定期的に再フォーマッ トすることをおすす めします。 しかし、 再フォーマッ トはSDカードに保存したデータ (ビデオや写真など) を 全て削除しますので、 早目にバックアップしてください。... -
Page 130: モードの概要
モードを切り替える カメラーを起動して、 画面でスワイプすると、 ビデオモードと写真モードを変更できます。 画面上の現在の撮影モードをタップすると、 ショートカッ トメニューはより多くの撮影モー ドを表示されます。 Wifiのオン/オフ カメラーを起動して、 上向きボタンを押してWifiをオンにします。 Wifi名称とパスワードが 画面に表示します。 上向きボタンをもう一度押すとWifiをオフにします。 モード一覧 画面の 「現在の撮影モード」 をタップすると、 ビデオまたは写真のショートカッ トメニュー からさまざまなモードを選択できます。 ビデオ 本体が起動すると、 ビデオモードが表示されます。 ビデオモードには、 シャッターボタンを押すと、 ビデオの録画を開始します。 もう一度シャ ッターボタンを押すと録画を停止します。 上向きボタンまたは下向きボタンをタップして、 ズームレベルを調整できます。 ご注 : 防水ケースを装着する場合は録音できません。 スローモーシ ョン スローモーションビデオモードで、 シャッターボタンを押すと、 カメラがスローモーション ビデオを記録します。 タイムラプス... -
Page 131: Brave 7 のカスタマイズ
写真モードで、 シャッターボタンを押して写真を撮ります。 セルフタイマー セルフタイムモードでは、 シャッターボタンを押してからシャッターが切れるまでに遅延 が生じます。 連写 バーストモードでは、 複数の写真が連続してキャプチャされるため、 動きの速いアクティ ビティのキャプチャに最適です。 タイムラプス タイムラプス写真は、 指定された間隔で一連の写真をキャプチャします。 このモードを 使用してアクティビティの写真をキャプチャし、 後で最適なものを選択します。 長時間露光 長時間露光撮影とは、 シャッタースピードを遅く (シャッターが開いている時間を長く)して 撮影する方法です。 BRAVE 7 のカスタマイズ ビデオ設定 1. ビデオ解像度 : 4K30/2.7K30/1080P60/1080P30/720P120/720P60/720P30 デフォルト設定は4K30fps。 ご注 : 高い温度環境に高解像度、 または高フレームレートでビデオをキャプチャすると、 カメラー本体が暖かくなり、 電力消耗が増加する可能性があります。 2. 画像安定化 : オフ/オン デフォルト設定はオフ。 カメラが内蔵している加速度計がカメラの動きを捉え、 それとビデオのコンテンツをシン... - Page 132 クする。 映像を記録するとき、 カメラが動いたぶんを逆方向に補正します。 特にサイクリン グ、 モーターサイクリング、 ハンドヘルドなどの場合に。 3. ビデオエンコード : H.264/H.265 デフォルト設定はH.264。 ビデオエンコードは基本的に、 特定のビデオ入力をほとんどのタイプのWebプレーヤー およびモバイルデバイスと互換性のあるデジタル形式に変換するプロセスです。 4. ループレコード : オフ/3分/5分/7分 デフォルト設定はオフ。 ループ録画とは SDカードの容量がいっぱいになった際、 自動的に古いファイルから順番 に上書きして録画する機能です。 (大事なデータは随時パソコンなどにバックアップをして ください。 ) 例えば、 ループ録画の設定が 「1分」 の場合、 カメラは1分の長さのビデオクリップを作成し ます。 カメラがより多くのメモリを必要とすると、 1分クリップは削除されます。 5. スローモーシ ョン : 1080P90/1080P60/720P120/720P60 デフォルト設定は1080P90。 スローモーションは、...
- Page 133 11. 露出値 : -2/-1/0/+1/+2 デフォルト設定は0。 EV ( 露出値) は、 露出の変化を測定するためのものです。 この設定は、 重要な領域が露出 オーバーまたは露出アンダーになる可能性があるショッ トで特に役立ちます。 12. ホワイ トバランス : Auto/Tungsten/Fluorescent/Daylight/Cloudy/Dawn 初期設定はAutoです。 13. メーター : センター/平均/スポッ ト デフォルト設定は平均。 測光モードとは、 カメラが露出を決定する方法を指します。 14. シーン : オート/ライディング/スノービュー/ナイトシーン デフォルト設定は自動。 15. フ ィルター : Natural/Black &White/Sepia/Retro/Gorgeous/Warm/Code/Red/Green/ Blue デフォルト設定はNatural。 写真設定 1. 解像度 : 20M/16M/12M/10M/8M/5M デフォルト設定は20M。 2. セルフタイマー...
- Page 134 4. タイムラプス時間 : オフ/5分/10分/15分/20分/30分/60分 デフォルト設定はオフ。 5. バース ト写真 : 12M/10M/8M/5M/3M デフォルト設定は12M。 6. 連写(毎秒) : 3枚/5枚/10枚/15枚 1秒あたりに撮影するバースト写真の数を調整できます。 7. シーン : オート/ライトペインティング デフォルト設定はオート。 8. 出力フォーマッ ト : JPG/JPEG + PNG デフォルト設定はJPEG。 9. 露出値 : -2/-1/0/+1/+2 デフォルト設定は0。 EV ( 露出値) は、 露出の変化を測定するためのものです。 この設定は、 重要な領域が露出 オーバーまたは露出アンダーになる可能性があるショッ トで特に役立ちます。 10. 露光時間 : オフ/2秒/5秒/10秒/30秒/60秒 デフォルト設定はオフ。 11. ホワイ トバランス : Auto/Tungsten/Fluorescent/Daylight/Cloudy/Dawn 初期設定はAutoです。...
- Page 135 14. フ ィルター : Natural/Black &White/Sepia/Retro/Gorgeous/Warm/Code/Red/Green/ Blue デフォルト設定はNatural。 15. 写真レベル : Fine/Normal/Economy デフォルト設定はFine。 システム設定 1. 音声コン トロール : オン/オフ デフォルト設定はオフ。 音声コントロールをオンにすると、 音声コントロールアイコンが画面に表示されます。 音声コマンド 説明 AKASO 電源オフ 録画開始 AKASO ビデオスタート 録画停止 AKASO ビデオストップ 写真を撮る AKASO 写真 Wifiをオンにする AKASO Wifiオン Wifiをオフにする AKASO Wifiオフ メモ : ...
- Page 136 2. サウンド : ボリューム/キートーン/タッチトーン/ブート トーン この設定で、 効果音をオン/オフにしたり、 カメラの音量を調整したりできます。 3. 歪み校正 : オン/オフ デフォルト設定はオフ。 歪みキャリブレーションをオンにすると、 画像の歪みを補正できます。 4. 角度 : 170° /140° /110° /70° デフォルト設定は170° 。 角度とは、 カメラのレンズを通してキャプチャできるシーンの量 (度単位で測定) を指しま す。 170° の角度はシーンの最大量をキャプチャし、 70° の角度は最小の量をキャプチャし ます。 5. ダイビングモード : オン/オフ デフォルト設定はオフ。 ダイビングモードをオンにすると、 水中シーンでの赤信号の不足を補うことができます。 8M本機防水を実現します。 6. リモコン : オン/オフ デフォルト設定はオフ。...
- Page 137 9. ISO : 自動/200/400/800/1600/3200 デフォルト設定は自動。 ISOは、 カメラの光に対する感度を決定し、 明るさと結果として生じる画像ノイズの間のト レードオフを作成します。 画像ノイズとは、 画像のざらつきの度合いを指します。 暗い場所 では、 ISO値を高くすると画像は明るくなりますが、 画像ノイズは大きくなります。 値を小さ くすると画像ノイズは低くなりますが、 画像は暗くなります。 10. WDR : オン/オフ デフォルト設定はオフ。 11. 言語 : English/Deutsch/Français/ Español/Italiano/日本語/简体中文/繁體中文 12. 日付形式 : YYYY/MM/DD 13. 日付設定 : カメラの日付を設定できます。 14. 時間設定 : カメラの時間を設定できます。 15. 日付スタンプ : オフ/日付と時刻/日付 デフォルト設定は日付と時刻。 16. スク リーンセーバー : オフ/ 1分/ 3分/ 5分 デフォルト設定は1分。...
- Page 138 19. カードをフォーマッ ト : キャンセル/確認 microSDカードを良好な状態に保つために、 定期的に再フォーマッ トしてください。 再フ ォーマッ トするとすべてのコンテンツが消去されるため、 最初に写真とビデオをオフロー ドしてください。 20. リセッ ト : キャンセル/確認 このオプションは、 すべての設定をデフォルト値にリセッ トします。 21. SDカード容量 : microSDカードのカード容量と残り容量を確認できます。 22. About : カメラのモデルとソフトウェアバージョンを確認できます。 ご注 : 一部の機能は同時に使用できません。 以下の情報を参照してください。 ビデオフレームレート> 60fps 手ぶれ補正 オートローライト 手ぶれ補正 ダイビングモード フィルターとホワイトバランス...
-
Page 139: アプリに接続する
AKASO GOアプリをインストールしたスマートフォンやタブレッ トが遠距離でカメラリモ ートを制御できます。 オプシ ョン1 : 1. カメラの電源を入れ、 上向きボタンを押してWifiをオンにします。 カメラの画面にはWifi 名とパスワードが表示されます。 2. Wifi 「 Brave 7」 を接続して、 スマートフォンのWLAN設定でパスワードを入力します。 3. AKASO GOアプリを開き、 右上の 「+」 アイコンをタップします。 「 Brave 7」 を追加して、 「ライブプレビュー」 をクリックします。 4. カメラがAKASO GOアプリに接続されます。 オプシ ョン2 : 1. カメラの電源を入れ、 上向きボタンを押してWifiをオンにします。 カメラの画面にはWifi 名とパスワードが表示されます。 2. AKASO GOアプリを開き、 右上の 「+」 アイコンをタップします。 「 Brave 7」 を追加して、... - Page 140 Please enter Wi-Fi name and password (Pay attention to capitalization) Brave7_ Please e.. 1234567890 Connecting...
- Page 141 カメラ、 コンピューター、 テレビ、 スマートフォン、 タブレッ トでコンテンツを再生できます。 コンピュータや互換性のあるテレビなどのデバイスにmicroSDカードを直接挿入して、 コンテンツを再生することもできます。 この方式では、 再生解像度はデバイスの解像度と その解像度を再生する機能に依存します。 ご注 : コンピューターでビデオや写真を再生するには、 予め、 これらのファイルをコンピュ ーターに転送する必要があります。 転送すると、 新しいコンテンツ用にmicroSDカードの スペースも解放されます。 Brave 7でファイルを表示する カメラの電源を入れ、 画面左側の再生ボタンをタップして再生モードに入ります。 再生モードで、 指を画面上でスワイプしてビデオまたは写真ファイルを見ます。 コンテンツの削除 Brave 7 のファイル削除 1. 再生モードに入ります。 microSDカードに大量のデータを保存された場合、 1分間ほど にダウンロードする可能性があります。 2. 画面上で指をスワイプして、 ビデオまたは写真ファイルをスクロールします。 3. 画面の削除アイコンをタップ→削除するファイルを選択→削除アイコンをもう一度タッ プします。 4. 選択したファイルまたはすべてのファイルを削除することを確認します。 5. 再生モードを終了するには、 [キャンセルして戻る]ボタンをタップします。 AKASOアプリのファイル削除 1. AKASO GOアプリを開き、 カメラをアプリに接続します。 2. 再生アイコンをタップして、 すべてのビデオと写真をチェックします。 3. 削除したい写真やビデオを選択します。...
-
Page 142: カメラのメンテナンス
ファイルをコンピューターにオフロードするには、 カードリーダー (別売) が必要です。 microSDカードをコンピューターのUSBポートに挿入してから、 ファイルエクスプローラ でファイルをコンピュータに転送したり、 選択したファイルを削除したり します。 コンテンツをスマートフォンにオフロードする 1. AKASO GOアプリを開き、 カメラをアプリに接続します。 2. 再生アイコンをタップして、 すべてのビデオと写真をチェックします。 3. ダウンロードしたい写真やビデオを選択して、 右上隅にあるその他アイコンをタップし て、 [削除]を選択します。 ご注意 : ビデオや写真をiPhoneまたはiPadにオフロードできない場合は、 設定 → プラ イバシー → 写真 → 「AKASO GO」 → 「読み取りと書き込み」 のステップより操作してくだ さい。 カメラのメンテナンス カメラのパフォーマンスを最大限に引き出すには、 次のガイドラインに従ってください。 1. 最高のオーディオパフォーマンスを得るには、 カメラを振ること、 或いはマイクに息を 吹きかける方法によってマイク穴のホコリを予め取り除いてください。 2. レンズをきれいにするには、 柔らかく糸くずの出ない布でレンズを拭いてください。 レンズの周りに異物を入れないでください。 3. 指でレンズに触れないでください。 4. 内部の部品に損傷を与える可能性がありますので、 カメラを落下や衝撃から離してく... - Page 143 バッテリー寿命の最大化 記録中にバッテリーが0%に達すると、 カメラはファイルを保存して電源を切ります。 バッテリー寿命を最大化するには、 可能な場合は次のガイドラインに従ってください。 • ワイヤレス接続をオフにする。 • より低いフレームレートと解像度でビデオをキャプチャする。 • スクリーンセーバー設定を使用する。 バッテリーの保管と取り扱い カメラには、 バッテリーなどの敏感なコンポーネントが含まれています。 カメラを非常に 低温や高温の環境に置かないでください。 低温や高温の状態では、 一時的にバッテリー の寿命が短くなったり、 正常に動作しなくなったりする可能性があります。 カメラの表面ま たは内部に結露が発生する可能性があるため、 カメラを使用するときは温度や湿度の急 激な変化を避けてください。 • カメラやバッテリーを電子レンジやヘアドライヤーなどの外部熱源で乾燥させないで ください。 カメラ内部の液体との接触によるカメラまたはバッテリーの損傷は、 保証の 対象外です。 • コイン、 鍵、 ネックレスなどの金属物と一緒にバッテリーを保管しないでください。 バッ テリー端子が金属物に接触すると、 火災を起こる可能性があります。 • カメラを不正に改造することは製品の安全性、 規制への準拠、 パフォーマンスに大幅に 影響して、 保証も無効になりますから、 そうしないでください。 警告...
- Page 144 リモート リモコンの画面から、 撮影モード、 記録状態、 電池状態、 SDカード状態を確認できます。 カメラのリモコン設定をオンにして、 リモコンの電源ボタンを押すと、 アクションカメラに 自動的に接続されます。 スクリーン Micro USBポート ビデオ/写真モードボタン シャッターボタン 電源スイッチ 充電 マイクロUSBケーブルを使ってリモコンの右側にあるUSBポートに接続してください。 充電中は赤いインジケータライトが点灯されます、 充電完了すると消えます。...
-
Page 145: カメラの取り付け
カメラの取り付け カメラをヘルメッ ト、 ギア、 装備に取り付けます。... - Page 146 お問い合わせ AKASO製品について何かご不明な点がございましたら、 遠慮なくお問い合わせください。 至急 (24H以内) に対応しております。 Eメール: cs@akasotech.com 公式サイト : www.akasotech.com The microSD, microSDHC, microSDXC and SD marks and logos are trademarks of SD-3C, LLC.
Need help?
Do you have a question about the Brave 7 and is the answer not in the manual?
Questions and answers