Advertisement
Quick Links
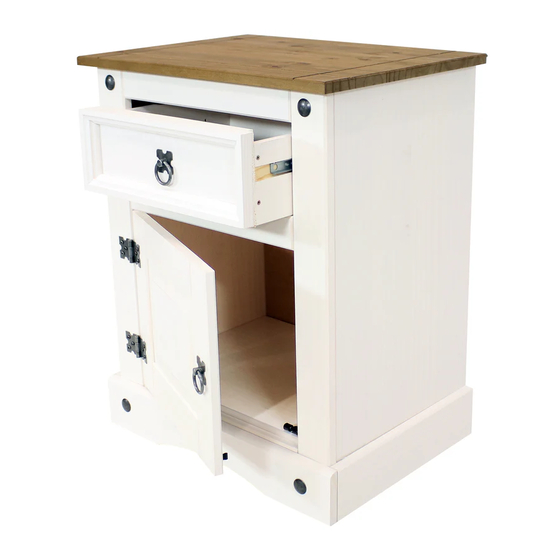
END TABLE CABINET WITH DRAWER
Carefully review assembly and care instructions before using this product. Save this document for future reference.
Assemble components on a soft, clean surface to avoid scratching or damaging the finish.
HELPFUL HINTS
Sunnydaze Decor advises reviewing this manual fully, and assembling the unit soon after purchase.
Check that all parts are accounted for and familiarize yourself with the assembly before beginning.
CL381
Purchase Date:
Thank you for choosing Sunnydaze Decor. We stand behind our brand and the quality of the items we sell.
Replacement parts or products will be sent at our discretion within the 1-year warranty period. Proof of purchase, with
the date of purchase as well as photos of the merchandise defect, must be provided. Photos are used to determine
the cause of defects and for future quality control. Register your warranty at
If you have any questions, comments or concerns, feel free to contact us by phone at 833-982-1977, by email:
customerservice@sunnydazedecor.com, or via our contact us page at
AGR-348
SAVE THIS MANUAL FOR FUTURE REFERENCE.
/
/
Order/Customer Reference Number:
02/2023
https://tiny.cc/SunnydazeWarranty
https://tiny.cc/SunnydazeContact
Inspect packaging to ensure all
parts are accounted for before
disposing of packing materials.
Save the packing slip.
SCAN THIS CODE
WITH YOUR
SMARTPHONE
TO VIEW OUR
ASSEMBLY VIDEO
2-PERSON
ASSEMBLY
Page 1 / 11
Advertisement

Summary of Contents for Sunnydaze Decor AGR-348
- Page 1 Order/Customer Reference Number: Thank you for choosing Sunnydaze Decor. We stand behind our brand and the quality of the items we sell. Replacement parts or products will be sent at our discretion within the 1-year warranty period. Proof of purchase, with the date of purchase as well as photos of the merchandise defect, must be provided.
- Page 2 INTRODUCTION Read the manual carefully to ensure you fully understand all use, care, assembly, and safety information. Assemble on a soft, flat, clean, and Read this manual carefully and dry surface. follow the assembly instructions in the order listed. Pay close Use a soft, protective barrier when attention to assembly diagrams.
-
Page 3: Tools Required
COMPONENTS Seq. Part Name Qty. Left Side Panel Right Side Panel Bottom Panel Bottom Frame Center Face Frame Top Face Frame Drawer Rail Side Trim Board (L/R) Front Trim Board Door Drawer Back Backing Board Divider Drawer Face Drawer Side (L/R) Drawer Bottom Left Stile Right Stile... - Page 4 ASSEMBLY Carefully review all steps and fully understand assembly before beginning. IMPORTANT: Take care not to over-tighten screws as doing so may crack the wood or strip the screw hole, causing a weak connection and reduced stability. STEP 1 02: 1 03: 1 04: 1 05: 1...
- Page 5 STEP 3 IMPORTANT: Ensure the stiles are installed in the correct direction, 18: 1 as indicated in the diagrams. 19: 1 B: 6 Identify the Top and Bottom of the Side Panels (02,03), Left Stile (18) and Right Stile (19); the bottom of the stiles will have a larger gap between the mounting holes and the end of the panel.
- Page 6 STEP 5 Assistance is recommended for this step. 01: 1 09: 2 B: 4 N: 6 Place Top (01) on a flat, clean surface. Align the assembled components with the top and secure using six M4.5x25mm Pan Screws (N). Align two Side Trim Boards (09) with the bottom of the unit, as shown. Have an assistant firmly hold the trim boards in place to ensure they remain flush with the unit while hardware is secured.
- Page 7 STEP 7 B: 6 Front Back IMPORTANT: Ensure the drawer rails are installed in the correct direction, as indicated in the diagrams. Identify the two indents on Drawer Rails (08), the indent with the shortest distance from the edge of the rail must be installed toward the front of the cabinet.
- Page 8 STEP 9 11: 1 D: 1 H: 1 K: 6 Back IMPORTANT: Note the direction of the mounting holes on the hinges and install as shown in the diagram. Do not fully secure Screws (K) until after the door is properly aligned in the next step.
- Page 9 STEP 11 13: 2 14: 1 Place two Backing Boards (13) on the back of the unit and slide Divider (14) between them. Ensure the backing boards are snug beneath the lip of the top and the lips of the side panels. Then, secure the backing board using sixteen 8x8mm Nails (Z).
- Page 10 STEP 13 P: 2 Extend the drawer slides out from the cabinet. Align the first small hole on the drawer slide with the pre-drilled hole on the front of the drawer sides. From the inside of the drawer, secure the drawer to the slides using one M4x8mm Bolt (P) on each side, as shown.
- Page 11 SAFETY STATEMENTS & WARNINGS • Residential use only. Not for commercial or industrial use. • For indoor use only. • Ensure fittings are tight before use. Periodically check fitting to ensure they are tight. • Only use this unit on a flat, level surface. •...


Need help?
Do you have a question about the AGR-348 and is the answer not in the manual?
Questions and answers