Table of Contents
Advertisement
Quick Links
Advertisement
Table of Contents

Subscribe to Our Youtube Channel
Related Manuals for Custom Audio Electronics DP24-42BA


Summary of Contents for Custom Audio Electronics DP24-42BA
- Page 1 PRINTER DP24-42BA External Charger Battery User Manual www.custom.it DP 24/42 BA...
- Page 2 All rights reserved. The reproduction of this manual, either totally or partially, in any form whatsoever, whether it be on paper or through computer processes, is strictly prohibited. Custom Engineering s.r.l. and the resource teams employed in the making of this manual will not be held responsible for any problems arising as a result of improper use of this manual, as they guarantee that the information contained in it has been subjected to careful inspection.
-
Page 3: General Information Regarding Safety
GENERAL INFORMATION REGARDING SAFETY · Read and keep the following instructions. · Observe all warnings and follow all instructions attached to the printer. · Before cleaning the printer, disconnect the feed cable. · Clean the printer with a damp cloth. Do not use liquid or spray products. ·... - Page 4 DESCRIPTION INTRODUCTION The DP24-42B is an extremely simple and functional desktop printer. It is the perfect solution for all industrial, professional and laboratory applications requiring immediate data printout in receipt form: POS, weighing systems, non-fiscal receipts, security, checking and diagnosis. It is equipped with a rapid type 6 wire impact print mechanism which uses ordinary paper in 57.5mm wide rolls.
-
Page 5: Green Led
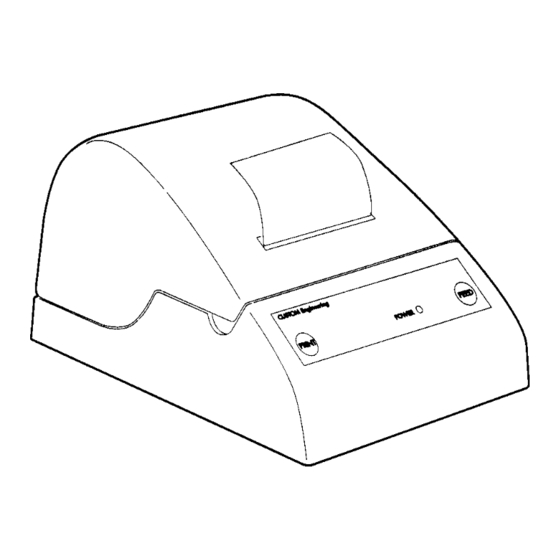
DESCRIPTION Product description The DP24-42B printer consists of a body in ABS equipped with a cover by means of which access is gained to the paper roll and print head. The front part of the printer houses a keyboard equipped with two keys, PRINT and FEED, and one led (POWER ON). - Page 6 DESCRIPTION Technical Specifications. The table below shows the main features of the two printer models: 24 columns and 42 columns. Table 1 Columns Character (W x H mm) Normal 1.7 x 2.6 1.1 x 2.6 Double height 1.7 x 5.2 1.1 x 5.2 Double width 3.4 x 2.6...
-
Page 7: Installation And Use
DESCRIPTION INSTALLATION AND USE Installation procedure • Place the printer on a flat, smooth surface, taking care that there is enough space for normal operations of replacing paper and inked ribbon. • Fit the interface connector, fixing it in place with the screws provided on the printer connector body; Connections Logic The DP24-42 is equipped with an RS232 serial interface (9 pin socket connector). - Page 8 DESCRIPTION Configuration The Dip Switches on the back of the printer are used for configuring the serial communication protocol and some of the default parameters. DIP1 DIP2 DIP3 BAUD Rate 1200 2400 4800 9600 DIP4 Description Transmission protocol RTS/CTS Transmission protocol XON/XOFF DIP5 Description Deactivates transmission of $0D pressing the PRINT key...
-
Page 9: Maintenance
MAINTENANCE Replacing the paper roll To change the paper roll proceed as follows: 1) open the upper cover and place the paper roll in the correct rotation position; 2) insert the end into the print mechanism opening; 3) press the FEED key until a few centimetres of paper comes out of the printer; 4) insert the end into the slot on the printer cover and close the cover. -
Page 10: Printer Functions
PRINTER FUNCTIONS Writing modes The DP24-42B printer has two writing modes, selected by the control characters: NORMAL and REVERSE. The base matrix of the characters is 6 x 10 dots. Characters can be printed in various formats. Graphics Sizes of the graphics dot and of the number of dots per line vary in accordance with the number of columns and are shown in Table 1. - Page 11 PRINTER FUNCTIONS Control characters All the commands for management of the DP24-42B printer functions are listed in the table below (Table 2). Commands may be transmitted to the printer at any time, but they will be carried out only when the characters previously transmitted have been printed or previous commands have been carried out.
- Page 12 PRINTER FUNCTIONS List of Commands ASCII: - / Hex: $00 Small character writing The command $00 is used for setting the print to small characters. If for example double height or double width characters have been set and the user wants to return to small characters, key the code. This command clears the print buffer so it must not be sent immediately after an ASCII string otherwise the string will be cancelled.
- Page 13 PRINTER FUNCTIONS ASCII: - / Hex: $04 Restore normal mode The command $04 is equivalent to command $00. ASCII: - / Hex: $0A Execute a line feed The command $0A carries out a printer line feed. If there are any characters in the line buffer this command executes printing of the buffer itself.
- Page 14 PRINTER FUNCTIONS ASCII: - / Hex: $12 Print time and date This command gives printout of the time and date in the following format: hh : mm dd - mm - yy. Should expanded or double width print be selected (i.e. less than 15 characters per line) only the time will be printed.
- Page 15 PRINTER FUNCTIONS ASCII: ESC N / Hex: $1B $4E Set printing in NORMAL mode The command “ESC” N selects normal mode printing. In this mode the receipt comes out of the printer written upside down and from right to left. On switching on the default value is selected with switch 9 located at the back of the printer.
- Page 16 PRINTER FUNCTIONS ASCII: ESC U / Hex: $1B $55 Insert date (mm-dd-yy) in buffer The command “ESC” U is used for inserting the printer’s built-in real time clock date into the line buffer in American format mm-dd-yy. This command can be used for inserting the date into a sentence without zeroing the line buffer.
- Page 17 PRINTER FUNCTIONS SERIAL INTERFACE RS232. The signals characterizing communication in the serial protocol are RX, TX and RTS if protocol RTS/ CTS has been selected; if protocol XON/XOFF has been selected the signals are TX and RX. DP 24/42 BA...
- Page 18 PRINTER FUNCTIONS Real Time Clock RTCK (optional) The Real Time Clock is available as an optional. Printing and clock setting are managed by means of a series of control characters: Print clock Set clock RTCK serial transmission ESC T Insert time in print buffer ESC D Insert date in print buffer ESC U Insert date (American format) in print buffer.
Need help?
Do you have a question about the DP24-42BA and is the answer not in the manual?
Questions and answers