Advertisement
Available languages
Available languages
Quick Links
Advertisement

Related Manuals for Audio Analogue Bellini Anniversary


Summary of Contents for Audio Analogue Bellini Anniversary
- Page 1 AUDIO ANALOGUE BELLINI Anniversary zero feedback preamplifier MANUALE D’ISTRUZIONI – ITALIANO(p.1/p.12) OWNER’S MANUAL – ENGLISH(p.13/p.24) MANUEL D’UTILISATION – FRANÇAIS(p.25/p.34) BEDIENUNGSANLEITUNG – DEUTSCH(S.35/S.44) Manual rev 1.2ml...
- Page 2 ITALIANO Caro Audiofilo, congratulazioni e grazie per aver scelto il BELLINI Anniversary preamplifier. Nato nel reparto ricerca e sviluppo di Airtech, il BELLINI Anniversary riesce ad ottenere un suono di qualità altissima con un rapporto prezzo/qualità ineguagliato. Caratteristiche costruttive: ...
- Page 3 PREMESSA AF GROUP SRL, proprietaria e produttrice del marchio AUDIO ANALOGUE, non accetta responsabilità nei casi in cui: Le procedure operative di utilizzo e manutenzione dell’apparato descritte nel manuale non siano rispettate. I danni si verifichino in seguito a riparazioni o modifiche dell’apparato eseguite da personale non autorizzato o a seguito di normale deterioramento dell’apparato.
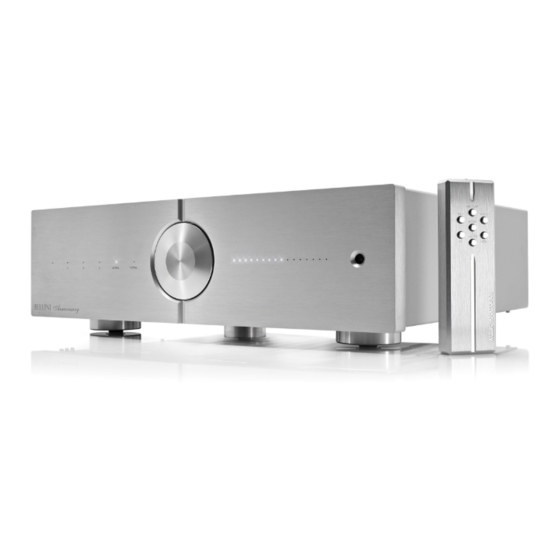
- Page 4 Descrizione del pannello frontale 1 Led di standby (il LED rosso acceso indica apparecchio in standby, il LED spento indica apparecchio in funzione) 2 I cinque LED indicano l'ingresso attivo 3 Pulsante ON/OFF (una breve pressione accende l’apparecchio mentre una pressione di almeno 5 secondi lo spegne), Controllo del volume rotativo, selezione dell'ingresso (premendo per 3 secondi la manopola si ciclano gli ingressi, il cambiamento avviene al rilascio) 4 Indicatori del livello di volume.
- Page 5 Separare l’imballo dalle imbottiture antiurto in schiuma espansa. Scelta del luogo dove collocare il BELLINI Anniversary preamplifier Il BELLINI Anniversary preamplifier è un apparecchio che può generare calore. Per questo motivo è consigliabile posizionarlo dove sia garantita una corretta circolazione d’aria. In particolare, è opportuno garantire uno spazio sufficiente attorno e sopra l’apparecchio (almeno 30cm), ed evitare...
- Page 6 Collegamento del BELLINI Anniversary preamplifier Prima di collegare il BELLINI Anniversary preamplifier alle sorgenti, verificare che tutti gli apparecchi siano scollegati dalla rete elettrica. Per prima cosa, collegare le uscite delle sorgenti audio agli ingressi del BELLINI Anniversary preamplifier che si desiderano utilizzare. Utilizzare solo cavi della migliore qualità.
- Page 7 Note sulle uscite bilanciate Le uscite bilanciate del BELLINI Anniversary accettano connettori conformi alla piedinatura standard dei connettori XLR riportata nella figura sotto. Per evitare il crearsi di loop di massa tra il preamplificatore e l'amplificatore di potenza(che danno luogo a problemi di ronzio) si consiglia di usare sempre cavi bilanciati "veri".
- Page 8 Per andare a cambiare il settaggio di ogni configurazione si dovrà andare ad operare con i tasti del telecomando VOL+ e VOL-, che andranno ad attivare i led della barra del volume corrispondenti al settaggio desiderato. Tutti i settaggi vengono memorizzati nel controllore così da essere richiamati ad ogni accensione. Per tornare al normale funzionamento, continuare a premere il tasto SET fin quando l'amplificatore non esce dalla modalità...
- Page 9 -10,0 -20,0 -30,0 -40,0 -50,0 -60,0 -70,0 -80,0 fig. 3 fig. 4 fig. 5 Regolazione del BALANCE(led ingressi n°3) In questa modalità solo il LED dell’ingresso 3 sarà più luminoso. Questa funzione permette di regolare il bilanciamento fra i due canali. In questa modalità sarà acceso solo il LED dell’ingresso numero 3 mentre la barra dei LED di volume indicherà...
- Page 10 IMPORTANTE = Quando il preamplificatore è in modalità DIRECT il volume è al massimo. FATE ATTENZIONE! Informazioni tecniche Per ricevere informazioni tecniche dettagliate visitate il sito www.audioanalogue.com Specifiche Tecniche Parametro Condizioni di misura Valore Numero di canali: Impedenza di ingresso 47 kΩ...
- Page 11 Distorsione rispetto alla frequenza a 2V e con un carico di 100 kOhm (0,003%) e 600 Ohm (0,02%) FFT ad 1V con un carico di 100 kOhm (blu) e di 600 Ohm (celeste) Risposta in frequenza ad 1 V...
-
Page 12: Ricerca Guasti
Se il prodotto è impiegato a scopi commerciali. Procedere come segue per eliminarlo. Contattare il proprio rivenditore Audio Analogue che fornirà informazioni circa il ritiro del prodotto. Potrebbero essere addebitate le spese di ritiro e riciclaggio. Prodotti piccoli e quantitativi ridotti potranno essere ritirati anche dai centri di raccolta locali. - Page 13 ENGLISH Dear Audiophile, Congratulations and thank you for choosing the BELLINI Anniversary preamplifier. Audio Analogue is proud to introduce you the new born. It has been designed by the Airtech R&D and uses proprietary Airtech technologies. Features Inductive power supply to reduce any AC disturb to the line stage ...
- Page 14 INTRODUCTION AF GROUP SRL, owner and manufacturer of AUDIO ANALOGUE brand does not take any responsibility in the following cases: Whenever the operational procedures related to the use and the maintenance of the equipment as described in this manual are not respected.
- Page 15 Front panel 1 Standby LED (Red light indicates standby, off when the preamplifier is working). 2 Active input indicator. 3 ON/OFF (short push to power ON, 5 seconds push to power OFF), Volume Control (rotate) and input selection (3 seconds push to change, change is at the button release) 4 Volume level indicator 5 IR receiver.
- Page 16 Remote controller description STBY : Turn ON and OFF the preamplifier SETUP : used for special functions, see further MUTE : activates/de-activates the mute function : changes the selected source (increase) : changes the selected source (decrease) ...
- Page 17 Where to place the BELLINI Anniversary preamplifier The BELLINI Anniversary preamplifier is a complex unit that may generate heat. Please locate the unit in a well-ventilated place. In particular, leave at least 30 cm around and above the unit and avoid placing it close to heat sources (radiators, heaters, preamplifiers, television sets).
- Page 18 "true" balanced cables having the ground pin separated from the shield and the cable shield properly connected to the cable connector. Electrical specifications: The maximum signal voltage accepted by the BELLINI Anniversary balanced input is 7 V differential signal.
- Page 19 From the remote control you can go up and down simply pressing the IN+ or IN- respectively. Configuration setting In this section the procedures to set the different BELLINI Anniversary functions are described. The functions are accessed by pressing the remote “SET” button(one single push on SET button to move to the next configuration) When the preamplifier is in “SET MODE”...
- Page 20 Volume scale selection(input led nr.2) In this mode only the LED of input 2 will be brighter and the volume LEDs will show the volume scale currently set. Four different volume scales are available. The four curves are: 1. Volume Scale #1 – This setting is thought for general loudspeaker (fig. 1)(default) 2.
- Page 21 fig. 5 In fig. 5 the volume LEDs for each setting is shown. The default scale is the number 1. To modify the volume scale push the "VOL+" “VOL-“ keys on the remote. BALANCE setting(inputs led nr.3) In this mode only the LED of input 3 will be brighter. This function permits to balance the two channels. In this mode the input LED number three will be ON and the volume LEDs will show the balance currently set.
- Page 22 Technical Data Parameter Measurement conditions Value Channels: Input impedance 47 kΩ Gain unbalanced output 5 dB Gain balanced output 11 dB Frequency Response Attenuation 0dB, -0.5dB band 200 KHz Output Noise Band limits 0Hz-80kHz ≈24 uV Unbalanced output: A-weighted ≈9µV Output Noise Band limits 0Hz-80kHz ≈37 uV...
- Page 23 FFT at 1V , 100 kOhm Load (Blue) and 600 Ohm (Cyan) Frequency response at 1V...
-
Page 24: Troubleshooting
If this product is used for business purposes and you want to discard it: Please contact your Audio Analogue dealer who will inform you about the take-back and recycling. Small products (and small amounts) might be taken back by your local collection facilities. - Page 25 FRANÇAIS Cher audiophile, Félicitations et merci d’avoir choisi BELLINI Anniversary preamplifier. Né dans le département de recherche et développement d’Airtech, le BELLINI Anniversary parvient à obtenir un son de très haute qualité avec un rapport prix/qualité inégalé. Caractéristiques de construction: Alimentation inductive pour réduire toute perturbation provenant du réseau au stade de la ligne...
- Page 26 Anniversary est transporté d’un environnement extrêmement froid à un environnement extrêmement chaud, de la condensation interne pourrait se former, ce qui pourrait provoquer un mauvais fonctionnement. Dans ce cas, attendre au moins une heure avant de réutiliser le Bellini Anniversary pour lui permettre d’atteindre progressivement la température ambiante.
-
Page 27: Description Du Panneau Frontal
DESCRIPTION DU PANNEAU FRONTAL Led de stand-by (le LED rouge allumé indique appareil en stand-by, le LED éteint indique appareil en fonctionnement) Les cinq LED indiquent l’entrée active Bouton ON/OFF (une courte pression allume l’appareil pendant qu’une pression d’au moins 5 secondes l’éteint), Contrôle du volume rotatif, sélection de l’entrée (en appuyant sur le bouton pendant 3 secondes on passe les entrées, le changement se produit à... -
Page 28: Description De La Télécommande
CHOIX DE L’ENDROIT OÙ PLACER LE BELLINI ANNIVERSARY Le BELLINI Anniversary preamplifier est un appareil qui peut générer de la chaleur. Pour cette raison, il est recommandé de le placer là où une bonne circulation d’air est garantie. En particulier, il convient d’assurer un espace suffisant autour et au-dessus de l’appareil (au moins 30 cm), et d’éviter des emplacements... - Page 29 éteint l’amplificateur final. Si vous utilisez le dernier Donizetti avec son câble de déclenchement, cette séquence se produira automatiquement. Le signal de déclenchement est propriétaire, donc la sortie déclencheur du Bellini Anniversary ne doit être relié à rien d’autre que l’entrée déclencheur de l’amplificateur final Donizetti Anniversary.
- Page 30 KOhm. NOTES SUR LES SORTIES ÉQUILIBRÉES Les sorties équilibrées du BELLINI Anniversary acceptent des connecteurs conformes au brochage standard des connecteurs XLR indiqués dans la figure ci-dessous. Pour éviter la création de boucles de masse entre le préamplificateur et l’amplificateur de puissance (qui donnent lieu à des problèmes de bourdonnement), on conseille d’utiliser toujours des câbles équilibrés "vrais".
- Page 31 RÉGLAGE DE LA CONFIGURATION Cette section décrit les différentes procédures pour définir les fonctions qui caractérisent le BELLINI Anniversary. Vous ne pouvez accéder aux fonctions qu’avec la télécommande en utilisant la touche "SET" (une seule pression sur la touche SET pour aller à la configuration suivante). Lorsque l’appareil entre en mode de configuration, les LEDs des entrées indiquent la fonction réglée selon la numérotation suivante: 1.
- Page 32 -10,0 -20,0 -30,0 -40,0 -50,0 -60,0 -70,0 -80,0 fig. 4 fig. 3 fig. 5 RÉGLAGE DE L’ÉQUILIBRE (LED ENTRÉE N°3) Dans ce mode, seule le LED de l’entrée 3 sera plus lumineux. Cette fonction permet de régler l’équilibre entre les deux canaux. Dans ce mode, seule le LED de l’entrée numéro 3 sera allumé, tandis que la barre des LEDs de volume indiquera le réglage d’équilibre actuel.
-
Page 33: Dépannage
La télécommande ne fonctionne pas Distance excessive du panneau frontal de l’appareil ou angle Approcher plus de l’appareil ou changer d’angle incorrect Si les remèdes suggérés ne fonctionnent pas ou si le problème n’est pas listé, contactez votre revendeur Audio Analogue... - Page 34 Si le produit est utilisé à des fins commerciales. Procéder comme suit pour l’éliminer. Contactez votre revendeur Audio analogue qui vous donnera des informations sur le retrait du produit. Les frais de retrait et de recyclage peuvent être facturés. Les petits produits et les petites quantités pourront également être retirés des centres de collecte locaux.
- Page 35 DEUTSCH Liebe Audiophile, lieber Audiophiler, herzlichen Glückwunsch und danke dafür, dass Sie sich für den BELLINI Anniversary Preamplifier entschieden haben. Der BELLINI Anniversary wurde in der Forschungs- und Entwicklungsabteilung von Airtech entwickelt und kann eine sehr hohe Klangqualität erreichen – mit einem unvergleichbaren Preis-Leistungs-Verhältnis.
- Page 36 Alkoholbasis. Wenn der Bellini Anniversary von einer sehr kalten zu einer heißen Umgebung transportiert wird, könnte sich Kondenswasser in seinem Inneren bilden, was Funktionsstörungen verursachen könnte. Wenn das passieren sollte, warten Sie bitte mindestens eine Stunde, bevor Sie den Bellini Anniversary wieder verwenden, damit er die Raumtemperatur allmählich erreichen kann.
- Page 37 BESCHREIBUNG DES VORDERPANELS 1Standby-LED (wenn das rote LED an ist, ist das Gerät im Standby; wenn das LED aus ist, ist das Gerät in Betrieb) 2 Die fünf LEDs zeigen den aktiven Eingang 3 Knopf ON/OFF (ein kurzer Knopfdruck schaltet das Gerät ein, während ein Knopfdruck von mindestens 5 Sekunden es ausschaltet), Dreh-Lautstärkeregler, Eingangswahlschalter (mit einem Druck von 3 Sekunden werden die Eingänge getaktet, beim Loslassen wird der Eingang gewechselt) 4 Anzeigen des Lautstärkeniveaus.
-
Page 38: Beschreibung Der Fernbedienung
Trennen Sie die Verpackung von der stoßfesten Schaumstoffpolsterung. ORT, WO DER BELLINI ANNIVERSARY HINGESTELLT WIRD Der BELLINI Anniversary Preamplifier ist ein Gerät, das Wärme erzeugen kann. Aus diesem Grund wird empfohlen, es an einen gut belüfteten Ort zu stellen. Insbesondere sollen Sie darauf achten, genügend Freiraum um und über dem Gerät (mindestens 30 cm) sicherzustellen, und zu vermeiden, es in die... - Page 39 Geräte vom Stromnetz getrennt sind. Zuerst schließen Sie die Ausgänge der Klangquellen an die Eingänge des BELLINI Anniversary Preamplifier an, die Sie verwenden möchten. Verwenden Sie nur Kabel der besten Qualität. Dann schließen Sie die Ausgänge des BELLINI Anniversary Preamplifier an den Verstärker an.
- Page 40 ANMERKUNG ZU DEN BALANCIERTEN AUSGÄNGEN Die balancierten Ausgänge des BELLINI Anniversary akzeptieren Steckverbinder gemäß der Standard- Pinbelegung der XLR-Steckverbinder, wie das Bild hier unten zeigt. Um die Entstehung einer Erdschleife (die Brummgeräusche verursacht) zwischen dem Vorverstärker und dem Leistungsverstärker zu vermeiden, wird empfohlen, immer „wahre“...
- Page 41 Um die Einstellung jeder Konfiguration zu ändern, sollen die Tasten VOL+ und VOL- der Fernbedienung verwendet werden, die die der gewünschten Einstellung entsprechenden LEDs der Lautstärkeleiste aktivieren werden. Alle Einstellungen werden im Kontroller gespeichert, so dass sie jedes Mal abgerufen werden, wenn das Gerät eingeschaltet wird.
- Page 42 Abb. 5 REGELUNG DER BALANCIERUNG (EINGANG-LED NR. 3) In diesem Modus ist nur das Eingang-LED 3 heller. Mit dieser Funktion kann die Balancierung zwischen den beiden Kanälen geregelt werden. In diesem Modus leuchtet nur das Eingang-LED Nummer 3, während die LEDs der Lautstärkeleiste die aktuelle Einstellung der Balancierung zeigen.
-
Page 43: Technische Daten
Die Fernbedienung funktioniert nicht Vorderpanel des Geräts Nähern Sie sich dem Gerät oder ändern Sie oder nicht korrekter den Winkel Winkel Sollten die empfohlenen Lösungen das Problem nicht beheben oder ist das Problem nicht aufgelistet, wenden Sie sich bitte an Ihren Audio Analogue-Händler. - Page 44 Wenn das Produkt zu gewerblichen Zwecken verwendet wird, entsorgen Sie es, wie folgt: Wenden Sie sich an Ihren Audio Analogue-Händler, der Hinweise über die Rücknahme des Produkts geben wird. Rücknahme- und Recyclingkosten könnten zu Ihren Lasten entstehen. Kleine Produkte und geringe Mengen können auch in den örtlichen Sammelstellen abgegeben werden.
Need help?
Do you have a question about the Bellini Anniversary and is the answer not in the manual?
Questions and answers