Little Giant VCMX-20 Instruction Sheet
Condensate pump
Hide thumbs
Also See for VCMX-20:
- User manual ,
- Installation manual (9 pages) ,
- Owner's manual (25 pages)
Table of Contents
Advertisement
Available languages
Available languages
Quick Links
Franklin electric Co., Inc.
P. O. Box 12010
E N G L I S H
Oklahoma City, OK 73157-2010
405.947.2511 • Fax: 405.947.8720
www.LittleGiantPump.com
CustomerService-WTS@fele.com
EN
This instruction sheet provides you with the information required to safely own and
operate your Little Giant pump. Retain these instructions for future reference.
The Little Giant pump you have purchased is of the highest quality workmanship
and material, and has been engineered to give you long and reliable service.
Little Giant pumps are carefully tested, inspected, and packaged to ensure safe
delivery and operation. Please examine your pump carefully to ensure that no
damage occurred during shipment. If damage has occurred, please contact the
place of purchase. They will assist you in replacement or repair, if required.
Read tHese InstRuCtIons CaReFuLLY BeFoRe atteMptInG to
InstaLL, opeRate, oR seRVICe YouR LIttLe GIant puMp. KnoW
tHe puMp's appLICatIon, LIMItatIons, and potentIaL HaZaRds.
pRoteCt YouRseLF and otHeRs BY oBseRVInG aLL saFetY
InFoRMatIon. FaILuRe to CoMpLY WItH tHese InstRuCtIons
CouLd ResuLt In peRsonaL InJuRY and/oR pRopeRtY daMaGe!
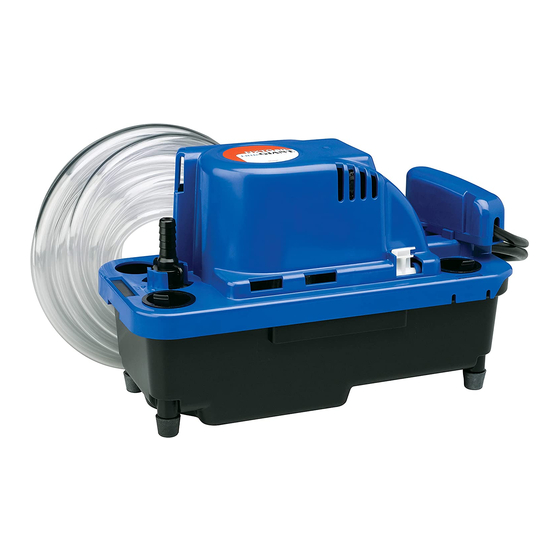
desCRIptIon
The Little Giant VCMX-20 automatically removes condensation from air con-
ditioners, high-efficiency gas furnaces, and condensing boilers. A float/switch
mechanism turns the pump on when approximately 1.6" of water collects in
its tank, and turns the pump off when the tank drains to approximately 1.2". A
safety overflow switch activates when water in the tank rises to approximately
2.2", turning off the thermostat or turning on an alarm (depending upon wiring
configuration).
saFetY GuIdeLInes
•
Do not use to pump flammable or explosive fluids such as gasoline, fuel oil,
kerosene, etc. Do not use in explosive atmospheres. Pump should be used
with liquids compatible with pump component materials.
•
Do not handle pump with wet hands or when standing on a wet or damp
surface, or in water. This pump is supplied with a grounding conductor
and/or grounding type attachment plug. To reduce the risk of electrical
shock, be certain that it is connected to a properly grounded grounding
type receptacle.
•
In any installations where property damage and/or personal injury might
result from an inoperative or leaking pump due to power outages,
discharge line blockage, or any other reason, a backup system(s) and/or
alarm should be used.
•
Support pump and piping when assembling and when installed.
Failure to do so may cause piping to break, pump to fail, motor
bearing failures, etc.
Ensure bracket is level
Assurez-vous que le support est de niveau
Mounting bracket
Asegúrese de que el soporte esté nivelado
Support de montage
Soporte de montaje
Bracket screws
Vis du support
Tornillos para el soporte
STANDARD PUMP • POMPE STANDARD •
BOMBA ANTICONDENSACIÓN
Anti-sweat sleeve
Manchon anticondensation
Manguito anticondensación
Mounting bracket
Support de montage
Soporte de montaje
ANTI-SWEAT PUMP • POMPE ANTICONDENSATION • BOMBA
ANTICONDENSACIÓN
Fig. 1 (en/FR/es)
VCMX-20
Condensate puMp •
poMpe À Condensats •
BoMBa de CondensaCIÓn •
KondensatpuMpe • poMpa
peR La RIMoZIone deLLa
Condensa • CondensaatpoMp
• KondensatpuMpe
ENGLISH
Wall • Mur • Pared
Mounting bracket
Support de montage
Soporte de montaje
Wall • Mur • Pared
Bracket screws
Vis du support
Tornillos para el soporte
CautIon: Do not install this pump where it can be splashed or sprayed.
CautIon: Do not use this pump inside air plenums.
1. Carefully unpack the pump. Using the enclosed mounting bracket, mount
the pump either on the side of the air conditioner/furnace/boiler or on a
nearby wall. (See Figures 10 and 11 for pump dimensions.) The tank has a
mounting slot on each side so it can be positioned either way (Fig. 1). Ensure
that the pump is level and the inlet is below the coil drain. Conduit fittings
are not compatible with the plastic pump housing.
Pumps with an anti-sweat sleeve use a different mounting bracket, but the
mounting location holes are the same and the brackets are interchangeable.
If mounting the pump on a flat surface, install the enclosed 4 rubber feet onto
the bottom of the tank.
2. Fully insert the enclosed check valve into the discharge line, ensuring that
the O-ring and discharge line are free of debris (Fig. 2).
3. Insert the check valve into the pump discharge hole and twist it by hand 1/4
turn (Fig. 3).
A
4. Check to ensure that the valve is securely locked into position (Fig. 4).
eLeCtRICaL ConneCtIons
WaRnInG: All wiring must be performed by a qualified service technician.
Check local electrical and building codes before installation. The installation
must be in accordance with their regulations as well as the most recent National
Electrical Code (NEC).
1. Shut off electrical power at fuse box before making any connections. All
wiring must comply with local codes.
2. Line voltage: Connect power cord to line voltage specified on motor and
nameplate. Power cord must be connected to a constant source of power
(not a fan or other device that runs intermittently). If power cord does not
have a plug, wiring is as follows: green (or green/yellow) is ground, black (or
brown) is line, and white (or blue) is neutral.
1
InstaLLatIon
Fig. 2 (en/FR/es)
Fig. 3 (en/FR/es)
Fig. 4 (en/FR/es)
B
Advertisement
Table of Contents

Subscribe to Our Youtube Channel
Related Manuals for Little Giant VCMX-20


Summary of Contents for Little Giant VCMX-20
- Page 1 Little Giant pump. Retain these instructions for future reference. the bottom of the tank. The Little Giant pump you have purchased is of the highest quality workmanship 2. Fully insert the enclosed check valve into the discharge line, ensuring that and material, and has been engineered to give you long and reliable service.
- Page 2 Inclinez depuis le point le plus haut La pompe Little Giant que vous avez achetée a été fabriquée avec des matériaux Incline hacia abajo desde el punto más alto et une exécution de la meilleure qualité et a été conçue pour vous fournir un service fiable et de longue durée.
-
Page 3: Installation
à leurs règles ainsi qu’à celles du Code national de l’électricité. referencia futura. La bomba Little Giant que compró se fabrica utilizando mano de obra y 1. Coupez l’alimentation électrique au niveau du tableau électrique avant materiales de la más alta calidad y ha sido diseñada para prestarle un servicio d’effectuer toute connexion. -
Page 4: Instalación
El interruptor de seguridad viene de fábrica con las tomas de conexión conectadas a los terminales del interruptor COM La VCMX-20 de Little Giant elimina automáticamente la condensación de y NO. climatizadores y estufas a gas de alta eficiencia y calderas de gas de condensación. -
Page 5: Elektrische Anschlüsse
Pumpen mit Anti-Kondenswassermanschette verwenden eine andere BesCHReIBunG Halterung, die Positionen der Befestigungslöcher sind jedoch gleich, und Die Little Giant VCMX-20 Pumpe entfernt Kondenswasser automatisch die Halterungen sind austauschbar. aus Klimaanlagen und Gasheizkesseln von hohem Leistungsgrad. Ein Wenn die Pumpe auf einer flachen Oberfläche befestigt wird, installieren Sie Schwimmschaltermechanismus schaltet die Pumpe ein, wenn ca. - Page 6 Discharge Line Installation um den Heiz-/Kühlkreislauf abzuschalten. Die COM- und NC-Schalterkontakte auf der gegenüberliegenden Seite des Tanks.) Installation de la ligne d’écoulement können verwendet werden, um einen Niederspannungsalarmkreislauf Instalación de la tubería de descarga (in Serie verbunden) auszulösen, wenn das Wärme-/Kühlsystem nicht unterbrochen werden kann.
-
Page 7: Installazione
Tutti i cablaggi vanno eseguiti da un tecnico di servizio qualificato. Verificare le norme elettriche ed edilizie locali prima dell’installazione. La pompa Little Giant acquistata è della massima qualità dal punto di vista della L’installazione deve avvenire in accordo con i regolamenti e con la più recente lavorazione e dei materiali ed è... - Page 8 5. Controllare le linee di ammissione e di mandata e pulirle se necessario. Accertarsi che non siano presenti attorcigliamenti nelle linee che potreb- Dit instructieblad bevat de informatie die u nodig hebt om uw Little Giant-pomp op bero ostacolare il flusso.
- Page 9 Dette instruktionshæfte indeholder den nødvendige vejledning til sikker mon- (geen ventilator of ander toestel dat cyclisch wordt geactiveerd). Als de tering og anvendelse af Little Giant-pumpen. Opbevar hæftet og brug det som referencemateriale. stroomkabel geen stekker heeft, sluit u de bedrading als volgt aan: groen (of groen/geel) is de aarding, zwart (of bruin) is de stroomleider en wit (of Konstruktionen af og materialerne til denne Little Giant-pumpe er af den højeste...
-
Page 10: Elektriske Tilslutninger
4. Kontroller, at ventilen er korrekt fastmonteret i åbningen (fig. 4). eLeKtRIsKe tILsLutnInGeR adVaRseL: Al installation af elledninger skal udføres af en udlært elektriker i overensstemmelse med de gældende forskrifter. 1. Afbryd strømmen på strømtavlen før ledningstilslutning. Alle ledninger skal opfylde de gældende forskrifter. - Page 11 IteM paRt desCRIptIon • desCRIptIon • desCRIpCIÓn • BesCHReIBunG • desCRIZIone • BesCHRIJVInG • BesKRIVeLse Tank, black, polypropylene • Réservoir, noir, polypropylène • Tanque, negro, polipropileno • Tank, schwarz, polypropylen • Serbatoio, nero, polipropilene • Reservoir, zwart, polypropyleen • Opsamlingsbeholder, sort, 154390 polypropylen Feet, rubber (4 pack) •...
- Page 12 Models with Vibration Dampening Feet and Standard Bracket Modèles avec pieds antivibrations et support standard Modelos con patas amortiguadoras de vibración y soporte estándar Modelle mit vibrationsdämpfenden Füßen und Standardhalterung Modelli con piedini smorza-vibrazioni e staffa standard Modellen met vibratieremmende voetstukken en standaardbeugel Modeller med vibrationsdæmpende fødder og standardbeslag Fig.
- Page 13 Any product that should fail for either of the above two reasons and is still within the EXPRESSE. TOUTES GARANTIES INDUITES (Y COMPRIS, SANS S’Y LIMITER, warranty period will be repaired or replaced at the option of Little Giant as the sole TOUTE GARANTIE INDUITE DE COMMERCIABILITÉ OU D’ADAPTATION À UN remedy of buyer.
- Page 14 Il prodotto Little Giant è garantito in perfette condizioni alla sua uscita dalla 15 voltios. Little Giant ofrece una gama de GFCI y recomienda un GFCI para fabbrica. È garantito da ogni eventuale difetto di materiali e manodopera cada bomba.
- Page 15 BeGRÆnset GaRantI Giant offre una vasta gamma di GFCI e raccomanda l’uso di un GFCI per ogni Dette Little Giant-produkt er med garanti for at være i perfekt stand fra fabrikken. singola pompa. Garantien dækker defekte materialer og konstruktionsfejl i 24 måneder (90 dages garanti på...
- Page 16 Per assistenza tecnica, contattare: Voor technische hulp belt u: Teknisk assistance, kontakt tlf.: + 1 (405) 947-2511 www.LittleGiantpump.com Customerservice-Wts@fele.com Form 998633 - 04/11 © 2011 Franklin Electric Co., Inc. Little Giant® is a registered trademark of Franklin Electric Co., Inc.
Need help?
Do you have a question about the VCMX-20 and is the answer not in the manual?
Questions and answers