Table of Contents
Advertisement
Quick Links
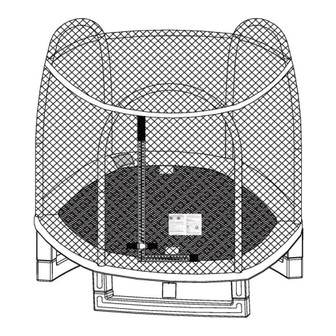
88" MY FIRST TRAMPOLINE WITH ENCLOSURE
Assembly, Installation, Care, Maintenance and Use Instructions
DO NOT attempt somersaults or flips. Paralysis or death can result if you land on your head or neck!
No more than one person on the trampoline at a time. Multiple users increase the risk of injury.
Use trampoline only with mature, knowledgeable adult supervision.
These instructions are for your safety. Please read each of them thoroughly before you
assemble and use this trampoline. Retain this manual for future reference.
Maximum weight of the user shall NOT exceed 100lbs/45kg for this product.
This product is recommended for children between 3-10 years of age.
For Customer Service, please call 1-866-370-2131 or visit www.sportspowerltd.net
Flat M, 3/F, Kaiser Estate Phase 3, 11 Hok Yuen Street, Hunghom, Kowloon, Hong Kong
YSLJZOG1026
USER'S MANUAL
Monday – Friday 9:00 AM – 5:00 PM Eastern Time
Sportspower Ltd.
Corporate Office 1-800-497-6106
Advertisement
Table of Contents

Related Manuals for SPORTSPOWER JUMP ZONE YSLJZOG1026


Summary of Contents for SPORTSPOWER JUMP ZONE YSLJZOG1026
- Page 1 For Customer Service, please call 1-866-370-2131 or visit www.sportspowerltd.net Monday – Friday 9:00 AM – 5:00 PM Eastern Time Sportspower Ltd. Flat M, 3/F, Kaiser Estate Phase 3, 11 Hok Yuen Street, Hunghom, Kowloon, Hong Kong Corporate Office 1-800-497-6106...
- Page 2 Use trampoline only with mature, knowledgeable adult supervision. NO SOMERSAULTS OR FLIPS – No more than ONE user at a time PARALYSIS OR DEATH can result if you (maximum weight - 100 lbs/45 kg). land on your head or neck! Do not use if in a Do not allow Remove all hard...
-
Page 3: Table Of Contents
TABLE OF CONTENTS Use trampoline only with mature, knowledgeable adult supervision. Do not attempt or allow somersaults. Landing on the head or neck can cause serious injury, paralysis, or death, even when landing in the middle of the trampoline. ... -
Page 4: Before You Start To Assemble
Heavy gloves should be used to protect your hands from pinch points during assembly and goggles should be worn to avoid injuries to the eyes. Never modify the construction or the design of the product. Do not use any unauthorized Sportspower parts with this trampoline. ... -
Page 5: Important Safety Instructions
IMPORTANT SAFETY INSTRUCTIONS Use trampoline only with mature, knowledgeable adult supervision. Do not attempt or allow somersaults. Landing on the head or neck can cause serious injury, paralysis, or death, even when landing in the middle of the trampoline. ... - Page 6 IMPORTANT SAFETY INSTRUCTIONS Use trampoline only with mature, knowledgeable adult supervision. Do not attempt or allow somersaults. Landing on the head or neck can cause serious injury, paralysis, or death, even when landing in the middle of the trampoline. ...
- Page 7 IMPORTANT SAFETY INSTRUCTIONS Use trampoline only with mature, knowledgeable adult supervision. Do not attempt or allow somersaults. Landing on the head or neck can cause serious injury, paralysis, or death, even when landing in the middle of the trampoline. ...
- Page 8 Sportspower authorized replacement netting or pad is installed. Please refer to the Trampoline Net & Pad – Maintenance Requirements section contained in this manual for further details.
-
Page 9: Important Instructions For Enclosure Netting And Mat
Official Sportspower replacement nets and padding can be purchased by contacting our authorized customer service by toll free number or email which can be found on the website www.sportspowerltd.net. - Page 10 Replace the enclosure net and pad earlier if there are any signs of wear, tear, brittleness, cracking, stretching or any other signs of weakness. New enclosure netting and pad can be purchased through SPORTSPOWER’S authorized service center (toll-free numbers and email address can be found on our website www.sportspowerltd.net).
-
Page 11: Trampoline And Enclosure Parts List
HARDWARE PARTS LIST Trampoline and Enclosure Parts List Trampoline Key Number Part Picture Description Quantity Trampoline Mat, stitched with Triangle-Rings and Safety Pad Top Rail Corner Top Rail with Socket Vertical Leg Extension Plastic Vertical Leg Extension Plastic Horizontal Leg Base Plastic Flat Plate Galvanized Spring (28N 5 1/2”) Trampoline Safety Instruction... -
Page 12: Hardware Parts List
HARDWARE PARTS LIST Hardware Parts List Key Number Part Picture Description Quantity Screws Arc Washer Spring Lock Washer Self-Locking Screw Cap Nut Tools List Key Number Part Picture Description Quantity Wrench Allen Wrench Spring Loading Tool... -
Page 13: Assembly And Installation Instructions
Before assembly, please ensure that you have all the parts required to assemble the product. If you are missing any parts, please contact our Customer Support agents. Please do not use unauthorized Sportspower parts to assemble the trampoline. This may damage the integrity of the product and will void the manufacturer’s warranty. -
Page 14: Trampoline Frame Assembly
TRAMPOLINE FRAME ASSEMBLY Trampoline Frame Assembly BEFORE YOU BEGIN: Review all steps before assembly and read all precautions before using the trampoline. At least two adults are required to assemble this trampoline. Protective gloves should be used during assembly to avoid pinching by the springs. Goggles should be worn to avoid injuries to the eyes. Step 1 –... - Page 15 TRAMPOLINE FRAME ASSEMBLY Step 2 – Frame Assembly Locate the following 12 pieces of steel tubing parts and 3 sets of Leg Supports (pre-assembled in Step 1) that are needed to assemble the trampoline frame: 6 - Top Rail (# 2) 6 - Corner Top Rails (# 3) 3 - Leg Supports Lay out all the parts on dry flat surface as shown in FIGURE 2.
- Page 16 TRAMPOLINE FRAME ASSEMBLY Step 3 Attach the Corner Top Rail with Socket (# 3) to the Leg Support and then attach the Straight Frame Tube with Foam (# 11) to the Socket on the Corner Top Rail with Socket (# 3) as shown in FIGURE 3. Then secure using the Screw (# A), Arc Washer (# B), Spring Lock Washer (# C), and Cap Nut (# E) as shown in the ENLARGED DIAGRAM in FIGURE 3.
- Page 17 TRAMPOLINE FRAME ASSEMBLY Step 4 At this point, two people will be needed to assemble the trampoline. Complete the Trampoline Frame by inserting all of the Top Rails (# 2) into the Corner Top Rail with Sockets (# 3) as shown in FIGURE 4. Note: Please make sure that the curved section of the Plastic Horizontal Leg Base is facing outward! # 11 # 11...
-
Page 18: Trampoline Mat Assembly
TRAMPOLINE MAT ASSEMBLY Trampoline Mat Assembly To assemble the trampoline mat, you will only need the Spring Loading Tool (# 10) provided with this product. SPRING LOADING TOOL (# 10) Step 5 Slide Trampoline Mat stitched with Triangle-Rings and Safety Pad (#1) through Straight Frame Tube with Foam (#11) to cover the trampoline frame as shown in Figure 5. - Page 19 TRAMPOLINE MAT ASSEMBLY Step 6 Select a starting point on the frame and let it be called point “Zero” (choose a point that is located on the Corner Top Rail with Sockets (# 3)). ZERO (# 1) BOTTOMVIEW OF TRAMPOLINE FIGURE 6...
- Page 20 TRAMPOLINE MAT ASSEMBLY Step 7 – Spring Assembly When attaching the springs, do not place your hands, arms, legs or any other body part close to the connector points (i.e. joints connecting the steel tubes). The connector points can become pinch points as the trampoline springs tighten up.
- Page 21 TRAMPOLINE MAT ASSEMBLY Step 8 – Spring Assembly After you have secured the spring at point “Zero”, attach springs at all Corner Top Rails (# 3) as shown in FIGURE 8. For even distribution of spring tension and ease of assembly, the springs must always be installed on opposite sides of the mat in an alternating manner, i.e.
- Page 22 TRAMPOLINE MAT ASSEMBLY Step 9 – Spring Assembly Attach a spring at every 3 hole interval. For even distribution of tension and ease of assembly, the springs must be placed on opposite sides of the mat in an alternating manner, i.e. 3 then 21, 33 then 15, etc. In addition to the previously installed springs, you should now have springs at 3, 9, 15, 21, 27, and 33 as shown in FIGURE 9.
- Page 23 TRAMPOLINE MAT ASSEMBLY Step 10 Continue to attach the remaining 18 springs in the same manner as the previous step, i.e. the springs must be placed on opposite sides of the mat in an alternating manner to ensure even distribution of tension. The completed trampoline should look as shown in FIGURE 10.
- Page 24 TRAMPOLINE MAT ASSEMBLY Step 11 – Trampoline Safety Placard Attachment Attach Trampoline Safety Instruction Placard (# 9) to the trampoline frame using the strap provided as shown in FIGURE 11. Make sure the strap is looped around the frame to ensure that it does not slide off the trampoline.
-
Page 25: Frame Pad Assembly
SPINNER FLASH LITEZONE ASSEMBLY Frame Pad Assembly Never use the trampoline without the Frame Pad, the Frame Pad reduces the risk of getting injured by hitting the metal frame or springs. Inspect the Frame Pad before each and every use to ensure all exposed metal parts are fully covered by the Frame Pad! STEP 12 Lay the Frame Pad (stitched to the Trampoline Mat) over the trampoline so that the springs and steel frame are... -
Page 26: Trampoline Enclosure Assembly
TRAMPOLINE ENCLOSURE ASSEMBLY Trampoline Enclosure Assembly BEFORE YOU BEGIN: This trampoline should only be used when the enclosure netting is properly assembled. The trampoline netting must be checked thoroughly before each use to ensure there are no tears or damages. Please carefully read all the Important Safety Instructions contained in this manual and all warnings on the product before use. - Page 27 TRAMPOLINE ENCLOSURE ASSEMBLY Step 14 – Assemble the Enclosure Top Frame Attach the Curve Frame Tube with Foam (# 12) to the Top Frame Tube with Foam (# 13) to form an “ARCH” as shown in FIGURE 14, then secure using the Self-Locking Screw (# D). Lay the “ARCH” down on the Mat for further use.
- Page 28 TRAMPOLINE ENCLOSURE ASSEMBLY Step 15 – Assemble the Enclosure Top Frame Lift up the Enclosure Netting over the top of the “ARCH” and attach the assembled “ARCH” to the Straight Frame Tube with Foam (# 11) as shown in FIGURE 15. Repeat for all of the assembled “ARCHES”. Afterwards, pull down the Enclosure Netting evenly over the Straight Frame Tubes with Foam (# 11).
- Page 29 TRAMPOLINE ENCLOSURE ASSEMBLY Step 16 – Assemble the Enclosure Top Frame Line up the elastic straps on the Enclosure Netting (# 14) to the Trampoline Top Rail frame and wrap them BEHIND the Corner Top Rail with Socket (# 3). Tie the elastic straps into a half-knot and then tie it into a one- sided bow as shown in FIGURE 16.
- Page 30 TRAMPOLINE ENCLOSURE ASSEMBLY Step 17 Find the elastic straps located between the leg poles. Pull the longer strap through a Triangle-Ring, then tie the straps into a half-knot and finally into a one-sided bow as shown in FIGURE 17. Triangle-Ring Short Strap Long Strap Long Strap...
-
Page 31: Disassembly Of The Trampoline Enclosure
TRAMPOLINE ENCLOSURE ASSEMBLY Step 18 – Closing the Enclosure Close the zipper which is located at the entrance of the enclosure netting and secure the entrance by connecting the hooks into the D-Rings as shown in FIGURE 18. ENLARGED DIAGRAM FIGURE18 Disassembly of the Trampoline Enclosure To disassemble the trampoline enclosure, simply follow the above instructions in reverse order. -
Page 32: Care And Maintenance
If any part becomes damaged or worn, please stop using the trampoline immediately until this part is replaced with authorized Sportspower parts. Please do not use unauthorized Sportspower parts to assemble the trampoline. This may damage the integrity of the product and can cause injuries during use. ... -
Page 33: Proper Use Instructions
PROPER USE INSTRUCTIONS Proper Use Instructions Read and understand the use instructions in this manual prior to using this product. Failure to do so can result in serious injury or death. Responsibilities of the user The key here is to stay in control of your jumps. DO NOT move onto more complicated, more difficult manoeuvres until you have mastered the basic, fundamental bounce. - Page 34 PROPER USE INSTRUCTIONS Read and understand the use instructions in this manual prior to using this product. Failure to do so can result in serious injury or death. Read all instructions before using the trampoline. Warnings and instructions for the care, maintenance and use of this trampoline are included to promote safe, enjoyable use of this equipment.
-
Page 35: Learning The Fundamental Trampoline Skills
USE INSTRUCTIONS Learning the fundamental trampoline skills The following lessons are suggested for you to learn basic steps and bounces. Before using the trampoline, you should read and understand all safety instructions. A complete discussion and demonstration of body mechanics and trampoline guidelines should occur between the supervisor and student as well. - Page 36 USE INSTRUCTIONS BASIC TRAMPOLINE BOUNCES THE BASIC BOUNCE 1. Start from the standing position, with your feet having shoulder width apart and with head up and eyes on mat 2. Swing arms forward and up in a circular motion 3. Bring feet together while in mid-air and point toes downwards.
-
Page 37: Product Warranty
PRODUCT WARRANTY Product Warranty Sportspower Ltd warrants its products to be free from defects in material and workmanship under normal use and service conditions for ninety (90) days after the date of purchase. Extended warranty from 90 to 180 days will be offered to those customers registering their products at www.sportspowerltd.net within 14 days from the date of purchase. - Page 38 PRODUCT WARRANTY SPORTSPOWER IS NOT RESPONSIBLE OR LIABLE FOR INDIRECT, SPECIAL OR CONSEQUENTIAL DAMAGES ARISING OUT OF OR IN CONNECTION WITH THE USE OR PERFORMANCE OF THE PRODUCT OR OTHER DAMAGES WITH RESPECT TO ANY ECONOMIC LOSS, LOSS OF PROPERTY, LOSS OF REVENUE OR PROFITS, LOSS OF ENJOYMENT OR USE, COST OF REMOVAL, INSTALLATION OR OTHER CONSEQUENTIAL DAMAGES.
Need help?
Do you have a question about the JUMP ZONE YSLJZOG1026 and is the answer not in the manual?
Questions and answers