Table of Contents

Subscribe to Our Youtube Channel
Related Manuals for MAKEiD S1 Pro


Summary of Contents for MAKEiD S1 Pro
- Page 1 MakeID Label Printer-S1 Pro User Manual ——English Packaging List (actual items may vary) 1* Printer 1* User Manual (warranty card and product certificate included) 1* Quick-Start Guide 1*Charging Cable 1* Ordinary White Label Roll (15mm*50mm)
-
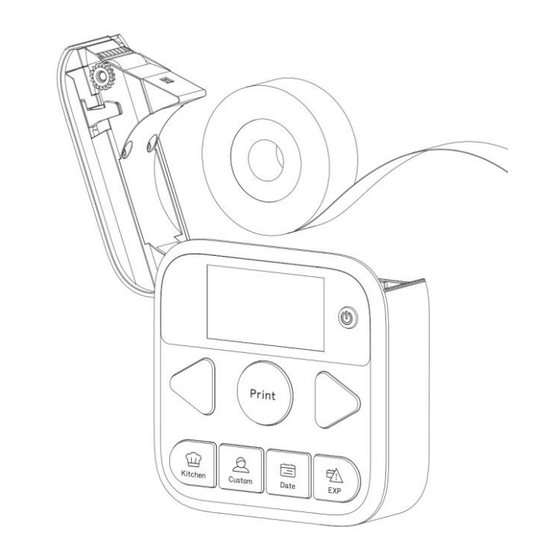
Page 2: Label Roll Installation
User Instructions 1. Label Roll Installation *This printer can only print die-cut labels. Please ensure that you use official MakeID labels, otherwise the printer may be damaged or abnormal printing might occur. Step1. Push the Cover-Open button open and put in the label roll as in the direction shown in the figure with the printable side facing down. -
Page 3: App Download
2. APP Download Scan the QR code to download the APP directly, or you may go to Google Play or APP store to search for「MakeID-Life」APP to download. 3. Button Initial Settings Step1. This label printer is powered by lithium battery. When the battery power is sufficient, long press the Power button for 2 seconds to light up the screen to power on the printer. - Page 4 After selecting the S1 Pro printer theme, search for it. Click on the searched printer and connect. Please connect the printer in the APP. Do not connect it to Bluetooth in the phone system setting. Set the Date button as instructed and select your preferred calendar format in the APP. After successful setting, the default date is the current date’s day.
- Page 5 Set the Kitchen button as instructed in the APP. Then, click on to finish the setting before you can print out the label directly by clicking on the Print button. Such a step is required.‼️...
-
Page 6: Button Usage
Set the Custom button and the Expiry Date button as instructed in the APP. Then, click on to finish the setting before you can print out the label directly by clicking on the Print button. Step3. After successfully setting all the steps above, you can print out the label directly by clicking on the Print button. - Page 7 Step1. 1 , click on the Kitchen button or the Custom button. Step2. 2 , click on the Selection button to select the text. Step3. 3 , click on the Print button to print out the label. Date button Step1. 1 , click on the Date button, Step2.
- Page 8 Expiry Date button Step1. 1 , click on the Expiry Date button. Step2. 2 , click on the Selection button to select preferred expiry date. Step3. 3 , click on the Print button to print out the expiry date label.
- Page 9 5. How to Use the APP * You could also edit the text in the APP to print after the printer is connected by following the steps above. Step1. , the printer is powered on and the label roll has been correctly installed, then connect the printer to the phone in the APP.
- Page 10 Step3. , click on to edit the text, and to change fonts or resize text. Step4. , click on to insert stickers or icons. Step5. , click on to enter the print preview page where you could set print copies. Step6.
-
Page 11: Printer Parameter
6. How to Stick the Label Each label comes with an adhesive on the backside. Tear off the backing paper before sticking it onto any object surfaces. 7. Charging Method The printer is powered by lithium battery with a Type-C input port of 5v=2A charging input; Please use the Type-C charging cable that comes with the printer. - Page 12 Only MakeID official labels can be used for this printer. Thus, please do not use other branded labels as the replacement, as this may cause damage to the printhead and shorten its life.
-
Page 13: Troubleshooting
time. Do not wipe the labels with any cleaning tools that contain alcohol. Thermal inkless printing is a special printing technology. The printings might fade if it is improperly used. We recommend sticking the label in room temperature in dry, flat, and infrequently touched places. - Page 14 Make sure your phone is connected to the Internet. Then, scan the QR code to download the APP directly, or you may go to Google Play or APP store to search for「MakeID-Life」APP to download. 「MakeID-Life」APP download failure Check if「MakeID-Life」APP is correctly downloaded.
-
Page 15: Warranty Policy
Warranty Policy Warranty Period MakeID will provide you with free limited liability repair or product replacement services for 1 year from the date of purchase of this product in the event of a hardware failure on the condition that you have installed and used this product in full accordance with the normal working conditions and methods specified in this user manual. - Page 16 Non-MakeID components are used. Malfunctions or damage due to force majeure such as man-made or natural disasters (e.g. earthquake, fire, etc.) Other malfunctions or damage that is not caused by product quality issues. This policy does not affect your legal rights as a consumer.
Need help?
Do you have a question about the S1 Pro and is the answer not in the manual?
Questions and answers