Table of Contents
Advertisement
Part No. SK 816008
Date: February 23, 2011
MODELS 90, 91, and 94
MANUAL AQUEOUS
PARTS WASHERS
Support Manual
All rights reserved. The information in this document is proprietary and confidential. No part of this
publication may be reproduced, stored in a retrieval system, or transmitted in any form or by any means -
electronic, mechanical, photocopying, recording, or otherwise - without prior written permission of Safety-
Kleen Systems, Inc. and distribution hereof is strictly limited to authorized Safety-Kleen personnel and to
those purchasing the equipment.
Safety-Kleen Systems, Inc.
5360 Legacy Drive, Building 2, Suite 100
Plano, TX 75024
Advertisement
Table of Contents

Related Manuals for safety-kleen 90

Summary of Contents for safety-kleen 90
- Page 1 - electronic, mechanical, photocopying, recording, or otherwise - without prior written permission of Safety- Kleen Systems, Inc. and distribution hereof is strictly limited to authorized Safety-Kleen personnel and to those purchasing the equipment.
-
Page 2: Table Of Contents
Safety-Kleen Systems, Inc. Models 90, 91, and 94 Manual Aqueous Parts Washers TABLE OF CONTENTS Sections Page No. 1.0 INTRODUCTION 2.0 PRODUCT DESCRIPTION 2.1 Applications 2.2 Definitions 2.3 Heater Pump Controller (HPC) & Heater Pump Module (HPM) 3.0 SPECIFICATIONS 3.1 Technical Specifications 3.2 Site Requirements... -
Page 3: Introduction
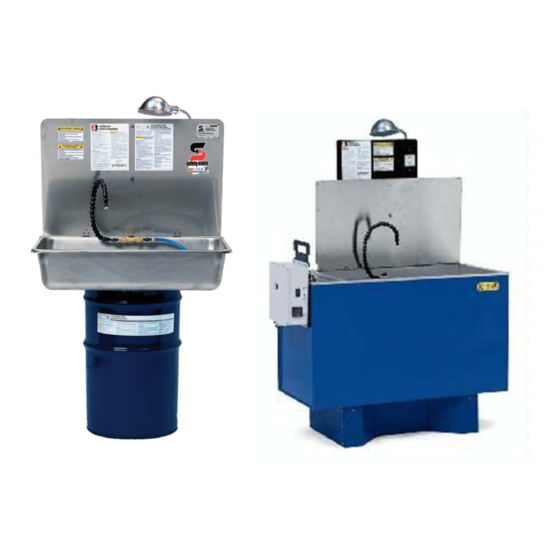
The sink-on-a-drum style parts washer is available in two sizes with the Model 90 using a large stainless steel sink while the Model 94 uses a small painted sink. The Aqueous Vat Parts Washer Model 91 is a large, insulated parts washing tank. -
Page 4: Definitions
Safety-Kleen Systems, Inc. Models 90, 91, and 94 Manual Aqueous Parts Washers 2.2 Definitions TERM DESCRIPTION GFCI The abbreviation GFCI stands for “Ground Fault Circuit Interrupter”. It is a safety device designed to cut the electrical power in the circuit if there is any electrical current leakage to ground. -
Page 5: Specifications
Safety-Kleen Systems, Inc. Models 90, 91, and 94 Manual Aqueous Parts Washers 3.0 SPECIFICATIONS 3.1 Technical Specifications Model 90 Model 94 Model 91 Dimensions Width: 36” (91.4 cm) 31” (78.7 cm) 51” (129.5 cm) Depth: 26” (66.0 cm) 20” (50.8 cm) 24”... -
Page 6: Installation
4.3 Pre-Installation Before installing the Model 90, 94, or 91 at the customer site, use the outlet tester, (SK p/n 250421, Grainger p/n 3T885; Ideal brand p/n 61-035) and verify that the receptacle intended for use is safe and properly wired. Notify the customer if the tester identifies any wire conditions that are not correct as indicated on the tester’s label, and ask that... -
Page 7: Troubleshooting Guide
Safety-Kleen Systems, Inc. Models 90, 91, and 94 Manual Aqueous Parts Washers 6. Connect the hose assembly from the sink to the hose from the pump. 7. Install the lamp assembly. (During repairs of HPM units, avoid reusing the existing lamp to assure integrity of assembly) 8. - Page 8 Reuse the fusible link assembly if it is in suitable condition. • Make sure that the lid moves freely without obstruction and that the Fusible Link standpipe for the Model 90 (SK #2244) or the Model 94 (SK #2144) is in Damage place and the locknut is tight.
-
Page 9: Repair Procedures - Level 1 And
Safety-Kleen Systems, Inc. Models 90, 91, and 94 Manual Aqueous Parts Washers • Check for a loose hose that may be leaking on the floor and re-route if Unit Leaks necessary • If the drum or vat is leaking, replace them as soon as possible. - Page 10 Safety-Kleen Systems, Inc. Models 90, 91, and 94 Manual Aqueous Parts Washers 3. Ensure the pump cord is connected to the control box (top rear) 4. With the unit plugged in, push the GFCI “Reset” button and check for the red indicator light. If there is no light, return the SK #2387 for GFCI replacement.
- Page 11 Safety-Kleen Systems, Inc. Models 90, 91, and 94 Manual Aqueous Parts Washers 4. Remove the volute by turning it counterclockwise. Be careful not to crack the ceramic shaft! 5. Remove the impeller. Thoroughly clean the debris from the impeller, impeller well, and volute.
-
Page 12: Label Placement Drawing
Safety-Kleen Systems, Inc. Models 90, 91, and 94 Manual Aqueous Parts Washers Support Manual Page 12 of 14... -
Page 13: Exploded View
Safety-Kleen Systems, Inc. Models 90, 91, and 94 Manual Aqueous Parts Washers Support Manual Page 13 of 14... -
Page 14: Model 2387
Safety-Kleen Systems, Inc. Models 90, 91, and 94 Manual Aqueous Parts Washers Support Manual Page 14 of 14...
Need help?
Do you have a question about the 90 and is the answer not in the manual?
Questions and answers