Table of Contents
Advertisement
Quick Links
Advertisement
Table of Contents

Related Manuals for Gaggenau CMP270111+


Summary of Contents for Gaggenau CMP270111+
- Page 1 Instruction manual CMP 250 Fully Automatic Espresso Machine...
-
Page 2: Table Of Contents
Accessories Additional information on products, accessories, Switching the appliance on and off replacement parts and services can be found at Main switch www.gaggenau.com and in the online shop Hibernate mode www.gaggenau.com/zz/store Activating the appliance Setting up the appliance Initial settings... -
Page 3: Intended Use
Intended use Intended use Important safety information C heck the appliance for damage after I n t e n d e d u s e unpacking it. Do not connect the appliance if it P lease read carefully, follow and retain the I m p o r t a n t s a f e t y i n f o r m a t i o n has been damaged in transport. -
Page 4: E Nvironmental Protection
Environmental protection Warning – Hazard due to magnetism! E nvironmental protection The appliance contains permanent magnets which may affect electronic implants, e.g. heart S aving energy pacemakers or insulin pumps. Persons wearing E n v i r o n m e n t a l p r o t e c t i o n electronic implants must maintain a minimum ▯... -
Page 5: Familiarising Yourself With Your Appliance
Familiarising yourself with your appliance Familiarising yourself with your appliance U se this section to familiarise yourself with your new F a m i l i a r i s i n g y o u r s e l f w i t h y o u r a p p l i a n c e appliance. -
Page 6: Assembly And Components
Familiarising yourself with your appliance Assembly and components... -
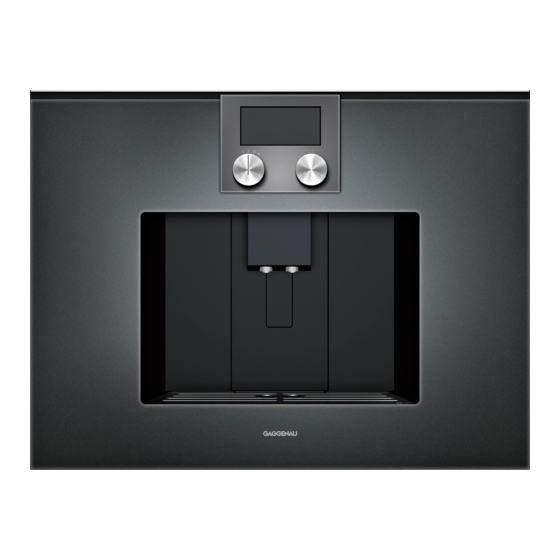
Page 7: Display And Operating Controls
Familiarising yourself with your appliance Function selector positions Display and controls Shelf, e.g. for a cup Water tank with cover Accessory drawer (for quick reference guide and accessories) Bean container Grinding level adjustment Magnetic holder (for milk hose connecting element) Ground coffee drawer Protective cover (for brewing unit) Position... -
Page 8: Colours And Display
Familiarising yourself with your appliance Colours and display Additional information Colours By touching the symbol you can call up additional information. The different colours are used to guide the user in the relevant setting situations. During operation you will for example receive information about the number of beverages dispensed previously. -
Page 9: Accessories
Switching the appliance on and off Accessories Switching the appliance on and off The fully automatic espresso machine has a drawer for storing accessories such as the quick reference guide M ain switch or measuring spoon inside the appliance. After opening S w i t c h i n g t h e a p p l i a n c e o n a n d o f f the door, you can use the magnetic holder and the clip for the individual parts, such as the milk hose set. -
Page 10: Hibernate Mode
– settings" on page 20 – In Basic settings, you can select whether the Gaggenau logo is to be displayed during hibernate Switch on the appliance at the main switch. "Basic settings" on page 20 mode. ~ The preset language appears in the display. -
Page 11: Setting The Water Hardness
Water filter Setting the water hardness Water filter It is important to set the water hardness correctly so that the appliance indicates in good time when the O peration with or without a water descaling programme should be run. The preset water W a t e r f i l t e r hardness is level 4. -
Page 12: Inserting The Water Filter
Filling the water tank and bean container Inserting the water filter Filling the water tank and bean New water filters must always be rinsed after being container fitted. Rotate the function selector to S. U sing your appliance, you can prepare coffee using Select "Water filter change"... -
Page 13: Preparing Beverages
Preparing beverages You may be able to select further options depending on Preparing beverages your choice of beverage: ¦ Size Small - Medium - Large - Very large B everage selection ˆ Strength Very mild - Mild - Medium - Strong - P r e p a r i n g b e v e r a g e s Very strong - Extra strong etc., not Notes... -
Page 14: Preparing Coffee Using Freshly Ground Beans
Preparing beverages Preparing coffee using freshly ground Set the temperature using the rotary selector. beans The appliance must be switched on. The water tank and bean container must be filled. Rotate the function selector to position 2. ™ 10 Press to confirm the settings. -
Page 15: Preparing Coffee Using Ground Coffee
Preparing beverages Preparing coffee using ground coffee Preparing a coffee with milk Warning – Risk of burns! The appliance must be switched on and the water tank must be filled. The milk system becomes very hot. After use, allow it to cool down first before touching it. -
Page 16: Preparing Milk Froth And Warm Milk
Preparing beverages Preparing milk froth and warm milk Using a milk carton or other container: ▯ Open the door. Warning – Risk of burns! ▯ Push the beverage dispenser down completely. The milk system becomes very hot. After use, allow it to ▯... -
Page 17: Setting The Grinding Level
Preparing beverages Changing bean type Notes & – While the beverage is dispensed, the symbol is If you are using a new type of bean, the Empty grind displayed. Touch this symbol to stop the beverage function allows you to run the grinding unit until empty being prepared. -
Page 18: Individual Beverages
Individual beverages Press I to start. Individual beverages Depending on the beverage selected, the beans will be ground first, then the milk prepared and finally the coffee brewed. Y ou can define and save instructions for up to I n d i v i d u a l b e v e r a g e s 8 individual beverages. -
Page 19: Child Lock
Child lock Child lock T he appliance has a child lock to prevent children C h i l d l o c k operating it accidentally. Notes – You must set the child lock to "Available" in Basic "Basic settings" on page 20 settings. -
Page 20: Basic Settings
Basic settings Basic settings Y our appliance can be individually adjusted in the basic Touch the symbol. B a s i c s e t t i n g s settings. Set the basic setting using the rotary selector. Turn the function selector to S. ™... - Page 21 Basic settings Weight unit g*/oz. Set the weight unit "Setting Setting for weight detection. ~ Milk container weight Standard*/Individual the milk container weight" on page 22 Language German* / French / Italian / Spanish / Select language for text display Portuguese / Dutch / Danish / Swedish Note: / Norwegian / Finnish / Greek / Turkish...
-
Page 22: Setting The Milk Container Weight
Basic settings Setting the milk container weight Messages Using the weight, the appliance detects the quantity of Depending on the setting in "Basic settings" or when milk in the milk container to ensure that there is always dispensing a beverage with milk, various reminders or sufficient milk to dispense e.g. -
Page 23: Daily Care And Cleaning
Daily care and cleaning Daily care and cleaning Not dishwasher-safe: Shelf Accessory drawer D aily maintenance Water tank with cover D a i l y c a r e a n d c l e a n i n g Every time the appliance is switched on or switched to Beverage dispenser cover 0, it rinses automatically. -
Page 24: Cleaning The Milk System
Daily care and cleaning Cleaning the milk system Cleaning the milk system manually Take the milk system apart to clean it: The milk system is automatically cleaned with a short jet of steam directly after preparing a milk drink. Push the beverage dispenser down completely and pull the cover forwards to remove. -
Page 25: Cleaning The Brewing Unit
Daily care and cleaning Firmly attach the beverage dispenser straight from 10 Remove the cover and clean the filter under running the front onto the three connections. water. Replace the cover. Cleaning the milk container For reasons of hygiene the milk container must be cleaned regularly. -
Page 26: Service Programmes
Service programmes – At the end of a service programme, wipe down the Service programmes appliance using a soft, damp cloth to immediately remove any descaler residue. This residue may cause corrosion. ( Also see the quick reference guide) S e r v i c e p r o g r a m m e s –... -
Page 27: Descaling
Service programmes Descaling Cleaning and descaling Duration: approx. 21 minutes Duration: approx. 26 minutes Turn the function selector to S. The cleaning and descaling programme combines the individual cleaning and descaling functions. If the two Select "Descaling programme" using the rotary programmes are both due at around the same time, the selector. -
Page 28: Emptying Programme
Emptying programme 13 Touch the I symbol. Emptying programme The programme will run for approx. 7 minutes and rinse the appliance. 14 Empty and replace the drip tray. T he emptying programme is a service programme which E m p t y i n g p r o g r a m m e ™... -
Page 29: Simple Troubleshooting
Simple troubleshooting Simple troubleshooting S i m p l e t r o u b l e s h o o t i n g Problem Cause Remedial action The personally selected capacity is not Grinding level is too fine. The Adjust the grinding level to a coarser setting. - Page 30 Simple troubleshooting Problem Cause Remedial action There is water under the drip tray. This is condensation. Do not insert the drip tray without the cover. Display screen "Milk container con- Container is outside the range of Position the container at the right-hand edge. nected?"...
-
Page 31: Technical Data
Simple troubleshooting Technical data Electrical connection 220–240 V ~, (voltage – frequency) 50 / 60 Hz Power rating 1600 W Maximum static pump pressure 19 bar Maximum capacity of the water tank 2,4 l (without filter) Maximum capacity of the coffee 500 g bean container Length of the power cable 1,7 m Dimensions (H x W x D) 455 x 590 x 444 mm...
Need help?
Do you have a question about the CMP270111+ and is the answer not in the manual?
Questions and answers