Advertisement
Quick Links
GLOBAL PROCUREMENT AND MARKETING LIMITED
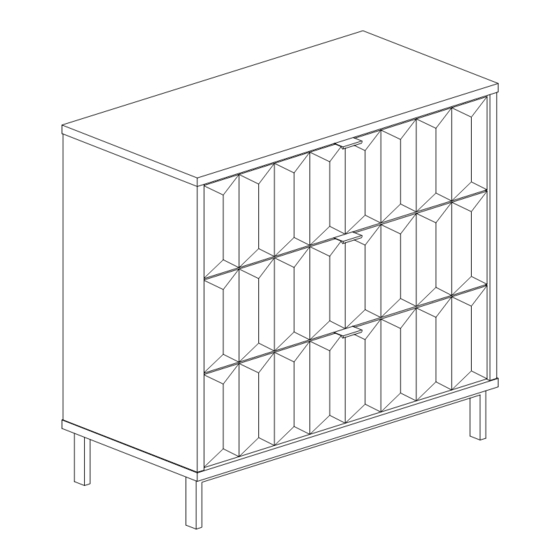
SIENA 3 DRAWER CHEST
Assembly Instructions – Please keep for future reference
Dimensions
No. people
Width: 79.8cm
Depth: 40cm
Height: 74.6cm
Important – Please read these instructions fully before starting assembly
If you need help or have damaged or missing parts, please email aftersales@gpmfurniture.co.uk
Assembly Time
30 mins
00000 / 00000
00000 / 00000
(approx.)
1
OW #
CHTSIE3WT
CHTSIE3GY
Advertisement

Related Manuals for GPM SIENA CHTSIE3WT


Summary of Contents for GPM SIENA CHTSIE3WT
- Page 1 GLOBAL PROCUREMENT AND MARKETING LIMITED SIENA 3 DRAWER CHEST Assembly Instructions – Please keep for future reference CHTSIE3WT CHTSIE3GY Dimensions No. people Assembly Time OW # Width: 79.8cm 30 mins 00000 / 00000 Depth: 40cm 00000 / 00000 (approx.) Height: 74.6cm Important –...
- Page 2 Safety and Care Advice Important – Please read these instructions fully before starting assembly ● ● ● Check you have all the Make sure you have enough Assemble on a soft, level components and tools listed space to lay out the parts surface to avoid damaging the on pages 4 and 5.
-
Page 3: Exploded View
If you have damaged or missing components, email: aftersales@gpmfurniture.co.uk Exploded View... - Page 4 If you have damaged or missing components, Components - Panels email: aftersales@gpmfurniture.co.uk Please check that you have all the components listed below before constructing your item. Part No Description Size(mm) Thickness(mm) Top panel 798*400 Bottom panel 798*400 Left side panel 600*397 Right side panel 600*397...
-
Page 5: Components - Fixings
If you have damaged or missing components, email: aftersales@gpmfurniture.co.uk Components - Fixings Please check that you have all the components listed below before constructing your item Note: The quantities below are the correct amount to complete the assembly. In some cases more fittings may be supplied than are required. - Page 6 If you have damaged or missing components, Assembly Instructions email: aftersales@gpmfurniture.co.uk Step 1 1. Press cam into pre-drilled hole with the arrow 2 . Push the bolt all the way into the side hole. pointing toward the side hole. ( see 6 O'clock. ) Step 2...
- Page 7 If you have damaged or missing components, Assembly Instructions email: aftersales@gpmfurniture.co.uk Step 3 3 . With all cam & bolts installed align and push the 4 . Turn cam clockwise to tighten. Secure connection panels together - NO GAPS by turning arrow on the cam to 2 O'clock to ( MAKE SURE PANELS HAVE NO GAPS ) smoothly lock panels together.
- Page 8 If you have damaged or missing components, Assembly Instructions email: aftersales@gpmfurniture.co.uk Step 5 First Second Step 6 Warning label on reverse...
- Page 9 If you have damaged or missing components, Assembly Instructions email: aftersales@gpmfurniture.co.uk Step 7 Step 8...
- Page 10 If you have damaged or missing components, Assembly Instructions email: aftersales@gpmfurniture.co.uk Step 9 Step 10...
- Page 11 If you have damaged or missing components, Assembly Instructions email: aftersales@gpmfurniture.co.uk Step 11 Step 12...
- Page 12 If you have damaged or missing components, Assembly Instructions email: aftersales@gpmfurniture.co.uk Step 13 Step 14...
- Page 13 If you have damaged or missing components, Assembly Instructions email: aftersales@gpmfurniture.co.uk Step 15 Step 16...
- Page 14 If you have damaged or missing components, Assembly Instructions email: aftersales@gpmfurniture.co.uk Step 17 Please consult your local hardware store to find out the correct hardware to fix the strap to the wall. Step 18...
Need help?
Do you have a question about the SIENA CHTSIE3WT and is the answer not in the manual?
Questions and answers