Table of Contents
Advertisement
Quick Links
Advertisement
Table of Contents

Related Manuals for thomann Harley Benton AirBorne Pro Instrument


Summary of Contents for thomann Harley Benton AirBorne Pro Instrument
- Page 1 AirBorne Pro Instrument Wireless System...
- Page 2 Thomann GmbH Hans-Thomann-Straße 1 96138 Burgebrach Germany Telephone: +49 (0) 9546 9223-0 Internet: www.thomann.de 03.03.2023, ID: 482514 (V5)
-
Page 3: Table Of Contents
Table of contents Table of contents General information..........................6 1.1 Further information........................... 7 1.2 Notational conventions........................7 1.3 Symbols and signal words....................... 8 Safety instructions..........................10 Features............................... 13 Installation and starting up........................ 15 4.1 General Information........................15 4.2 Dealing with lithium batteries..................... 16 4.3 Receiver............................... - Page 4 Table of contents Troubleshooting............................33 Protecting the environment......................35 AirBorne Pro Instrument Wireless System...
- Page 5 AirBorne Pro Instrument Wireless System...
-
Page 6: General Information
Our products and user manuals are subject to a process of continuous development. We there‐ fore reserve the right to make changes without notice. Please refer to the latest version of the user manual which is ready for download under www.thomann.de. AirBorne Pro Instrument... -
Page 7: Further Information
General information 1.1 Further information On our website (www.thomann.de) you will find lots of further information and details on the following points: Download This manual is also available as PDF file for you to download. Use the search function in the electronic version to find the topics of Keyword search interest for you quickly. -
Page 8: Symbols And Signal Words
General information Letterings The letterings for connectors and controls are marked by square brackets and italics. Examples: [VOLUME] control, [Mono] button. Instructions The individual steps of an instruction are numbered consecutively. The result of a step is indented and highlighted by an arrow. Example: Switch on the device. - Page 9 General information Signal word Meaning DANGER! This combination of symbol and signal word indicates an immediate dangerous situation that will result in death or serious injury if it is not avoided. WARNING! This combination of symbol and signal word indicates a pos‐ sible dangerous situation that can result in death or serious injury if it is not avoided.
-
Page 10: Safety Instructions
Safety instructions Safety instructions Intended use This device is intended to be used for the wireless transmission of audio signals from instru‐ ments to amplifiers or active speakers. Use the device only as described in this user manual. Any other use or use under other operating conditions is considered to be improper and may result in personal injury or property damage. - Page 11 Safety instructions NOTICE! Operating conditions This device has been designed for indoor use only. To prevent damage, never expose the device to any liquid or moisture. Avoid direct sunlight, heavy dirt, and strong vibrations. Only operate the device within the ambient conditions specified in the chapter ‘Technical specifications’...
- Page 12 Safety instructions NOTICE! Electromagnetic compatibility with other electrical equipment Using the device near radios or TV sets may cause interference. Then increase the distance between the devices. NOTICE! Fire hazard due to exceedance of the maximum current The device can power other devices of identical construction. The current consumption of all other devices connected in series must not exceed the values indicated in the technical specifications.
-
Page 13: Features
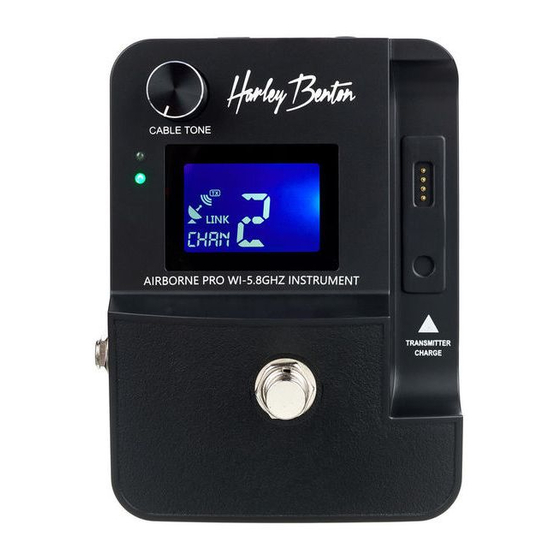
Features Features The Wireless System AirBorne Pro Instrument Set consists of the following components: AirBorne Pro Instrument pedal receiver: – Fixed built-in antenna for optimum reception quality – Built-in chromatic tuner with easy-to-read LCD display – Built-in magnetic charging station for the transmitter –... - Page 14 Features – Rotatable 220° angled audio plug (1/4" jack plug) Plug-n-Play Transmission range up to 35 m USB cable and 9 V plug-in power supply included The system works in the frequency range 5.729 GHz… 5.820 GHz and is free of charge and reg‐ istration worldwide.
-
Page 15: Installation And Starting Up
For more information, please visit: http://www.thomann.de. Make sure that transmitter and receiver are both tuned to the same channel. -
Page 16: Dealing With Lithium Batteries
Installation and starting up 4.2 Dealing with lithium batteries WARNING! Incorrect handling of lithium batteries can result in injury In the event of a short circuit, overheating or mechanical damage, lithium bat‐ teries can cause severe injuries. Follow the advice on the correct handling of lithium batteries in the present sec‐ tion. -
Page 17: Receiver
Installation and starting up Only use powder extinguishers or other suitable extinguishing agents to extinguish a burning lithium battery. 4.3 Receiver Connecting the power supply NOTICE! External power supply The device is powered by an external power supply. Before connecting the external power supply, ensure that the input voltage (AC outlet) matches the voltage rating of the device and that the AC outlet is protected by a residual cur‐... - Page 18 Installation and starting up Connecting audio and starting Connect the audio output of the receiver to your amplifier. You can add further pedals (e.g. effects pedal) between the receiver and amplifier. The following figure shows an example of how the device can be integrated into your signal chain. CABLE TONE AirBorne Pro Instrument Wireless System...
-
Page 19: Connections And Controls
Connections and controls Connections and controls 5.1 Receiver ö CABLE TONE & ) * + AirBorne Pro Instrument Wireless System... - Page 20 Connections and controls 1 Display 2 Magnetic charging contacts for the transmitter 3 Footswitch to activate the tuner mode Tuner mode can only be activated when transmitter and receiver are paired. 4 [OUT] | 1/4" mm jack socket as unbalanced audio signal output for direct connection to an amplifier 5 LED to indicate the coupling between transmitter and receiver.
-
Page 21: Transmitter
Connections and controls 5.2 Transmitter AirBorne Pro Instrument Wireless System... - Page 22 Connections and controls 11 Magnetic charging contacts for the transmitter 12 [MUTE] | press and hold the button for two seconds to mute the receiver's output. is flashing in the display. Press and hold the button again for two seconds to unmute. 13 1/4"...
-
Page 23: Operating
Operating Operating Pairing transmitter and receiver Press and hold the main switch on the transmitter and receiver to switch on the devices. ð If the ID displays light up in the same colour (red = channel 1, green = channel 2, blue = channel 3, purple = channel 4) and the displays on the transmitter and receiver show the same channel, the pairing was successful. - Page 24 Operating ð The new channel is automatically adopted for transmitter and receiver. If the receiver does not receive a signal from the transmitter, the receiver switches off automatically after 30 minutes. AirBorne Pro Instrument Wireless System...
- Page 25 Operating Display layout of the trans‐ The following illustrations show the display layouts on the transmitter: mitter ö : Successful pairing and transfer : Battery status : Channel assignment Battery charging : The output of the receiver is muted. AirBorne Pro Instrument Wireless System...
- Page 26 Operating Display layout of the receiver The following illustrations show the display layouts of the receiver: ö : Successful pairing and transfer : Channel assignment : Tuning display : Successful pairing and transfer : Tone display : The transmitter is charged in the receiver's charging station AirBorne Pro Instrument Wireless System...
- Page 27 Operating Instrument tuning Once transmitter and receiver have been successfully paired, you can tune the instrument con‐ nected to the transmitter with the receiver. Press the footswitch to activate tuner mode. ð When tuner mode is active, the transmission is automatically muted. Now tune the connected instrument.
-
Page 28: Technical Specifications
Technical specifications Technical specifications 7.1 Receiver Number of systems that can be operated in parallel 4 systems Input connections Power supply Connector for power adapter Output connections Power supply of further devices Socket for connecting a 9 V cable LINE output 1/4”... -
Page 29: Transmitter
Technical specifications Power consumption 0.7 W Power supply External power adapter, 100 - 240 V 50/60 Hz Operating voltage / 500 mA, centre negative Dimensions (W × H × D) 99 mm × 50 mm × 130 mm Weight 263 g Ambient conditions Temperature range 0 °C…40 °C... - Page 30 Technical specifications Signal-to-noise ratio 78 dB Audio sampling rate 24 bit / 48 kHz Distortion –100 dBm Latency 5.6 ms Range in clear field of vision up to 35 m Battery / rechargeable battery Battery type 1 × lithium-ion battery Voltage 3.7 V Capacity...
- Page 31 Technical specifications Further information Transmission channels Transmission technology digital Transmitter type Guitar bug Receiver type Pedal board Selectable frequencies Frequency display Frequency search Diversity detachable antenna Battery status indicator Charging system Built-in battery Rechargeable battery transmitter Rack kit AirBorne Pro Instrument Wireless System...
-
Page 32: Plug And Connection Assignment
Plug and connection assignment Plug and connection assignment Introduction This chapter will help you select the right cables and plugs to connect your valuable equip‐ ment in such a way that a perfect sound experience is ensured. Please note these advices, because especially in ‘Sound & Light’ caution is indicated: Even if a plug fits into the socket, an incorrect connection may result in a destroyed power amp, a short circuit or ‘just’... - Page 33 Troubleshooting Troubleshooting In the following we list a few common problems that may occur during operation. We give you some suggestions for easy troubleshooting: Symptom Remedy No sound 1. Check the power supply of transmitter and receiver. 2. Make sure that transmitter and receiver are operating in the same frequency range.
- Page 34 1. Try a different plug-in power supply or charge the transmitter with the USB cable. If the procedures recommended above do not succeed, please contact our Service Center. You can find the contact information at www.thomann.de. AirBorne Pro Instrument Wireless System...
- Page 35 Protecting the environment Protecting the environment Disposal of the packaging mate‐ rial For the packaging, environmentally friendly materials have been chosen that can be supplied to normal recycling. Ensure that plastic bags, packaging, etc. are properly disposed of. Do not just dispose of these materials with your normal household waste, but make sure that they are collected for recycling.
- Page 36 Protecting the environment Disposal of your old device This product is subject to the European Waste Electrical and Electronic Equipment Directive (WEEE) in its currently valid version. Do not dispose with your normal household waste. Dispose of this device through an approved waste disposal firm or through your local waste facility.
- Page 37 Notes AirBorne Pro Instrument Wireless System...
- Page 38 Notes AirBorne Pro Instrument Wireless System...
- Page 40 Musikhaus Thomann · Hans-Thomann-Straße 1 · 96138 Burgebrach · Germany · www.thomann.de...
Need help?
Do you have a question about the Harley Benton AirBorne Pro Instrument and is the answer not in the manual?
Questions and answers