
Related Manuals for Icy Box IB-TH100-DK


Summary of Contents for Icy Box IB-TH100-DK
- Page 1 Manual IB-TH100-DK Swivel stand for tablet and smartphone with USB Type-C DockingStation ® Handbuch IB-TH100-DK Drehbarer Ständer für Tablet und Smartphone mit USB Type-C DockingStation ®...
- Page 2 Manual IB-TH100-DK Please read carefully the following information to prevent injuries, da- mage to material and device as well as data loss: Warning levels Signal words and safety codes indicate the warning level and provide immediate information in terms of the probability of occurrence as well as the type and severity of the consequences if the measures to prevent hazards are not complied with.
- Page 3 Manual IB-TH100-DK • Avoid direct sunlight on the device/power unit • Guarantee sufficient ambient air for the device/power unit • Do not place objects on the device/power unit 4. Hazards caused by very small parts and packaging Risk of suffocation...
- Page 4 Handbuch IB-TH100-DK Zur Vermeidung körperlicher Schäden, sowie von Sach-, Geräteschäden und Datenverlust beachten Sie bitte folgende Hinweise: Warnstufen Signalwort und Sicherheitszeichen kennzeichnen die Warnstufe und geben einen sofortigen Hinweis auf Wahrscheinlichkeit, Art und Schwere der Folgen, wenn die Maßnahmen zur Vermeidung der Gefahr nicht befolgt werden.
- Page 5 Handbuch IB-TH100-DK • direkte Sonneneinstrahlung auf Gerät/Netzteil vermeiden • ausreichend Umgebungsluft für Gerät/Netzteil sicherstellen • keine Gegenstände auf dem Gerät/Netzteil abstellen 4. Gefahren durch Kleinstteile und Verpackung Erstickungsgefahr WARNUNG Lebensgefahr durch Ersticken oder Verschlucken • Kleinteile, Zubehör für Kinder unzugänglich verwahren •...
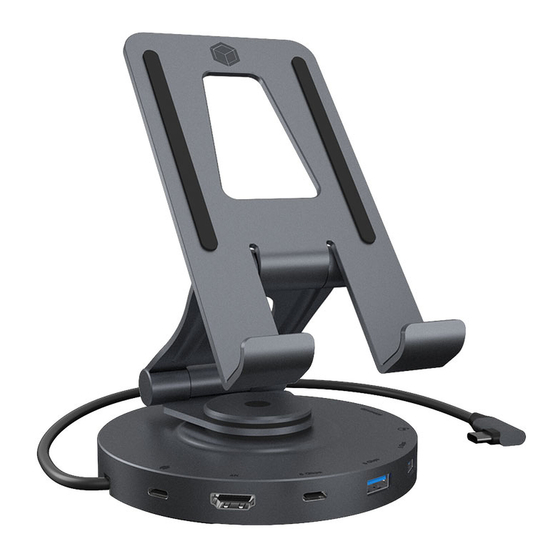
- Page 6 Manual IB-TH100-DK Package content 1x IB-TH100-DK, 1x manual View USB Type- C PD 3.0 interface with Power Delivery support up to 100 watts ® (no data transfer) HDMI 2.0 interface with up to 3840x2160@60 Hz ® USB 3.2 Gen 1 Type-C interface, data transfer rates of up to 5 Gbit/s and ®...
- Page 7 Manual IB-TH100-DK 2x USB 3.2 Gen 1 Type-A interface, data transfer rates of up to 5 Gbit/s and 5 V/0.9 A charging support 3.5 mm headset combo jack SD 3.0 card reader, data transfer rates of up to 100 MB/s...
-
Page 8: Computer Manual
DisplayPort™ Alt Mode. Please check the specifications of your computer system as Computer well as its USB Type-C™ interface or use the ICY BOX product with a manual Thunderbolt™ 3 connector. To use this dock to its full potential, ensure that the USB Type-C host port of your ®... - Page 9 Manual IB-TH100-DK Starting up Stand function: • Unfold the holder to place a smartphone or tablet on it Caution: When opening or closing the stand, there is a risk of trapping hands. Adjust the parts to the desired position carefully.
- Page 10 Manual IB-TH100-DK Tilt: back and forth Height adjustment: up and down The support should not be tilted too far back or forward so that the placed unit does not fall down. Place your smartphone or tablet vertically or horizontally on the support surface.
- Page 11 Manual IB-TH100-DK When the docking station cable is not connected, you can now rotate support and device 360°, clockwise or counterclockwise. When the docking station cable is connected (see next step), you can perform a rotation of up to 180°, depending on the device used.
- Page 12 Manual IB-TH100-DK DockingStation Function Remove the integrated USB Type-C connection cable located at the bottom ® of the stand and pass it through the cut-out in the base to the outside. Connect the USB Type-C cable to the supported USB Type-C interface of ®...
-
Page 13: Microsd Card
Manual IB-TH100-DK Connect your peripheral devices to the corresponding interfaces of the dock. Use of memory card slots SD card Insert the SD card into the SD card slot with the bevelled corner first. The golden PINs of the card must show downwards. -
Page 14: Supported Video Resolutions
Manual IB-TH100-DK Supported video resolutions The IB-TH100-DK supports 4K resolutions if the connected display and the graphics unit support it. - Page 15 Manual IB-TH100-DK Samsung DeX (Android ) Konfiguration ™ Note: Screenshots may vary slightly depending on the operating system. Other smart device manufacturers often offer similar functions (e.g. PIXEL/Google, Easy Projection/Huawei, etc.). If this is not the case, the content of the smart device display is usually mirrored to the connected monitor.
- Page 16 Manual IB-TH100-DK • It is also possible to use and operate the desktop monitor via an integrated Samsung DEX touchpad on the smart device display.
- Page 17 Manual IB-TH100-DK • Now, if necessary, make adjustments in the settings of design, resolution and other functions according to your needs. Detailed instructions for use can be found under the menu item - Settings - Samsung DeX --- „How to use...
-
Page 18: Display Configuration
Manual IB-TH100-DK Windows display configuration ® Note: The screenshots might vary slightly with the operating system. Extended monitor application under MST technology (MultiStreamTrans- port protocol) Arrange your displays Once the extra monitors are connected, they can be configured to either mirror mode, extended mode or to the setting of the primary display. - Page 19 Manual IB-TH100-DK - Select Multiple displays > Extend desktop to this display if you wish to extend a monitor. - Click Keep changes to confirm and exit. - Once the setting is completed, simply drag and drop the application icons to arrange your monitors.
- Page 20 Manual IB-TH100-DK Setting the right resolution and frequency of your displays There are two possibilities to choose the resolution of the selected monitor: 1. Standard - Identify your monitors by clicking the Identify button. - Select the relevant monitor by clicking the identified monitor symbol.
- Page 21 Manual IB-TH100-DK 2. Advanced display settings - Identify your monitors by clicking the Identify button. - Click on Advanced display settings A new page opens up - Select the relevant monitor by clicking Choose display - Click on Display adaptor properties for Display X...
- Page 22 Manual IB-TH100-DK A new window opens up - Click on List All Modes A new window opens up - Click on a valid mode according to your demands. Repeat for each attached monitor if necessary.
- Page 23 Manual IB-TH100-DK macOS Display configuration ® Once the extra monitors are connected, they can be configured to mirror mode or extend mode. - Click on System Preferences - Click on Displays A new window opens up - Click Arrangement...
- Page 24 Manual IB-TH100-DK - Select the corresponding monitor symbol by clicking and holding the symbol of the monitor that shall be placed in order to do the positioning. To set up scaled resolutions of the monitor displays, click the Display tab. In the window that now opens for the respective display, you can set your desired resolutions separately.
-
Page 25: Advanced Display Settings
Manual IB-TH100-DK Advanced display settings Hold down the option key and click on Scaled again and an advanced menu for setting resolution and repetition frequency opens. Please select your preferred settings here. Repeat for each attached monitor if necessary. - Page 26 Handbuch IB-TH100-DK Verpackungsinhalt 1x IB-TH100-DK, 1x Handbuch Ansicht USB Type- C PD 3.0 Schnittstelle mit Power Delivery Unterstützung von bis ® zu 100 Watt (keine Datenübertragung) HDMI 2.0 Schnittstelle mit bis zu 3840x2160@60 Hz ® USB 3.2 Gen 1 Type-C Schnittstelle, Datenübertragungsraten von bis zu 5...
- Page 27 Handbuch IB-TH100-DK 2x USB 3.2 Gen 1 Type-A Schnittstelle, Datenübertragungsraten von bis zu 5 Gbit/s und 5 V/0,9 A Ladeunterstützung 3,5 mm Headset Kombibuchse SD 3.0 Kartenleser, Datenübertragungsraten von bis zu 100 MB/s microSD 3.0 Kartenleser, Datenübertragungsraten von bis zu 100 MB/s...
- Page 28 Schnittstelle unterstützen auch den DisplayPort™ Alt Mode. Bitte überprüfen Sie die Spezifikationen Ihres Computersystems Computer und dessen USB Type-C™ Schnittstelle oder nutzen Sie das ICY BOX manual Produkt an einem Thunderbolt™ 3 Anschluss. Um dieses Dock in vollem Umfang zu nutzen, stellen Sie sicher, dass der USB Type-C ®...
- Page 29 Handbuch IB-TH100-DK Inbetriebnahme Ständerfunktion: • Halterung aufklappen, um ein Smartphone oder Tablet aufzulegen Achtung: Beim Auf- oder Zuklappen des Ständers besteht die Gefahr des Einklem- mens der Hand. Stellen Sie die Teile mit Vorsicht auf die gewünschte Position ein. •...
- Page 30 Handbuch IB-TH100-DK • Die Ablagefläche sollte nicht zu weit nach hinten oder nach vorne geneigt werden, damit das aufgelegte Gerät nicht herunterfällt. Neigung: vor und zurück Höhenverstellung: hoch und runter • Legen Sie Ihr Smartphone oder Tablet hochkant oder quer auf der Ablage- fläche auf.
- Page 31 Handbuch IB-TH100-DK • Ist das Kabel der DockingStation nicht angeschlossen, können Sie die Aufla- ge mit Gerät nun um 360° im oder gegen den Uhrzeigersinn drehen. • Ist das Kabel der DockingStation angeschlossen (siehe nächster Schritt), können Sie abhängig vom aufgelegten Gerät eine Drehung um bis zu 180°...
- Page 32 Handbuch IB-TH100-DK DockingStation Funktion Entnehmen Sie das an der Unterseite des Ständers befindliche, integrierte USB Type-C Verbindungskabel und führen es durch die Aussparung im Fuß ® nach außen. Schließen Sie das USB Type-C Kabel an die unterstützte USB Type-C ®...
- Page 33 Handbuch IB-TH100-DK Schließen Sie Ihre Peripheriegeräte an die entsprechenden Schnittstellen der DockingStation an. Verwendung von Speicherkarten SD Karte Schieben Sie die SD Karte mit der abgeschrägten Ecke voraus in den SD Karten- schacht. Die goldenen Kontaktpunkte zeigen dabei nach unten.
- Page 34 Handbuch IB-TH100-DK Unterstützte Videoauflösungen Der IB-TH100-DK unterstützt 4K Auflösungen, wenn der angeschlossene Monitor und die Grafikeinheit diese Auflösung ebenfalls unterstützen.
- Page 35 Handbuch IB-TH100-DK Samsung DeX (Android ) Konfiguration ™ Hinweis: Die Screenshots können je nach Betriebssystem leicht variieren. Andere Smartgerätehersteller bieten oftmals ähnliche Funktionen an (z.B. PIXEL/ Google, Easy Projection/Huawei, etc.). Ist dies nicht der Fall, so wird in der Regel der Inhalt des Smartgerätedisplays auf den angeschlossenen Monitor gespiegelt.
- Page 36 Handbuch IB-TH100-DK • Es besteht ebenfalls die Möglichkeit; den Desktopmonitor über ein integ- riertes Samsung DEX Touchpad auf dem Smartgerätedisplay zu verwenden und zu bedienen.
- Page 37 Handbuch IB-TH100-DK • Nehmen Sie nun bei Bedarf Anpassungen in den Einstellungen von Design, Auflösung und weiteren Funktionen entsprechend Ihren Bedürfnissen vor. Ein detaillierter Verwendungshinweis findet sich unter dem Menüpunkt - Einstel- lungen – Samsung DeX --- „So verwendest du Samsung DeX...
- Page 38 Handbuch IB-TH100-DK Windows Konfiguration der Anzeigeeinheiten ® Hinweis: Die Screenshots können je nach Betriebssystem leicht variieren. Erweiterte Monitorverwendung in Verbindung mit der MST Technologie (MultiStreamTransport Protokoll) Monitore anordnen Sobald zusätzliche Monitore angeschlossen sind, können sie entweder auf den Spiegelmodus, den Erweiterungsmodus oder die Einstellung der Primäranzeige konfiguriert werden.
- Page 39 Handbuch IB-TH100-DK - Wählen Sie Mehrere Bildschirme > Desktop auf diese Anzeige erweitern, wenn Sie einen Monitor erweitern möchten. - Klicken Sie zum Bestätigen und Beenden auf Einstellungen Beibehalten. - Sobald die Einstellungen abgeschlossen sind, ziehen Sie einfach die Monitor- symbole per Drag &...
- Page 40 Handbuch IB-TH100-DK Einstellung der richtigen Auflösung und Frequenz Ihrer Anzeigen Es gibt zwei Möglichkeiten zur Auswahl der Auflösung des ausgewählten Monitors: 1. Standard Anzeigeeinstellungen - Identifizieren Sie Ihre Monitore, indem Sie auf die Schaltfläche Identifizieren klicken. - Wählen Sie den betreffenden Monitor durch Klicken auf das Symbol für den identifizierten Monitor aus.
- Page 41 Handbuch IB-TH100-DK 2. Erweiterte Anzeigeeinstellungen - Identifizieren Sie Ihre Monitore, indem Sie auf die Schaltfläche Identifizieren klicken. - Klicken Sie auf Erweiterte Anzeigeeinstellungen Eine neue Seite öffnet sich - Wählen Sie den entsprechenden Monitor aus, indem Sie auf Anzeige auswählen klicken.
- Page 42 Handbuch IB-TH100-DK Es öffnet sich ein neues Fenster - Klicken Sie auf Alle Modi auflisten Es öffnet sich ein neues Fenster - Klicken Sie auf den gewünschten Modus entsprechend Ihrer Anforderung. Wiederholen Sie dies bei Bedarf für jeden angeschlossenen Monitor.
- Page 43 Handbuch IB-TH100-DK macOS Konfiguration der Anzeigeeinheiten ® - Klicken Sie auf Systemeinstellungen - Klicken Sie auf Monitore Es öffnet sich ein neues Fenster - Klicken Sie auf Anordnen...
- Page 44 Handbuch IB-TH100-DK - Wählen Sie das entsprechende Monitorsymbol, indem Sie auf das Symbol des zu platzierenden Monitors klicken und halten, um die Anordnung vorzunehmen. Um skalierte Auflösungen der Monitoranzeigen vorzunehmen, klicken Sie den Reiter Monitor. In dem sich nun öffnenden Fenster der jeweiligen Anzeige können Sie separat Ihre gewünschten Ansichten einstellen.
- Page 45 Handbuch IB-TH100-DK Erweiterte Anzeigeeinstellungen Detailliertere Einstellungen können Sie wie folgt vornehmen: Halten Sie die Option Taste gedrückt und klicken Sie erneut auf Skaliert und ein erweitertes Menü zur Einstellung von Auflösung und Wiederholfrequenz öffnet sich. Wählen Sie hier bitte Ihre gewünschten Einstellungen aus.
- Page 46 Nos produits et emballages se recyclent, ne les jetez as! Trouvez où les déposer sur le site www.quefairedemesdechets.fr © Copyright 2023 by RaidSonic Technology GmbH. All Rights Reserved. The information contained in this manual is believed to be accurate and reliable. RaidSo- nic Technology GmbH assumes no responsibility for any errors contained in this manual.
Need help?
Do you have a question about the IB-TH100-DK and is the answer not in the manual?
Questions and answers