
Related Manuals for Icy Box IB-2912MCL-C31


Summary of Contents for Icy Box IB-2912MCL-C31
- Page 1 Manual IB-2912MCL-C31 Manual IB-2912MCL-C31 Docking and Clone Station for M.2 NVMe SSD Handbuch IB-2912MCL-C31 Docking und Clone Station für M.2 NVMe SSD...
- Page 3 Safety information IB-DK4070-CPD Please read carefully the following information to prevent injuries, damage to material and device as well as data loss: Warning levels Signal words and safety codes indicate the warning level and provide immediate information in terms of the probability of occurrence as well as the type and severity of the consequences if the measures to prevent hazards are not complied with.
- Page 4 Safety information IB-DK4070-CPD 5. Potential data loss Data lost during commissioning IMPORTANT Potentially irreversible data loss • Always comply with the information in the operating instructions/quick installation guide • Exclusively use the product once the specifications have been met • Back up data prior to commissioning •...
- Page 5 Sicherheitshinweise IB-DK4070-CPD Zur Vermeidung körperlicher Schäden, sowie von Sach-, Geräte- schäden und Datenverlust beachten Sie bitte folgende Hinweise: Warnstufen Signalwort und Sicherheitszeichen kennzeichnen die Warnstufe und geben einen sofortigen Hinweis auf Wahrscheinlichkeit, Art und Schwere der Folgen, wenn die Maßnahmen zur Vermeidung der Gefahr nicht befolgt werden. warnt vor einer unmittelbar gefährlichen Situation, GEFAHR die zum Tod oder zu schweren Verletzungen führen...
- Page 6 Sicherheitshinweise IB-DK4070-CPD 5. Möglicher Datenverlust Datenverlust bei Inbetriebnahme ACHTUNG Unwiederbringlicher Datenverlust möglich • Unbedingt Hinweise in der Bedienungsanleitung/Schnellinstallationsanleitung beachten • Produkt nur verwenden, wenn Spezifikationen erfüllt sind • Datensicherung vor Inbetriebnahme durchführen • Datensicherung vor Anschluss neuer Hardware durchführen • dem Produkt beiliegendes Zubehör verwenden 6.
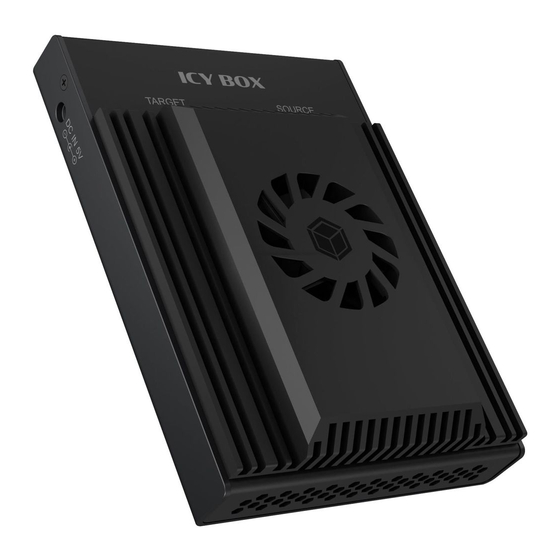
- Page 7 Manual IB-2912MCL-C31 Package content 1x IB-2912MCL-C31, 1x Wall power supply, 1x USB Type-C® to Type-C® cable, 2x Silicone thermal pads, 2x Aluminium heat sinks, 4x Rubber band, 1x Manual Front view 1 2 3 4 5 Side view LED for operation of the device (blue)
- Page 8 USB Type-C® enclosures and adapters, including this device! • Your host computer must have a USB Type C® interface. • The IB-2912MCL-C31 also works with computers and notebooks with USB 3.0/2.0/1.1 Type-C® interfaces. • The enclosure also works on devices with a Thunderbolt™ 3 interface with the transfer rate of up to 10 Gbit/s specified by USB 3.1 (Gen 2).
- Page 9 Manual IB-2912MCL-C31 Installation Important: To prevent damage or malfunction, do not connect the enclosure to the computer while a drive is installed. When installing the drives, be aware of possible electrostatic discharge, as this can cause damage or malfunction. Touch a "grounded" metal object or wear antistatic gloves before installation.
- Page 10 Push the cover back into the guide rails to close the enclosure. Connect the IB-2912MCL-C31 with the delivered power supply and the USB Type-C® cable to the corresponding port of your host computer and switch...
- Page 11 Usage When using PC mode The IB-2912MCL-C31 allows you to run 2 different SSDs regardless of their brands, models, or capacities via one USB connection. Just connect the IB- 2912MCL-C31 to the computer, switch it on and the SSDs will be detected as independent drives.
- Page 12 Manual IB-2912MCL-C31 Starting the clone process • Connect the IB-2912MCL-C31 to the delivered power supply and the USB Type-C® cable to the corresponding port of your host computer and switch on the device via the ON/OFF switch. • When the IB-2912MCL-C31 has been plugged in correctly the Power LED will turn on blue! •...
- Page 13 Handbuch IB-2912MCL-C31 Verpackungsinhalt 1x IB-2912MCL-C31, 1x Steckernetzteil, 1x USB Type-C® zu Type-C® Kabel, 2x Silikon Wärmeleitpad, 2x Aluminium Kühlkörper, 4x Gummiband, 1x Handbuch Front view 1 2 3 4 5 Side view LED für Betrieb des Gerätes (blau) LED für Betrieb der Quell-SSD (blau) LED für Betrieb der Ziel-SSD (blau)
- Page 14 Kenntnis! • Ihr Hostcomputer muss über eine USB Type-C® Schnittstelle verfügen. • Das IB-2912MCL-C31 arbeitet auch mit Notebooks und PCs mit USB 3.0/2.0/1.1 Type-C® Schnittstellen. • Das Gehäuse arbeitet auch an Geräten mit einer Thunderbolt™ 3 Schnittstelle mit der von USB 3.1 (Gen2) angegebenen Transferrate von bis zu 10 Gbit/s.
- Page 15 Handbuch IB-2912MCL-C31 Einbau Hinweis! Um Schäden oder Fehlfunktionen zu vermeiden, darf das Gehäuse während der Installation des Laufwerks nicht am Computer angeschlossen sein. Beim Einsetzen der Laufwerke achten Sie auf mögliche elektrostatische Entla- dung, da diese zu Schäden oder Fehlfunktionen führen können. Berühren Sie vor der Installation ein „geerdetes“...
- Page 16 Befestigungsclip. Schieben Sie die Abdeckung wieder in die Führungsschienen, um das Ge- häuse zu schließen. Verbinden Sie die IB-2912MCL-C31 mit dem mitgelieferten Netzteil und mittels des beiliegenden USB Type-C® Kabels mit dem entsprechenden An- schluss Ihres Computers und schalten Sie das Gerät über den EIN-/AUS-...
- Page 17 Handbuch IB-2912MCL-C31 Verwendung Wenn der PC-Modus genutzt wird Die IB-2912MCL-C31 ermöglicht es Ihnen, zwei SSDs über eine USB Ver- bindung unabhängig voneinander zu verwenden. Verbinden Sie einfach die IB-2912MCL-C31 mit Ihrem Computer per USB und die entsprechenden SSDs werden als einzelne Laufwerke dargestellt.
- Page 18 Stellen Sie sicher, dass das Quell-SSD im Schacht "Source" und die Ziel-SSD im Schacht "Target" installiert sind. Den Klonvorgang starten • Verbinden Sie die IB-2912MCL-C31 mittels des beiliegenden Netzteils und des USB Type-C® Kabels mit dem entsprechenden Anschluss Ihres Computers und schalten Sie das Gerät über den EIN-/AUS-Schalter ein.
- Page 20 © Copyright 2020 by RaidSonic Technology GmbH. All Rights Reserved. The information contained in this manual is believed to be accurate and reliable. RaidSonic Technology GmbH assumes no responsibility for any errors contained in this manual. RaidSonic Technology GmbH reserves the right to make changes in the specifications and/or design of the above-mentioned product without prior notice.
Need help?
Do you have a question about the IB-2912MCL-C31 and is the answer not in the manual?
Questions and answers