Table of Contents
Advertisement
Quick Links
Contents
Example Diagrams .................................................2
Standard Application .......................................2
OAD Pressure Assist Application .......................3
RAD Pressure Assist Application .......................3
Mounting the System Components ...........................4
Mounting the Controller ...................................4
Mounting the Inclinometer ................................5
Mounting the Supply Airflow Pickup Tubes ..........6
Mounting Pickup Tubes for Pressure Assist .........8
Mounting the Pressure Transducer(s) ...............10
Mounting the OAT, RAT, and MAT Sensors .........11
Mounting a Proportional Actuator ....................13
Connecting the Airflow Pickup Tubes ...............14
Connecting the Inclinometer ...........................15
Connecting the Proportional Actuator ...............17
KMC Controls, 19476 Industrial Drive, New Paris, IN 46553
Airflow Measurement System
/
877-444-5622
Connecting Networks ...........................................18
Connecting an Ethernet Network ......................18
Connecting an MS/TP Network ........................18
Connecting Power ...............................................19
Connecting Power to the Controller ..................19
Connecting Power to the Inclinometer ..............19
Controller Power and Communication Status ...........21
Controller MS/TP Network Isolation Bulbs ...............21
Wiring Diagrams ..................................................22
Input/Output Objects/Connections .........................28
Configuring and Operating ....................................28
Important Notices................................................29
/
Fax: 574-831-5252
/
Installation Guide
www.kmccontrols.com
Advertisement
Table of Contents

Subscribe to Our Youtube Channel
Related Manuals for KMC Controls TRUEFIT MEP-4552


Summary of Contents for KMC Controls TRUEFIT MEP-4552
-
Page 1: Table Of Contents
Connecting the Return Air Temperature Sensor ..16 Input/Output Objects/Connections ......28 Connecting the Mixed Air Temperature Sensor ...16 Configuring and Operating ........28 Connecting the Proportional Actuator ....17 Important Notices..........29 KMC Controls, 19476 Industrial Drive, New Paris, IN 46553 877-444-5622 Fax: 574-831-5252 www.kmccontrols.com... -
Page 2: Example Diagrams
Example Diagrams Standard Application Outdoor Air Damper Pressure Assist Application KMC Airflow Measurement System Installation Guide 925-019-07B... -
Page 3: Oad Pressure Assist Application
Return Air Damper Pressure Assist Application KMC Airflow Measurement System Installation Guide 925-019-07B... -
Page 4: Mounting The System Components
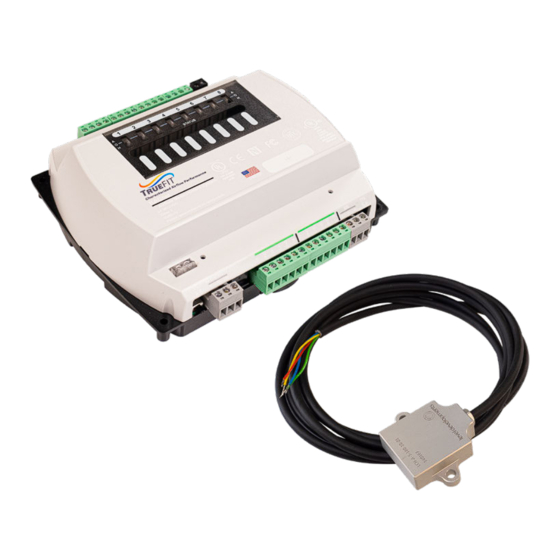
Mounting the System Components Mounting the Controller NOTE: Mount the controller inside a metal enclosure for RF shielding and physical protection. NOTE: To mount the controller with screws on a flat surface, complete the steps in On a Flat Surface. Or to mount the controller on a 35 mm DIN rail (such as integrated in an enclosure), complete the steps On a DIN Rail. -
Page 5: Mounting The Inclinometer
NOTE: Attach adequate strain relief (e.g. with wire ties) if needed to prevent the inclinometer from accidentally being pulled off of the damper blade during equipment maintenance. © 2021 KMC CONTROLS, INC. 19476 INDUSTRIAL DR. DRAWING TITLE: KMC CONQUEST A... -
Page 6: Mounting The Supply Airflow Pickup Tubes
Mounting the Supply Airflow Pickup Tubes There must be enough pressure flow pickup tubes must installed, for the size of the opening, to get an accurate average value for the air-stream. Multiple pickup tubes (at least 2) connected in a parallel pitot array are recommended. - Page 7 In the Supply Air Duct (using SSS-101x) NOTE: The pressure flow pickup tubes should be mounted in filtered air in the location of laminar flow, which is about 6 straight duct diameters down the air duct. 1. Determine the duct’s flow direction and install the pickup tubes based on the flow arrow imprint. NOTE: The pickup tubes must be mounted with the arrow pointing in the direction of the airflow.
-
Page 8: Mounting Pickup Tubes For Pressure Assist
Mounting Pickup Tubes for Pressure Assist Mounting for OAD Pressure Assist Complete these additional steps only if installing a TRF-5901C-AFMS or TRF-5901CE-AFMS for an OAD pressure assist application. (See the TrueFit AFMS Selection Guide for details.) Mounting the First Pickup Tube 1. - Page 9 Mounting for RAD Pressure Assist Complete these steps only if installing a TRF-5901C-AFMS or TRF-5901CE-AFMS for a RAD pressure assist application. (See the TrueFit AFMS Selection Guide for details.) Mounting the First Airflow Pickup Tube 1. Find a location for the first pickup tube near the return air damper, on the damper’s upstream side. 2.
-
Page 10: Mounting The Pressure Transducer(S)
Mounting the Pressure Transducer(s) NOTE: Complete these steps only if using a TRF-5901C(E)-AFMS controller. NOTE: Avoid locations with severe vibrations or excessive moisture. The enclosure has a standard 1/2-inch conduit opening and may be installed with either a conduit coupler or a cable-gland-type fitting. CAUTION Do not use in explosive or hazardous environments, with combustible or flammable gasses, as a safety or emergency stop device, or in any other application where failure of the product could... -
Page 11: Mounting The Oat, Rat, And Mat Sensors
Mounting the OAT, RAT, and MAT Sensors STE-1411/12/13/14 Bendable Copper Sensor Use a bendable copper sensor for easily-accessible mixed air sections and outside air hoods. If the mixed air section is not easily accessible, a flexible cable sensor may be used. If the unit does not have an easily- accessible outside air hood, a rigid steel probe may be used. - Page 12 2. Insert the sensor cable into the mixed air chamber, stringing the cable to cover the air path, and secure as needed. NOTE: The flexible cable can be easily shaped to fit any duct size but observe a minimum bend radius of two inches to prevent damage to wires or sensors.
-
Page 13: Mounting A Proportional Actuator
For instructions on how to mount your particular model of MEP-series proportional actuator: 1. Select the appropriate link from the list, or search for it on the KMC Controls website: •... -
Page 14: Connecting System Components To The Controller
Connecting System Components to the Controller Connecting the Airflow Pickup Tubes For a TRF-5901C(E)-AFMS Use appropriately sized polyethylene tubing for the pressure connections. The length of the tubing should not be longer than necessary. Arrange the tubing to minimize stress on the connections and prevent kinking. Connecting the Supply Airflow Pickup Tubes to the Pressure Transducer 1. -
Page 15: Connecting The Inclinometer
NOTE: The other ports of the two pickup tubes are left unconnected and open to air. Connecting the Pressure Transducer(s) to the Controller 1. Connect the signal wire from OUT on the supply air pressure transducer to UI9 on the controller. 2. -
Page 16: Connecting The Return Air Temperature Sensor
Connecting the Return Air Temperature Sensor NOTE: Use 18 to 24 AWG shielded wiring for all connections. Do not locate the device wires in the same conduit with wiring used to supply inductive loads such as motors. 1. Feed the wire that will go to the AFMS controller through the bottom hole (if applicable). 2. -
Page 17: Connecting The Proportional Actuator
AFMS controller. Using a New Proportional Actuator For instructions on how to wire your particular model of actuator to the controller: 1. Click on the appropriate model from the list, or search for it on the KMC Controls website: • MEP-4552 •... -
Page 18: Connecting Networks
Connecting Networks Connecting an Ethernet Network For “E” models only, connect an Ethernet patch cable to the 10/100 ETHERNET port. CAUTION Do NOT plug a cable meant for Ethernet communications into the Room Sensor port! The Room Sensor port powers a NetSensor. The supplied voltage may damage an Ethernet switch or router. NOTE: The Ethernet patch cable should be T568B Category 5 or better and a maximum of 328 feet (100 meters) between devices. -
Page 19: Connecting Power
Connecting Power Connecting Power to the Controller To connect a 24 VAC, Class-2 transformer to the black power terminal block of the controller: ⊥ ⊥ 1. Connect the neutral side of the transformer to the controller’s common terminal ∼ ∼ 2. -
Page 20: Connecting Power To The Proportional Actuator
Connecting Power to the Proportional Actuator For instructions on how to wire to power and complete setup of your particular model of actuator: 1. Select the appropriate model from the list, or search for it on the KMC Controls website: •... -
Page 21: Controller Power And Communication Status
Controller Power and Communication Status The status LEDs on a TRF-5901-AFMS and TRF-9311-AFMS indicate power connection and network communication. The descriptions below describe their activity during normal operation (at least 5 to 20 seconds after power-up/initialization or restart). NOTE: If both the green READY LED and the amber COMM LED remain OFF, check the power and cable connections to the controller. -
Page 22: Wiring Diagrams
See the AFMS Selection, Installtion and Application Guides for additional installation details. See www.kmccontrols.com for accessories and additional details. © 2023 KMC CONTROLS, INC. 19476 INDUSTRIAL DR. DRAWING TITLE: TRUEFIT AIRFLOW MEASUREMENT SYSTEM W/TRF-5901 KMC Airflow Measurement System Installation Guide 925-019-07B... - Page 23 General Purpose Controller 24 VAC/VDC Class 2 50/60 Hz Made in USA MS/TP 10/100 © 2023 KMC CONTROLS, INC. 19476 INDUSTRIAL DR. KMC Airflow Measurement System Installation Guide DRAWING TITLE: TRUEFIT AIRFLOW MEASUREMENT SYSTEM W/TRF-5901 WIRING 925-019-07B NEW PARIS, IN 46553 FILENAME: AFMS-5901C-2-SUBMITTAL PHONE: 574.831.5250...
- Page 24 See the AFMS Selection, Installtion and Application Guides for additional installation details. See www.kmccontrols.com for accessories and additional details. © 2023 KMC CONTROLS, INC. 19476 INDUSTRIAL DR. KMC Airflow Measurement System Installation Guide DRAWING TITLE: TRUEFIT AIRFLOW MEASUREMENT SYSTEM W/TRF-9311 925-019-07B...
- Page 25 FIT Airflow Measurement System Model: TRF-9311C(E) PRESSURE SENSOR HIGH MS/TP 10/100 ETHERNET © 2023 KMC CONTROLS, INC. 19476 INDUSTRIAL DR. DRAWING TITLE: TRUEFIT AIRFLOW MEASUREMENT SYSTEM W/TRF-9311 WIRING KMC Airflow Measurement System Installation Guide 925-019-07B NEW PARIS, IN 46553 FILENAME: AFMS-9311C-2-SUBMITTAL PHONE: 574.831.5250...
- Page 26 See the AFMS Selection, Installtion and Application Guides for additional installation details. See www.kmccontrols.com for accessories and additional details. © 2023 KMC CONTROLS, INC. 19476 INDUSTRIAL DR. DRAWING TITLE: TRUEFIT AFMS W/TRF-5901 W/PRESSURE ASSIST KMC Airflow Measurement System Installation Guide 925-019-07B...
- Page 27 General Purpose Controller 24 VAC/VDC Class 2 50/60 Hz Made in USA MS/TP 10/100 © 2023 KMC CONTROLS, INC. 19476 INDUSTRIAL DR. KMC Airflow Measurement System Installation Guide DRAWING TITLE: TRUEFIT AFMS W/TRF-5901 W/PRESSURE ASSIST WIRING 925-019-07B NEW PARIS, IN 46553 FILENAME:...
-
Page 28: Input/Output Objects/Connections
Input/Output Objects/Connections TRF-5901C(E)-AFMS TRF-9311C(E)-AFMS Inputs Inputs Space Sensor (on Room Sensor port) Space Sensor (on Room Sensor port) Space Setpoint Offset (on port) Space Setpoint Offset (on port) AI3/UI3 Incoming Damper Signal AI3/UI3 Incoming Damper Signal AI4/UI4 Outdoor Air Temp AI4/UI4 Outdoor Air Temp AI5/UI5... -
Page 29: Important Notices
KMC Controls, Inc. makes no representations or warranties with respect to this document. In no event shall KMC Controls, Inc. be liable for any damages, direct, or incidental, arising out of or related to the use of this document.
Need help?
Do you have a question about the TRUEFIT MEP-4552 and is the answer not in the manual?
Questions and answers