Rohde & Schwarz R&S SMB100B Getting Started
Rf signal generator
Hide thumbs
Also See for R&S SMB100B:
- Getting started (60 pages) ,
- Release notes (14 pages) ,
- User manual (641 pages)
Table of Contents
Advertisement
Quick Links
Advertisement
Table of Contents

Subscribe to Our Youtube Channel
Related Manuals for Rohde & Schwarz R&S SMB100B


Summary of Contents for Rohde & Schwarz R&S SMB100B
- Page 1 ® R&S SMB100B RF Signal Generator Getting Started (>F:]2) 1422104502 Version 06...
- Page 2 ® This document describes the R&S SMB100B, stock no. 1422.1000.02 and its options. © 2023 Rohde & Schwarz GmbH & Co. KG Muehldorfstr. 15, 81671 Muenchen, Germany Phone: +49 89 41 29 - 0 Email: info@rohde-schwarz.com Internet: www.rohde-schwarz.com Subject to change – data without tolerance limits is not binding. ®...
-
Page 3: Table Of Contents
® Contents R&S SMB100B Contents 1 Safety and regulatory information........7 1.1 Safety instructions................7 1.2 Labels on R&S SMB100B..............10 1.3 Warning messages in the documentation........11 1.4 Where to find key documents on Rohde & Schwarz....... 11 1.5 Korea certification class B..............12 2 Documentation overview............ - Page 4 ® Contents R&S SMB100B 4.5 Considerations for test setup............23 4.6 Connecting to power................24 4.7 Connecting to LAN................24 4.8 Connecting USB devices..............25 4.9 Connecting to RF coaxial connectors..........26 4.10 Connecting to RF 50 Ω............... 28 4.11 Connecting to Ref In/Ref Out.............28 4.12 Switching on or off................
- Page 5 ® Contents R&S SMB100B 6.3 Saving and recalling settings............47 7 Instrument control............... 51 7.1 Possible ways to operate the instrument......... 51 7.2 Means of manual interaction............. 52 7.3 Understanding the display information..........52 7.3.1 Status bar....................53 7.3.2 Tile diagram..................53 7.3.3 Taskbar....................
- Page 6 ® Contents R&S SMB100B Getting Started 1422.1045.02 ─ 06...
-
Page 7: Safety And Regulatory Information
® Safety and regulatory information R&S SMB100B Safety instructions Safety and regulatory information The product documentation helps you use the product safely and efficiently. Fol- low the instructions provided here and in the following chapters. Intended use The product generates radio frequency (RF) signals for the development, produc- tion and verification of electronic components, modules or devices. - Page 8 ® Safety and regulatory information R&S SMB100B Safety instructions Use the product only for its intended use and within its performance limits. Inten- ded use and limits are described in the product documentation such as the data sheet, manuals and the printed "Safety Instructions". If you are unsure about the appropriate use, contact Rohde &...
- Page 9 ® Safety and regulatory information R&S SMB100B Safety instructions If the product has foldable feet, always fold the feet completely in or out to ensure stability. The feet can collapse if they are not folded out completely or if the prod- uct is moved without lifting it.
-
Page 10: Labels On R&S Smb100B
® Safety and regulatory information R&S SMB100B Labels on R&S SMB100B these requirements, provide an easily accessible circuit breaker at the system level. Cleaning the product Use a dry, lint-free cloth to clean the product. When cleaning, keep in mind that the casing is not waterproof. -
Page 11: Warning Messages In The Documentation
® Safety and regulatory information R&S SMB100B Where to find key documents on Rohde & Schwarz Warning messages in the documentation A warning message points out a risk or danger that you need to be aware of. The signal word indicates the severity of the safety hazard and how likely it will occur if you do not follow the safety precautions. -
Page 12: Korea Certification Class B
® Safety and regulatory information R&S SMB100B Korea certification class B Korea certification class B 이 기기는 가정용(B급) 전자파 적합기기로서 주로 가정에서 사용하는 것을 목적으 로 하며, 모든 지역에서 사용할 수 있습니다. Getting Started 1422.1045.02 ─ 06... -
Page 13: Documentation Overview
® Documentation overview R&S SMB100B Service manual Documentation overview This section provides an overview of the R&S SMB100B user documentation. Unless specified otherwise, you find the documents at: www.rohde-schwarz.com/manual/smb100b Getting started manual Introduces the R&S SMB100B and describes how to set up and start working with the product. -
Page 14: Instrument Security Procedures
® Documentation overview R&S SMB100B Release notes and open source acknowledgment (OSA) https://gloris.rohde-schwarz.com Instrument security procedures Deals with security issues when working with the R&S SMB100B in secure areas. It is available for download on the internet. Printed safety instructions Provides safety information in many languages. -
Page 15: Application Notes, Application Cards, White Papers, Etc
® Documentation overview R&S SMB100B Videos Application notes, application cards, white papers, etc. These documents deal with special applications or background information on particular topics. www.rohde-schwarz.com/application/smb100b Videos Find various videos on Rohde & Schwarz products and test and measurement topics on YouTube: https://www.youtube.com/@RohdeundSchwarz On the menu bar, search for your product to find related videos. - Page 16 ® Documentation overview R&S SMB100B Videos Getting Started 1422.1045.02 ─ 06...
-
Page 17: Key Features
® Key features R&S SMB100B Key features The R&S SMB100B is a new high-performance signal generator developed to meet demanding customer requirements. Offering excellent signal characteristic and straightforward and intuitive operation, the signal generator makes signal generation fast and easy. Outstanding key features of the R&S SMB100B are: ●... - Page 18 ® Key features R&S SMB100B Getting Started 1422.1045.02 ─ 06...
-
Page 19: Preparing For Use
® Preparing for use R&S SMB100B Unpacking and checking Preparing for use Here, you can find basic information about setting up the product for the first time. Lifting and carrying Use the handles at the side, for lifting and carrying the R&S SMB100B, see "Lift- ing and carrying the product"... -
Page 20: Choosing The Operating Site
® Preparing for use R&S SMB100B Setting up the R&S SMB100B Choosing the operating site Specific operating conditions ensure proper operation and avoid damage to the product and connected devices. For information on environmental conditions such as ambient temperature and humidity, see the data sheet. See also "Choosing the operating site"... - Page 21 ® Preparing for use R&S SMB100B Setting up the R&S SMB100B 2. CAUTION! Foldable feet can collapse. See "Setting up the product" on page 8. Always fold the feet completely in or out. With folded-out feet, do not place anything on top or underneath the product. 3.
-
Page 22: Mounting The R&S Smb100B In A Rack
® Preparing for use R&S SMB100B Setting up the R&S SMB100B 4.4.2 Mounting the R&S SMB100B in a rack To prepare the rack 1. Observe the requirements and instructions in "Setting up the product" on page 8. 2. NOTICE! Insufficient airflow can cause overheating and damage the product. Design and implement an efficient ventilation concept for the rack. -
Page 23: Considerations For Test Setup
® Preparing for use R&S SMB100B Considerations for test setup Considerations for test setup Cable selection and electromagnetic interference (EMI) Electromagnetic interference (EMI) can affect the measurement results. To suppress electromagnetic radiation during operation: ● Use high-quality shielded cables, especially for the following connector types: –... -
Page 24: Connecting To Power
® Preparing for use R&S SMB100B Connecting to LAN b) Use a conductive floor mat and heel strap combination. Connecting to power For safety information, see "Connecting to power" on page 9. 1. Plug the AC power cable into the AC power connector on the rear panel. Only use the AC power cable delivered with the R&S SMB100B. -
Page 25: Connecting Usb Devices
® Preparing for use R&S SMB100B Connecting USB devices 1 = Hostname 2 = IP address If disconnected from the LAN, the R&S SMB100B displays the IP address 0.0.0.0. See also chapter "To configure the instrument for remote access" in the user manual. -
Page 26: Connecting To Rf Coaxial Connectors
® Preparing for use R&S SMB100B Connecting to RF coaxial connectors When connected, the R&S SMB100B detects the keyboard automatically. A detected keyboard has the default layout English – US. To connect a mouse ► Connect the mouse to any of the USB connectors. When connected, the R&S SMB100B detects the mouse automatically. - Page 27 ® Preparing for use R&S SMB100B Connecting to RF coaxial connectors To connect to screwable connectors The R&S SMB100B provides screwable RF connectors as in Table 4-1. ► NOTICE! Excessive tightening can damage the connectors. To connect the cable with the connector, proceed as follows: a) Carefully align the connector of the cable and the connector along a com- mon axis.
-
Page 28: Connecting To Rf 50 Ω
® Preparing for use R&S SMB100B Connecting to Ref In/Ref Out Connecting to RF 50 Ω 4.10 To connect to "RF 50 Ω" 1. Before connecting to the "RF 50 Ω" connector on the front panel, proceed as follows: a) Prepare the "RF 50 Ω" connector. See "To prepare for connecting"... -
Page 29: Switching On Or Off
® Preparing for use R&S SMB100B Switching on or off 4.12 Switching on or off The following table provides an overview of power states, LEDs and positions of the power switch. Table 4-2: Overview of power states State Position of power switch gray Standby orange... - Page 30 ® Preparing for use R&S SMB100B Switching on or off To shut down the product The product is in the ready state. ► Press the [On/Standby] key. The operating system shuts down. The LED changes to orange. In the standby state, the power switch circuits and the OCXO are active. To deac- tivate them, disconnect the instrument from the power supply.
-
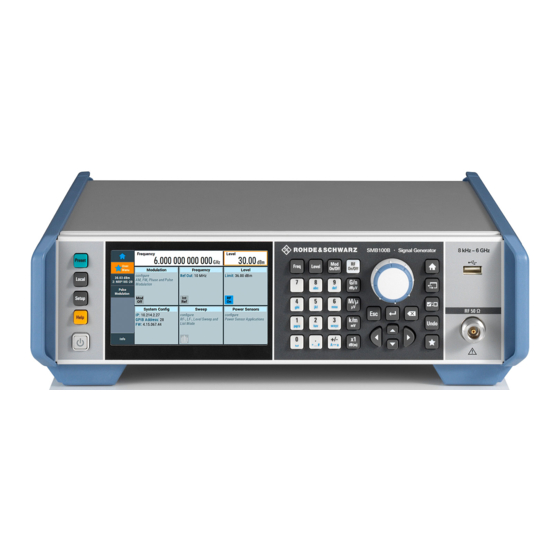
Page 31: Instrument Tour
® Instrument tour R&S SMB100B Front panel tour Instrument tour This chapter explains the control elements and the connectors of the R&S SMB100B. The views of the front panel and the rear panel help you to get familiar with the instrument and to perform first steps. For specifications of the interfaces, see the data sheet. -
Page 32: Utility Keys
® Instrument tour R&S SMB100B Front panel tour RF 50 Ω Keypad On/Standby 5.1.1 Utility keys The utility keys set the R&S SMB100B to a defined state, and provide access to basic settings and information on assistance. Table 5-1: Utility keys Utility Key Assigned functions [Preset]... -
Page 33: Function Keys
® Instrument tour R&S SMB100B Front panel tour The touch-sensitive panel provides an alternative means of user interaction for quick and easy handling of the instrument, see Chapter 7.2, "Means of manual interaction", on page 52. See also: ● Chapter 7, "Instrument control", on page 51, for operating the touchscreen. -
Page 34: Editing Keys
® Instrument tour R&S SMB100B Front panel tour 5.1.4.2 Editing keys Editing keys enable you to confirm an entry, delete individual characters, or exit the current operation. Table 5-3: Editing keys Type of key Description [Esc] key Closes all kinds of dialog boxes, if the edit mode is not active. Quits the edit mode, if the edit mode is active. -
Page 35: Display Keys
® Instrument tour R&S SMB100B Front panel tour Table 5-4: Navigation keys Type of key Description [Up/Down] Key The [Up] and the [Down] key does the following: ● In a numeric edit dialog box, increase or decrease the instru- ment parameter. ●... -
Page 36: Rf 50 Ω
® Instrument tour R&S SMB100B Rear panel tour RF 50 Ω 5.1.7 Output of the RF signal (N female connector). Ω", How to: Chapter 4.10, "Connecting to RF 50 on page 28 5.1.8 Keypad The keypad enables you to enter alphanumeric parameters, including the corre- sponding units. -
Page 37: Connectors
® Instrument tour R&S SMB100B Rear panel tour Figure 5-3: Rear panel view R&S SMB100B RF Signal Generator = Serial number (six digits in the string 1400.1000.02-<serial number>-<checksum>) IEC 625/IEEE 488 3, 5 = USB/USB In AC power supply connector and switch S/P Dif Stereo L/R 9, 10 =... - Page 38 ® Instrument tour R&S SMB100B Rear panel tour See also "Annex: Hardware interfaces" and chapter "Network and remote control" in the user manual. USB/USB In ● Female USB (universal serial bus) 2.0 connector of type A (host USB), to con- nect devices like a keyboard, a mouse, a memory stick, or the R&S NRP- Z3/Z4 cable for the R&S NRP power sensors ●...
- Page 39 ® Instrument tour R&S SMB100B Rear panel tour How to: Chapter 4.11, "Connecting to Ref In/Ref Out", on page 28 BNC connector for output of the internal LF generator signal. See the data sheet and in the user manual, section "Analog modulation". Mod.
- Page 40 ® Instrument tour R&S SMB100B Rear panel tour Getting Started 1422.1045.02 ─ 06...
-
Page 41: Trying Out The Instrument
® Trying out the instrument R&S SMB100B Generating an unmodulated carrier Trying out the instrument This chapter introduces the first steps with the R&S SMB100B. It shows how to operate and configure the instrument using simple examples. The complete description of the functionality and its usage is given in the R&S SMB100B user manual. - Page 42 ® Trying out the instrument R&S SMB100B Generating an unmodulated carrier The on-screen key pad closes and the frequency value is displayed. 3. To set the signal level, tap the "Level" field and enter the level in the same way. 4.
- Page 43 ® Trying out the instrument R&S SMB100B Generating an unmodulated carrier The blue colored "RF On" icon indicates that the RF output is activated. The R&S SMB100B provides the 6 GHz signal at the RF connector at the front panel. Getting Started 1422.1045.02 ─...
- Page 44 ® Trying out the instrument R&S SMB100B Generating an unmodulated carrier Figure 6-1: Generating an unmodulated signal Alternative ways to access the instrument functions To fulfill the same task, you can also use the front panel keys or the setting parameters provided in the frequency and level dialogs.
-
Page 45: Generating An Rf Frequency Sweep Signal
® Trying out the instrument R&S SMB100B Generating an RF frequency sweep signal Connect RF 50 Ω of the R&S SMB100B to a signal analyzer, for example ® R&S FSW, to display the generated signal. For the required settings of the signal analyzer, refer to its user manual or its online help. - Page 46 ® Trying out the instrument R&S SMB100B Generating an RF frequency sweep signal a) Select "Mode > Auto" to run the sweep continuously. b) Select "Shape > Sawtooth" to set the waveform shape of the sweep signal. c) Select "Spacing > Linear", to determine the calculation method for the fre- quency shift of a step.
-
Page 47: Saving And Recalling Settings
® Trying out the instrument R&S SMB100B Saving and recalling settings a) Set "Start Freq > 200 MHz" and "Stop Freq > 600 MHz" to determine the frequency sweep range. b) Set the step width "Step Lin > 10.0 MHz" to determine the width for a fre- quency step. - Page 48 ® Trying out the instrument R&S SMB100B Saving and recalling settings To save the instrument settings in a file We assume, a test configuration as described in Chapter 6.2, "Generating an RF frequency sweep signal", on page 45. 1. Press the [Setup] key on the front panel. 2.
- Page 49 ® Trying out the instrument R&S SMB100B Saving and recalling settings 2. Press the [Setup] key on the front panel. 3. In the "Setup" menu, select "Settings > Save/Recall". 4. In the "Save/Recall" dialog, select "Operation Mode > Recall". Navigate to the directory the file is saved in and select the MyTestSignal file.
- Page 50 ® Trying out the instrument R&S SMB100B Saving and recalling settings Try out the following: ● Touch and hold a spot in the tile diagram for at least 1 second to access the context-sensitive menu. ● Select "Mark All Parameters Changed from Preset". ●...
-
Page 51: Instrument Control
® Instrument control R&S SMB100B Possible ways to operate the instrument Instrument control This chapter provides an overview on how to work with the R&S SMB100B. It covers the following topics: ● Possible ways to operate the instrument............51 ● Means of manual interaction................ -
Page 52: Means Of Manual Interaction
® Instrument control R&S SMB100B Understanding the display information Means of manual interaction For the manual interaction with the R&S SMB100B, you have several methods that you can use as an alternative to perform a task: ● Touchscreen: Touchscreen operation is the most direct way to interact. Almost all control elements and actions on the screen are based on the standard operating sys- tem concept. -
Page 53: Status Bar
® Instrument control R&S SMB100B Understanding the display information Figure 7-1: Home screen 1 = Taskbar/softkey bar with "Home" and "Info" key 2 = Status bar 3 = Tile diagram ● Status bar......................53 ● Tile diagram.....................53 ● Taskbar......................54 ● Additional display characteristics.............. -
Page 54: Taskbar
® Instrument control R&S SMB100B Understanding the display information Tile Access to: ● "Modulation" Analog and stereo , and pulse modulation settings ● Built in LF generator ● "System Config" "Save/Recall": settings for saving and loading instrument configura- tions ● "Remote access": Network and emulation settings. -
Page 55: Additional Display Characteristics
® Instrument control R&S SMB100B Understanding the display information R&S NRP power sensors Shows a connected external power sensor. The button displays the current readings when the sensor is active. Active dialogs Indicates the dialog name of each active dialog in a separate button. "Info"... -
Page 56: Accessing The Functionality
® Instrument control R&S SMB100B Accessing the functionality ● Scroll bar handle An arrow icon that appears when you touch a scroll bar helps you to scroll in a dialog or list. If no scrollbar handle appears, you can touch and swipe an element to scroll up and down. -
Page 57: Entering Data
® Instrument control R&S SMB100B Entering data ● Taskbar/softkeys on the touchscreen ● Context-sensitive menus for specific elements on the touchscreen, or with the rotary knob (press and hold). ● Elements on the status bar in the touchscreen ● Displayed setting on the touchscreen that means block diagram and all set- tings available in dialogs. -
Page 58: Entering Numeric Parameters
® Instrument control R&S SMB100B Entering data For data input in dialog boxes, the instrument provides on-screen keypads for entering numeric and alphanumeric values. Thus, you can always set the param- eters via the touchscreen, the front panel, or an external keyboard. To correct an entry 1. -
Page 59: Entering Alphanumeric Parameters
® Instrument control R&S SMB100B Getting information and help 3. If the parameter does not require a unit, confirm the entered value by pressing "Enter". To enter values by using the front panel controls 1. Change the currently used parameter value by using the rotary knob or the [Up/Down] keys. - Page 60 ® Instrument control R&S SMB100B Getting information and help ● The general help explains a dialog box, provides instructions, and general information. To display context help ► To access a help topic, perform one of the following: a) Tap and hold the parameter for which you need information and tap "Help" in the context menu.
-
Page 61: Remote Control
® Instrument control R&S SMB100B Remote control If a dialog box is opened, the help topic for the current tab is shown. Other- wise the "Contents" page appears. Navigating in the table of contents and in the help topics 1. To move through the displayed contents entries, tap on an entry and scroll or use a connected mouse or the [Up/Down] keys. -
Page 62: Remote Operation Over Vnc
® Instrument control R&S SMB100B Remote operation over VNC ● Remote control via the USB interface For remote control over LAN or USB, you can use the R&S VISA (Virtual Instrument Software Architecture) library provided for download at the Rohde & Schwarz website http://www.rohde-schwarz.com/rsvisa. How to configure the remote control interfaces is described in the user manual, chapter "Network and remote control operation". -
Page 63: Contacting Customer Support
® Contacting customer support R&S SMB100B Contacting customer support Technical support – where and when you need it For quick, expert help with any Rohde & Schwarz product, contact our customer support center. A team of highly qualified engineers provides support and works with you to find a solution to your query on any aspect of the operation, program- ming or applications of Rohde &... - Page 64 ® Contacting customer support R&S SMB100B Getting Started 1422.1045.02 ─ 06...
-
Page 65: Index
® Index R&S SMB100B Index Customer support ........63 Active elements ........55 Alphanumeric parameters ....... 59 Data entry ..........57 Application cards ........15 Data sheets ..........14 Application notes ........15 Dialog boxes ..........56 Display Active elements ........55 Bench top, placing ........ - Page 66 ® Index R&S SMB100B Instrument help ........13 Instrument security procedures ....14 Navigation Instrument tour ........31 Keys ............ 34 Navigation controls Overview ..........33 Network ★ (User) ..........35 Environment ........24 Access on a remote computer .... 62 Numeric data entry ........57 Arrow ..........
- Page 67 ® Index R&S SMB100B Security procedures ........ 14 Service manual ........13 Softkey bar See Taskbar ........54 Standby ........... 36 Status bar Display ..........53 Stereo L/R connector ......38 Switching On or off ..........29 Tab labels ..........55 Text entry ..........
Need help?
Do you have a question about the R&S SMB100B and is the answer not in the manual?
Questions and answers