
Related Manuals for H3C S10506


Summary of Contents for H3C S10506
- Page 1 H3C S10500 Switch Series Installation Quick Start New H3C Technologies Co., Ltd. http://www.h3c.com.hk Document version: 6PW103-20170430...
- Page 2 Copyright © 2016-2017, New H3C Technologies Co., Ltd. and its licensors All rights reserved No part of this manual may be reproduced or transmitted in any form or by any means without prior written consent of New H3C Technologies Co., Ltd.
-
Page 3: Table Of Contents
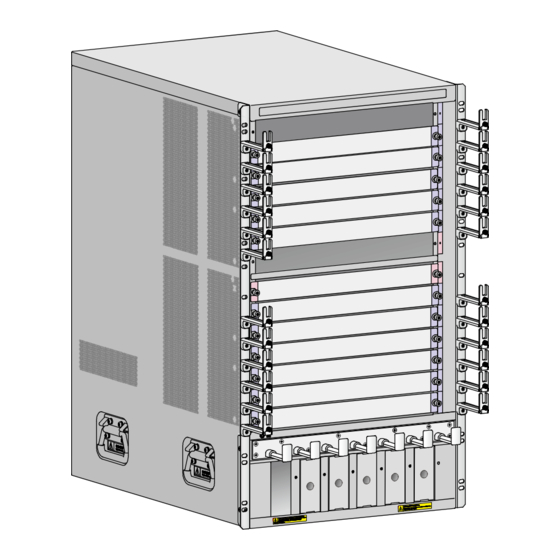
Contents Installation quick start ·················································································································································· 1 Chassis views and technical specifications ···················································································································· 1 Chassis views ···························································································································································· 1 Technical specifications ··········································································································································· 2 Safety recommendations ·················································································································································· 3 Examining the installation site ········································································································································· 4 Installing the switch ··························································································································································· 4 ... -
Page 4: Installation Quick Start
This installation quick start provides basic instructions for installing an S10500 switch. For more information about the installation procedure, see H3C S10500 Switch Series Installation Guide. The installation procedure is similar for all S10500 switch models. This installation quick start uses the S10508-V switch as an example. -
Page 5: Technical Specifications
Width Depth S10504 353 mm (13.90 in) (8 RU) 440 mm (17.32 in) 660 mm (25.98 in) S10506 353 mm (13.90 in) (8 RU) 440 mm (17.32 in) 660 mm (25.98 in) S10508 620 mm (24.41 in) (14 RU) 440 mm (17.32 in) 660 mm (25.98 in) -
Page 6: Safety Recommendations
1200 W 2400 W power • 2500 W (220 VAC) • S10504/S10506: 1 to 4 Quantity • S10508/S10508-V/S10510/S10512: 1 to 6 Safety recommendations To avoid equipment damage or bodily injury caused by improper use, read the following safety recommendations before installation. Note that the recommendations do not cover every possible hazardous condition. -
Page 7: Examining The Installation Site
The switch can only be used indoors. To make sure the switch operates correctly and prolong its service lifetime, the installation site must meet the requirements for load-bearing, temperature, humidity, cleanness, EMI, grounding power module, ventilation, and space. For more information, see H3C S10500 Switch Series Installation Guide. -
Page 8: Installing Cage Nuts
Figure 5 Installing a cage nut Align the installation holes on the front end of a slide rail with the cage nuts on a front rack post, and use six screws to attach the slide rail to the front rack post. Figure 6 uses the right slide rail as an example. - Page 9 For the S10506 and S10510 switches, you can use the cage nut installation template to determine the cage nut installation holes on the rack posts. For more information about the cage nut installation template, see H3C S10506&S10510 Switches Installation Quick Start.
-
Page 10: Installing The Switch In The Rack
Installing the switch in the rack Follow these guidelines when you install the switch in the rack: To avoid equipment damage or bodily injury, use a minimum of two people to lift the switch. H3C • recommends that you use a mechanical lift to move the switch. -
Page 11: Installing Frus
Figure 10 Grounding the switch Installing FRUs Installing a card CAUTION: Before installing a card in the chassis, make sure the connectors on the card are not broken or blocked. - Page 12 Figure 11 Installing a card Installing a subcard CAUTION: Before installing a subcard in the chassis, make sure the connectors on the subcard are not broken or blocked.
-
Page 13: Installing A Power Module
Figure 12 Installing a subcard Installing a power module CAUTION: Provide a circuit breaker for each power module and verify that the circuit breaker is off before • installation. Do not install power modules of different models on the same switch. •... -
Page 14: Connecting Power Cords
Figure 13 Installing a power module Connecting power cords Connecting an AC power cord CAUTION: Before you connect an AC power cord, make sure the circuit breaker for the power cord is switched off. -
Page 15: Accessing The Switch For The First Time
Figure 14 Connecting an AC power cord Connecting a DC power cord CAUTION: • Provide a circuit breaker for each DC power cord. Before connecting the DC power cord, make sure the circuit breakers for both the positive (+) and •... -
Page 16: Setting Terminal Parameters
On an S10506 or S10510 switch, if both the console port and USB console port are connected to terminals, you can only access the switch through the USB console port. To connect the console cable to the console port: Connect the DB-9 connector of the console cable to the 9-core serial port on the terminal. -
Page 17: Powering On The Switch
Power input Steady green Power module Power output Steady green Steady on Fan tray FAIL Obtaining documentation Take the following steps to get related documents from the H3C website at www.h3c.com.hk. Go to http://www.h3c.com.hk/Technical_Documents. Choose the desired product category and model. -
Page 18: Index
Index A C E I O S Accessing the switch for the first time,12 Installing the switch,4 Chassis views and technical specifications,1 Obtaining documentation,14 Examining the installation site,4 Safety recommendations,3...
Need help?
Do you have a question about the S10506 and is the answer not in the manual?
Questions and answers