MAMMOTION AWD 5000 Quick Start Manual
Robotic lawn mower
Hide thumbs
Also See for AWD 5000:
- User manual (83 pages) ,
- User manual (69 pages) ,
- User manual (105 pages)

Related Manuals for MAMMOTION AWD 5000


Summary of Contents for MAMMOTION AWD 5000
- Page 1 LUBA Robotic Lawn Mower Model: AWD 5000, LUBA0001, AWD 3000 Quick Start Guide V 1.0...
- Page 2 Thank you for choosing MAMMOTION as your garden care kit. This Quick Start Guide will help you learn and operate MAMMOTION LUBA. Safety and Regulations Operating MAMMOTION products requests training and practice. Please read through this document before operating it in your garden. They are:...
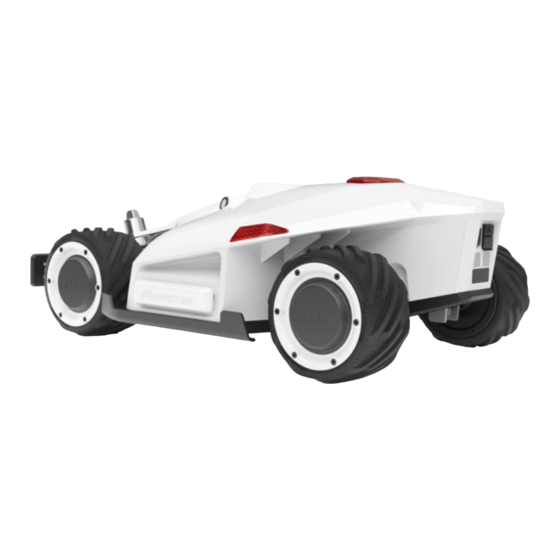
- Page 3 About MAMMOTION LUBA MAMMOTION LUBA is a 4-wheels-differential ( 4WD) perimeter wire free robotic lawn mower. The 4 W D a n d p e r i m e t e r w i r e f r e e enable LUBA to break the limits of mowing jobs and free the user’s hands.
- Page 4 1. Secure key 4. Charging port ) 2. SIM port(Reserved 5. Infrared sensor 3. USB port Note: 1. The reserved port might not function in some previous version mowers. 1. Cutting blade*8 2. Blade disk*2...
-
Page 5: Charging Station
Charging Station 1. Mounting hole for RTK base pole 4. Screws*3 2. Mounting holes*3 5. Power adaptor 3. Charging ports for LUBA 6. Extension wire(10meters)... - Page 6 RTK base 1. Antenna 3. RTK wire(2.5meter) 2. RTK base Mounting pole...
- Page 7 Install MAMMOTION APP 1. APP download & Installations Option1. Search the MAMMOTION on App Store (For iOS). Option2. Go to below download link for the MAMMOTION App (For Android). Link:https://www.pgyer.com/5WVG 2. LUBA registration and activation Keep pressing the POWER BUTTON on the LUBA until you hear“Di...”sound from it.
- Page 8 Step 1: Sign up on the App for the first use Turn on the GPS and Bluetooth on your phone. Select the country and input your email address. Then, click Code on the App. It will send a verifying code to your email. Input the six figures verifying code to the App and click Next to complete the signup.
-
Page 10: App Introduction
App introduction As shown in the following figure, the meanings of each icon are listed below: 1:Cutting height setting. When user changes the value of it, the lift motor will drive the blade to the corresponding height. 2:Positioning/navigation status. There are two statuses. One is GPS and the other is RTK. In normal work, the status should be in RTK status. - Page 11 RTK Base Installation Recommendation of selecting the RTK base point for typical installation: 1. Install the RTK base on the ground This way is for the property with relatively opened areas of the yard. For example, there are no tall buildings around the yard except the owner’s house or the buildings are far away from it.
-
Page 12: Installation Kit
Installation Kit: ⑤ ④ ③ ② ① ⑥ ① Charging station ② RTK base ③ Power adaptor for charging station ④ Extension wire for charging station(10 meters) ⑤ RTK wire(2.5 meters) ⑥ RTK base mounting pole with tools... - Page 13 Step1:Go through the 2.5meters RTK wire from A to B and then connect it to C. Step2:Insert and fix the RTK bas mounting pole to the ground from hole A on charging station.
- Page 14 Step3:Screw the other part of RTK base mounting pole together. Fix the RTK base to the mounting pole. The RTK base can be locked on the pole by driving the plastic screw on the back. Users can fix the RTK base on the pole first before fixing the pole to the ground as well. Step5: Then connect the wires for each part.
- Page 15 Note: 1. The LUBA status must be on Charging when clicking to reset the RTK antenna. 2. The RTK antenna reset will clear all the previous planed data. So it’s only done for a new place of charging station or setting. Step2:Draw map After the RTK antenna is reset, drive the LUBA out from the charging station for about 1meter away.
- Page 16 Manually complete the boundary drawing. When the LUBA is driven closely to the start point, the virtual boundary will be closed automatically. Then it will pop the message:Planning to complete. LUBA status will turn to be Standby when it’s completed. Note: Users can manually click to complete the virtual boundary drawing.
- Page 17 Draw no-go-zones More In more plans, users can set the working height of cutting blade, working modes, time, response to rain and device choosing accordingly.
- Page 18 Step3:Start task After the planning of map has been completed, click Start task at the bottom of the App. Then it will pop up the confirmation message. Confirm the mowing settings and start operation, the LUBA will work automatically.
- Page 19 When the LUBA is automatically starting, the status will turn to be Working. Charging station Working Note: 1. When clicking Start Task to start mowing, the LUBA will go around all the virtual boundaries and no-go-zone areas automatically first. Then it will go to the Start Point of running line to start the mowing task.
- Page 20 Note: The LUBA can be driven back for recharging manually on the App as well. But it will need the App connect to the LUBA successfully. Maintenance As for maintenance details, please refer to MAMMOTION official website or user manual.
- Page 21 FCC Statement This device complies with Part 15 of the FCC rules. Operation is subject to the following two conditions: 1) this device may not cause harmful interference, and 2) this device must accept any interference received, including interference that may cause undesired operation. Note: This equipment has been tested and found to comply with the limits for a Class B digital device, pursuant to part 15 of the FCC Rules.
- Page 22 cet appareil est conforme à l'exemption des limites d'évaluation courante dans la section 2.5 du cnr - 102 et conformité avec rss 102 de l'exposition aux rf, les utilisateurs peuvent obtenir des données canadiennes sur l'exposition aux champs rf et la conformité. This equipment complies with Canada radiation exposure limits set forth for an uncontrolled environment.
Need help?
Do you have a question about the AWD 5000 and is the answer not in the manual?
Questions and answers