
Related Manuals for Titaniumbaby Stellar i Size


Summary of Contents for Titaniumbaby Stellar i Size
- Page 1 Stellar i Size i Size autostoel 40 - 150 cm Gebruiksaanwijzing i Size car seat 40 - 150 cm Instructions for use Model No. 5990 i Size 40 - 150 cm...
-
Page 2: Table Of Contents
Inhoud Pagina OPMERKINGEN......................Kenmerken......................Waarschuwing....................Positie installatie....................Onderdelenlijst....................Zo installeert u ISOFIX en de steunpoot............Gebruik van ISOFIX en steunpoot..............5 punts gordel gebruiken om het kind vast te zetten........Installatiemet ISOFIX bevestigingen + veiligheidsgordel voor volwassenen..ISOFIX losmaken....................Verwijderen van het binnenkussen en het hoofdkussen........Aanpassen rugleuning.................. -
Page 3: Opmerkingen
OPMERKINGEN Opmerking over de i-Size categorie kinderbeveiligingssystemen (40 - 105 cm) Dit is een i-Size kinderbeveiligingssysteem. Het is goedgekeurd volgens de UN 129 normering, voor gebruik op i-Size- compatibele voertuigzitplaatsen, zoals aangegeven door voertuigfabrikanten in de gebruikshandleiding van het voertuig. Neem bij twijfel contact op met de fabrikant van het kinderbeveiligingssys- teem of met de verkoper. -
Page 4: Kenmerken
KENMERKEN Dit kinderzitje kan 360° gedraaid worden. Volgens UN normering Nr./129/03 is dit kinderzitje een universeel ISOFIX kinderzitje en moet het worden bevestigd met de ISOFIX aansluitingen. Om dit volgens de ECE R129/03 normering goedgekeurde kinderzitje te kunnen ge- bruiken, moet uw kind aan de volgende eisen voldoen. Naar voren gericht: lengte kind 76 cm - 150 cm Naar achteren gericht: lengte kind 40 cm - 105 cm / Gewicht kind: ≤18 kg;... - Page 5 • De riemen waarmee het kinderzitje in het voertuig is bevestigd moeten strak zitten, de steunpoot moet op de vloer van het voertuig rusten, alle riemen of stootkussens waarmee het kind wordt vastgezet moeten aan het lichaam van het kind zijn aangepast en de riemen mogen niet gedraaid zitten. •...
-
Page 6: Positie Installatie
POSITIE INSTALLATIE Veiligheidsgordel auto: Diagonale gordel Veiligheidsgordel auto: Heupgordel ISOFIX bevestigingen Bij gebruik als i-Size: Dit kinderbeveiligingssysteem is geschikt voor voertuigen die zijn uitgerust volgens de ECE R14 normering. En het kan pas op ISOFIX wor- den gebruikt, nadat dit is geïnstalleerd. Bij gebruik als i-Size stoelverhoger: Dit kinderbeveiligingssysteem is geschikt voor veiligheidsgordels die voldoen aan de ECE R16 normering en niet voor modellen die alleen... -
Page 7: Onderdelenlijst
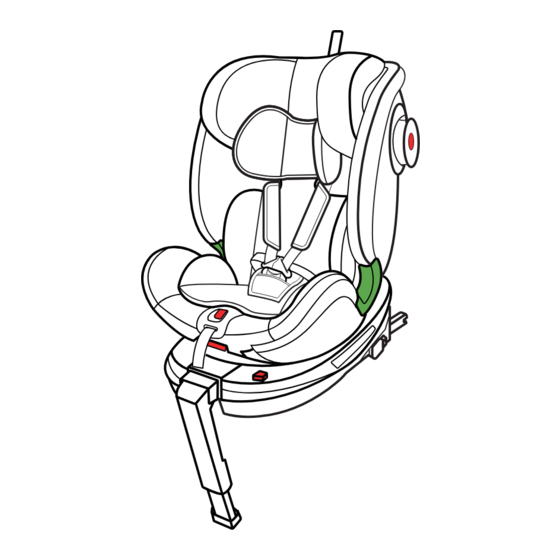
ONDERDELENLIJST Verstelband hoofdsteun Hoofdsteun III 组 Riemgeleider Schouderkussen Binnenkussen Schouderriem Gespkussen Gesp Instelknop Verstelknop Verstelriem beenondersteuning gordelsysteem vooruit & achteruit Verstelbare Afstelhendel voor steunpoot draaien/hoek Opmerking: Het binnenkussen is geschikt voor kinderen met een lichaamslengte van 40 - 60 cm. - Page 8 Verstelknop hoofdsteun Aanpasbare zijsteun Aanpassingsknop ZIJBESCHERMINGSSYSTEEM Riemgeleider Ontgrendelknop ISOFIX verstelling Houder voor ISOFIX aansluiting Verstelknop lengte beenondersteuning ISOFIX bevestigings aansluiting Opbergvak steunpoot Isofix geleiders Let goed op alle onderdelen. Raakt u er een kwijt, neem dan contact op met de fabrikant. Ontbreekt een onderdeel, of is het kinderzitje beschadigd, dan mag het niet meer gebruikt worden.
-
Page 9: Zo Installeert U Isofix En De Steunpoot
Zo installeert u ISOFIX en de steunpoot Maak de ISOFIX bevestigings- Verleng de ISOFIX bevestigingen, geleiders vast aan de ISOFIX door op de ontgrendelknop te bevestigingspunten. drukken. Stel de juiste lengte van de IOSFIX bevestiging in. Zorg ervoor dat beide ISOFIX De kleur van de indicatoren op bevestigingen goed zijn beide ISOFIX bevestigingen moet... - Page 10 Druk op de verstelknop van de Bij een correcte plaatsing van de steunpoot en houd deze ingedrukt. steunpoot op de vloer van het Verleng de steunpoot tot hij zo lang voertuig, zal het een groene kleur is dat hij de grond kan bereiken. tonen als de steunpoot stevig wordt samengedrukt.
-
Page 11: Gebruik Van Isofix En Steunpoot
GEBRUIK VAN ISOFIX + STEUNPOOT Maak het kinderzitje vast aan de autostoel. Naar achteren gericht: Draai het kinderzitje in de te- Lengte kind 40 – 105 cm genovergestelde positie van de rijrichting. Gewicht kind ≤18 kg Zet het kind in het zitje. - Page 12 GEBRUIK VAN ISOFIX + STEUNPOOT Maak het kinderzitje vast aan de autostoel. Naar voren gericht: Plaats het kinderzitje in de rijrich- Lengte kind 76 – 105 cm ting. Gewicht kind ≤18 kg Zet het kind in het zitje.
-
Page 13: Punts Gordel Gebruiken Om Het Kind Vast Te Zetten
5 PUNTS GORDEL GEBRUIKEN OM HET KIND VAST TE ZETTEN Druk de verstelknop van het Zet het kind in het kinderzitje en gordelsysteem in en trek tegelijk haal beide armen door de gordels. volledig aan de twee schouder- gordels van het kinderzitje. Belangrijk: Als eerste worden de Breng de delen samen en sluit de linker en de rechter gordel van de... - Page 14 Klik Zorg ervoor dat de gesp goed Trek de oprolriem aan tot de juiste vastzit. spanning. Zorg ervoor dat de ruimte tussen Druk op de rode knop om de gesp het kind en de schoudergordel los te maken. ongeveer twee vingers is. De vormgeving van de gesp kan variëren, afhankelijk van de actuele manier van plaatsing.
-
Page 15: Installatiemet Isofix Bevestigingen + Veiligheidsgordel Voor Volwassenen
INSTALLATIE MET ISOFIX BEVESTIGINGEN + VEILIGHEIDSGORDEL VOOR VOLWASSENEN Naar voren gericht: Lengte kind 100 – 150 cm i-Size stoelverhoger Maak de steunpoot korter met behulp van de instelknop. Positie 1 Klap de steunpoot in het opbergvak Draai de stoel in voorwaartse onder de stoel, druk hem aan en richting. -
Page 16: Isofix Losmaken
Let er bij het installeren en afstellen van de veiligheidsgordels op, dat zowel de schoudergordel als de heupgordel niet gedraaid is en dat de geleiders niet verhinderen dat de veiligheidsgordels in de juiste positie zitten. Let erop, dat de gordel in de juiste positie over het bekken van het kind loopt. -
Page 17: Verwijderen Van Het Binnenkussen En Het Hoofdkussen
Druk met de ene hand op de in- Plaats de steunpoot volledig in het stelknop voor vooruit en achteruit opbergvak; volg om hem los te en houd deze vast. Duw met de maken de omgekeerde procedure. andere hand de steunpoot terug. WAARSCHUWING Installeer het product NOOIT met alleen de autogordel. -
Page 18: Aanpassen Rugleuning
AANPASSEN RUGLEUNING Zoek de rode hendel en trek hem omhoog om de positie aan te passen. Achterwaarts Naar voren gericht: Lengte kind 76 cm - 150 cm; Naar achteren gericht: Lengte kind 40 cm - 105cm / Gewicht kind ≤18 kg; Dit kinderzitje heeft 3 posities voor naar voren gerichte installatie. -
Page 19: Aanpassing 5 Punts Gordelsysteem
AANPASSING 5 PUNTS GORDELSYSTEEM Zorg er bij het aanpassen van de gordels aan de huidige situatie van het kind voor, dat geen van de gordels gedraaid zit. Gebruik de verstelknop van het gordelsysteem Om vast te maken Om los te maken Druk de verstelknop van het gor- Trek de oprolband naar beneden delsysteem in en trek volledig aan... -
Page 20: Aanpassing Hoofdsteun
AANPASSING HOOFDSTEUN Maximum Maximum 2e fase aan- 1e fase aan- passing passing Minimum Minimum 1e fase aanpassing: gebruik de 2e fase aanpassing: gebruik de verstelband van de hoofdsteun om aanpassingsknop van de hoofd- de hoogte aan te passen. steun om de hoogte aan te pas- sen. -
Page 21: Het Gordelsysteem Opbergen (Geschikt Voor Kinderen Van 100 - 150 Cm)
Lengte van de kinderen is 135 – 150 cm: hoogteverstellingsmethode van de hoofdsteun. Druk de aanpassingsknop van de Gebruik de verstelband om de hoofdsteun in en houd hem vast, hoofdsteun in de hoogste positie om de hoofdsteun op de juiste van de 1e fase te zetten. - Page 22 Druk op de verstelknop van het Til de bovenste flap naar boven en gordelsysteem en maak de riemen trek de onderste flap naar voren. los. Berg de schoudergordels en de Verwijder het gespkussentje. gesp op in de opbergvakken. Trek de gesp naar de achterkant Maak de drukknopen weer vast van het zitkussen en plaats de gesp om het zitkussen weer op z’n...
-
Page 23: Draaien / Richting Veranderen
DRAAIEN / RICHTING VERANDEREN Naar achteren gericht: Lengte kind 40 cm–105 cm Gewicht kind ≤18 kg Voor het comfort van de kinderen, kan dit alleen worden gedaan als de auto stilstaat. Verboden als de auto wordt gebruikt. Naar voren gericht: Lengte kind 76 –... -
Page 24: Bekleding Verwijderen
WAARSCHUWING Nooit gebruiken als het niet geblokkeerd is! Moet geblokkeerd zijn in voorwaartse of achter- waartse richting. Controleer of het zitje goed vastzit door het krachtig heen en weer te bewegen. BEKLEDING VERWIJDEREN Druk op de rode knop om de gesp Verwijder alle kussens uit de stoel. - Page 25 Verwijder de diagonale gordelafdekkingen aan beide zijden. Verwijder de bekleding van de Verwijder de stoffen bekleding van hoofdsteun. het volledige zitje. Het zitje opnieuw bekleden: om de zachte stoffen bekleding opnieuw aan te brengen, moeten bovenstaande stappen omgekeerd worden uitgevoerd. WAARSCHUWING Het kinderveiligheidssysteem (kinderzitje) mag niet worden gebruikt zonder stoffen bekleding.
-
Page 26: Onderhoud
Onderhoud Onderhoud Onderhoud kinderzitje Berg het kinderzitje op een voor het kind ontoegankelijke plek op nadat u de zachte onderdelen hebt verwijderd. Was de zachte onderdelen met koud water (< 30 °C). ● De zachte onderdelen niet strijken. ● De zachte onderdelen niet bleken of laten stomen. ●... - Page 27 Stellar i Size i Size car seat 40 - 150 cm Instructions for use Model No. 5990 i Size 40 - 150 cm...
- Page 28 Content Page Important notice before use................Feature......................... Warning........................ Installation position....................Parts list....................... How to install ISOFIX and support leg..............Use ISOFIX + support leg..................Using 5 point harness to fix child................. Installation with ISOFIX attachments + adult safety belt........Release ISOFIX ..................... Remove inner cushion and head pad..............
-
Page 29: Important Notice Before Use
Important notice before use Notice regarding i-Size category Enhanced Child Restraint Systems (40 - 105 cm) This is an i-Size Enhanced Child Restraint System. It is approved according to UN Regulation No. 129, for use in, i-Size compatible vehicle seating positions as indicated by vehicle manufacturers in the vehicle users’... -
Page 30: Feature
FEATURE This enhanced child seat can be adjusted 360°rotation. According to UN Regulation No/129/03, this enhanced child seat is a Universal ISOFIX Child Restraint and should be fitted using the ISOFIX connections. To use this enhanced child seat approved to the ECE R129/03 Regulation, your child must meet the following requirements. - Page 31 • Any straps holding the restraint to the vehicle should be tight, that any support-leg should be in contact with the vehicle floor, that any straps or impact shields restraining the child should be adjusted to the child’s body, and that straps should not be twisted.
-
Page 32: Installation Position
INSTALLATION POSITION Car Safety Belt: Diagonal Belt Car Safety Belt: Lap Belt ISOFIX Attachments When using as i-Size: This ECRS system is suitable for vehicles equipped with the ECE R14 requirements. Can only be used in a vehicle equiped with ISOFIX. When using as i-Size booster seat This ECRS system is suitable for seat belt that has passed the ECE R16 requirement and is not suitable for models only equipped with 2-point... -
Page 33: Parts List
PARTS LIST Headrest adjustment belt Headrest III 组 Belt Guidance Shoulder pad Inner cushion Shoulder strap Buckle pad Buckle Adjuster button Support Leg forward Harness & backward adjusting strap adjust button Adjustable Adjustment lever support leg for rotating/Angle Notice: Inner cushion is suitable for child height of 40-60 cm. - Page 34 Headrest adjusting button Side adaptive support SIDE PROTECT SYSTEMS Adjust Button Belt Guidance ISOFIX adjustment release button Bracket of ISOFIX connector Support leg length adjust button ISOFIX attachments connector Support leg storage slot ISOFIX guides Take care of correct part, any lost make sure to contact with manufacturer, the parts of damaged baby car seats are not allowed to use.
-
Page 35: How To Install Isofix And Support Leg
HOW TO INSTALL ISOFIX AND SUPPORT LEG Fit the ISOFIX attlachments Extend the ISOFIX attlachments guides with the ISOFIX connectors by depressing on the attlachments anchor points release button. Adjust the right length of the IOSFIX connector. Make sure that both ISOFIX The colors of the indicators on attachments connectors are both ISOFIX attachments... - Page 36 Press and hold the adjustment To keep support leg’s bottom button of the support leg, extend level same to the vehicle floor, support leg naturally to the it will display green color while length that can reach the ground. the support leg be compress tightly.
-
Page 37: Use Isofix+Support Leg
USE ISOFIX+SUPPORT LEG Secure the safety seat to the car seat. Rearward Facing: Rotate safety seat to the Child height 40 cm-105 cm opposite direction of travel. Child weight ≤18kg Fix the child occupant to the safety seat. - Page 38 USE ISOFIX + SUPPORT LEG Secure the safety seat to the car seat. Forward Facing: Rotate safety seat to the opposite Child height 76 cm-105 cm direction of travel. Child weight ≤18kg Fix the child occupant to the safety seat.
-
Page 39: Using 5 Point Harness To Fix Child
USING 5 POINT HARNESS TO FIX CHILD While pressing the harness Place the child in the child adjustment button, pull completely restraint and pass both arms the two shoulder harnesses of the through the harnesses. child restaint. Important: The left and right Engage the buckle as pictures bolts of the 5-point safety show. - Page 40 Click Make sure the buckle is properly Pull the retractor belt to the engaged. right tightness. Make sure the space between Press the red button to disengage the child and the shoulder harness the buckle. is about the thickness of two fingers.
-
Page 41: Installation With Isofix Attachments+Adult Safety-Belt
Installation with ISOFIX attachments+adult safety-belt Forward Facing: Child height 100 cm-150 cm i-Size Booster seat Shorten the support leg by pressing the support leg button. Position 1 Fold the support leg into the seat Rotate the seat to forward base’s storage slot, then push direction, adjust recline level and fix it. -
Page 42: Release Isofix
When installing and adjusting the safety belts, make sure that both the shoulder belt and waist belt are not twisted and will not keep the safety belts from being properly positioned. Note the correct belt position should be above the child’s pelvis. RELEASE ISOFIX Push Prop up baby car seat with... -
Page 43: Remove Inner Cushion And Head Pad
One hand press and hold the Fix the support leg all into the forward & backward adjustment storage slot , if need released it , button , the other hand push follow the opposite procedure. back the support leg. Warning NEVER install the product with car belt only. -
Page 44: Recline Adjustment
RECLINE ADJUSTMENT Find the red hand lever, pull it upwards to adjust the position. Rearward Forward Facing: Child height 76 cm-150 cm; Rearward Facing: Child height 40 cm-105 cm/ Child weight ≤18kg; This safety seat have 3 positions for forward installation. Forward Facing: Child height 76 cm - 105 cm could use position 1, position 2 and position 3. -
Page 45: Point Harness Adjustment
5 POINT HARNESS ADJUSTMENT Adjusting the harness according to the current situation of child, make sure there no any twisting. Press the harness adjustment button To loosen To tighten While pressing the harness Pull down the adjustment adjustment button, pull the two webbing and adjust it to the shoulder harnesses of child proper length to make sure... -
Page 46: Head Rest Adjustment
HEAD REST ADJUSTMENT highest highest 2nd stage 1st stage regulation regulation minimum minimum 1st stage adjustment: use the 2nd stage adjustment: use the headrest adjustment belt to headrest adjustment button to adjust the height . adjust the headrest height. (only 1st stage adjust to the highest position , then the 2nd stage adjust can be operated) -
Page 47: Conceal The Harness System (Suitable For Child Height 100 - 150 Cm)
Children’s height is 135 - 150 cm: Height adjustment method of headrest. Press and hold the headrest Use the headrest adjustment belt adjustment button to move the to adjust the headrest to the headrest to the appropriate height. highest position of the 1st stage. Checking the shouder strap height No-Too low No-Too high... - Page 48 Press the harness adjustment Lift the upper flap upward and button and loosen the straps. pull the lower flap forward. Store the shoulder harnesses Remove the buckle bag. and buckle in their storage compartments. Pull the buckle to the back of the Do reattach the snaps to seat pad, and then store buckle recover the seat pad.
-
Page 49: Rotate/Changing Direction
Rotate/changing direction Rearward Facing: Child height 40cm-105cm Child weight≤18kg For the convenience of children using.Can only be used when the car is stopped;Prohibited after use of the car. Forward Facing: Child height 76cm-150cm Rearward Forward Pull the adjustment lever to Release the adjust lever while start rotating. -
Page 50: Detach Soft Goods
Warning Never use any unlocked direction, fix direction before using. Confirm safety seat is fixed tighly by shaking or rotating seat. DETACH SOFT GOODS Press the red button to disengage Remove all inner pad. the buckle. Remove the buckle pad, conceal Raise the back cushion under the buckle in the buckle hole on the headrest. - Page 51 Remove the diagonal belt covers of both sides. Remove the headrest cloth Remove the cloth cover all seats. cover. Seat cloth cover mounted:To assemble soft goods, reverse the steps above. Warning Child restraint system (safety seat) without cloth cover cannot be used.
-
Page 52: Maintenance
Dit product wordt geïmporteerd door: This product is imported by: Monierweg 30 7741 KT Coevorden The Netherlands T. +31 (0) 591 63 24 24 www.titaniumbaby.com Geproduceerd volgens en voldoet aan: ECE 129/03 info@titaniumbaby.nl Produced according and complies with ECE 129/03...
Need help?
Do you have a question about the Stellar i Size and is the answer not in the manual?
Questions and answers
De knop van de Isofix is afgebroken en daardoor kan t mechanisme niet los. Is er een backup manier om hem los te krijgen.