Table of Contents
Advertisement
Attention
For Customers in the U.S.A.
FCC Statement
This device complies with Part 15 of the FCC Rules. Operation is subject to the following two conditions:
(1) This device may not cause harmful interference, and
(2) this device must accept any interference received, including interference that may cause undesired operation.
Note
This equipment has been tested and found to comply with the limits for a Class B digital device, pursuant to Part 15 of
the FCC Rules. These limits are designed to provide reasonable protection against harmful interference in a residential
installation.
This equipment generates, uses and can radiate radio frequency energy and, if not installed and used in accordance
with the instructions, may cause harmful interference to radio communications. However, there is no guarantee that
interference will not occur in a particular installation. If this equipment does cause harmful interference to radio or
television reception, which can be determined by turning the equipment off and on, the user is encouraged to try to
correct the interference by one or more of the following measures:
• Change the direction of the radio or TV antenna.
Move the equipment or the radio or TV. For example, if the equipment is to the right of the TV, move it to the left of
the TV.
Or, move the equipment farther away from the radio or TV.
• Plug the equipment into a different outlet. Don't plug your radio or TV into the same circuit as your equipment.
• Ensure that all expansion slots are covered.
Also, ensure that all metal retaining brackets are tightly attached to the equipment.
• If these suggestions don't help, consult your equipment dealer or experienced radio/TV technician for help.
1
Advertisement
Table of Contents

Related Manuals for Toshiba PDR-2300


Summary of Contents for Toshiba PDR-2300
-
Page 1: Attention
Attention For Customers in the U.S.A. FCC Statement This device complies with Part 15 of the FCC Rules. Operation is subject to the following two conditions: (1) This device may not cause harmful interference, and (2) this device must accept any interference received, including interference that may cause undesired operation. Note This equipment has been tested and found to comply with the limits for a Class B digital device, pursuant to Part 15 of the FCC Rules. - Page 2 Attention (continued) Caution If you modify the camera in any way, without getting approval from Toshiba Corporation, your camera may violate FCC regulations. Violation of FCC regulations may cause the FCC to void your right to use the modified camera.
-
Page 3: Before Reading This Manual
Before Reading This Manual Thank you for purchasing the Toshiba PDR-2300 Digital Still Camera. To ensure that you use this camera safely and correctly, read this Instruction Manual carefully before using the camera. Once you have finished reading this Instruction Manual, keep it handy at all times. -
Page 4: Safety Precautions
Safety Precautions Read these safety precautions carefully before using the PDR-2300. These instructions contain valuable information on safe and proper use that will prevent harm and damage to the operator and other persons. Make sure that you fully understand the following details (indications) before proceeding to the main descriptions in this manual. -
Page 5: Exemption Clauses
• Toshiba’s liability, with the exception of a deliberate act or gross negligence by Toshiba, shall not exceed the purchase price of the product in any circumstances. - Page 6 Safety Precautions (continued) If the camera has fallen or its case is damaged, immediately turn the power OFF and remove the batteries and AC power adapter. Continued use in this state might cause fire or electric shock. For details on repair, consult the store of purchase, or please contact the technical support number.
- Page 7 Safety Precautions (continued) If you want to use the camera on an airplane, consult with the airline and follow their instructions. Use of the camera is sometimes restricted due to potential radio interference. Do not use the camera in humid, steamy, smoky or dusty places.
-
Page 8: About The Ac Power Adapter
Safety Precautions (continued) Do not subject the LCD monitor to impact. This might damage the glass on the screen or cause the internal fluid to leak. If the internal fluid enters your eyes or comes into contact with your body or clothes, immediately rinse them with fresh water. - Page 9 Safety Precautions (continued) Do not place blankets over the AC power adapter connected with the power source or place the Adapter near a heater or on an electric (warm) carpet. This might cause fire or malfunction. Do not damage, modify (e.g., to extend), or heat the AC power adapter cable.
-
Page 10: About Batteries
Safety Precautions (continued) Use only the supplied AC power adapter and power cable. Use of an AC power adapter and/or a power cable other than specified might cause fire or malfunction. If you plan not to use the camera for a long period of time, remove the AC power adapter plug from an electrical outlet. - Page 11 Safety Precautions (continued) Do not heat, disassemble or throw the batteries into fire or water. Doing this might cause the batteries to rupture, ignite or heat up, resulting in fire or serious injury. Dispose of the exhausted batteries properly according to your local regulations.
- Page 12 Safety Precautions (continued) Insert the batteries with careful attention according to the polarities (+ or -) of the terminals. Inserting the batteries with inverted polarities might cause fire and injury, or damage the surrounding areas. When carrying or storing the batteries, place each one in a separate plastic bag.
-
Page 13: Table Of Contents
Contents Preface Attention ... 1 Before Reading This Manual ... 3 Safety Precautions ... 4 Indication Definitions ... 4 Graphic Symbol Definitions ... 4 Exemption Clauses ... 5 When Using the Product ... 5 About the AC Power Adapter ... 8 About Batteries ... - Page 14 Contents (continued) Taking Pictures Manually ... 54 Changing the System Settings (Rec Mode) ... 55 Record Menu ... 55 LCD BRIGHTNESS ... 55 DIGITAL ZOOM ... 55 WHITE BALANCE (Manual mode only) ... 56 EV COMPENSATION (Manual mode only) ... 56 SHARPNESS (Manual mode only) ...
- Page 15 Contents (continued) Other Useful Information Changing the System Settings (Setup mode) ... 85 DATE/TIME ... 85 LANGUAGE ... 85 SOUND ... 85 FORMAT MEDIA ... 85 VIDEO MODE ... 85 VERSION INFO ... AUTO POWER OFF ... 86 RESET TO DEFAULT ... 87 Connecting the Camera to Other Devices ...
-
Page 16: Using Your Camera Correctly
● Do not expose the camera to sand or dust. The PDR-2300 is particularly sensitive to sand and dust. If the camera comes into contact with sand or dust, not only will the camera become damaged, it will also no longer be repairable. Pay special attention when using the camera at the beach or where sand or dust is likely to be present. - Page 17 Using Your Camera Correctly (continued) ● Carrying out maintenance on your camera • To prevent the lens, surface of the LCD monitor or viewfinder from being scratched, blow off any dust from these parts with a blower brush and lightly wipe with a soft dry cloth. •...
-
Page 18: Handling The Batteries
To extend the use of the camera, we strongly recommend that you only use the following types of batteries: • AA Alkaline batteries (Not Rechargeable): LR6AG (Toshiba) • AA Nickel Metal Hydride (Ni-MH) batteries (Rechargeable): TH-3 (Toshiba) The camera does not have a rechargeable function. Please use the battery charger on the market when recharging the Nickel Hydride (Ni-MH) battery. - Page 19 Handling the Batteries (continued) ● Method of Extending Battery Life Even if the camera is turned off, the battery power is slightly consumed. We strongly recommend that you remove the batteries when the camera is not in use for an extended period of time. However, removing the batteries will return the date and time settings to the default values.
-
Page 20: Handling The Ac Power Adapter
Handling the AC Power Adapter Be sure to use only the specified AC power adapter (PDR-AC20 : sold separately). Using a different AC power adapter might cause the camera to malfunction. When you use the AC power adapter, strictly observe the Safety Precautions on page 4 and the notes described below. •... - Page 21 Handling the AC Power Adapter (continued) Specifications AC Adapter (PDR-AC20) Input Output Operating temperature Storage temperature Maximum outer Dimensions : 40 x 30.5 x 94.2mm (W x H x D) Weight IMPORTANT • Use the power supply indicated on the supplied AC cord. When using power supply other than the displayed voltage in other countries/region, please purchase the AC cord that applies to the standard of the country/region.
-
Page 22: Handling The Sd Memory Card
Under normal use, data saved in the SD memory card is not damaged or lost. If used improperly, however, the data may be damaged or lost. Please be aware that Toshiba Corporation will accept no responsibility whatsoever for damaged or lost data, regardless of the type or cause of the problem or damage. -
Page 23: Specifications
Handling the SD Memory Card (continued) ● Specifications • Memory type • Operating temperature • Storage temperature • Operating/Storage humidity • Dimensions • Weight : NAND Flash memory : 0°C to +40°C : -20°C to +60°C : 30% to 80% (no condensation) : 24.0 mm x 32.0 mm x 2.1 mm (W x H x D) : Approx. -
Page 24: Accessories
Accessories Carefully unpack your package and make sure that you have the following items. In the event that any item is missing or if you find any mismatch or damage, promptly contact your dealer. • 4 x AA alkaline batteries •... -
Page 25: Getting To Know The Camera
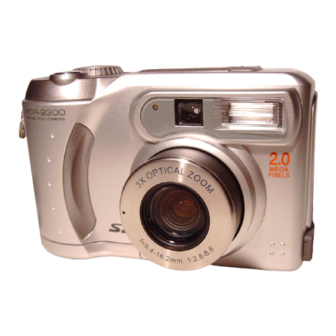
Getting to Know the Camera Front View... -
Page 26: Rear View
Getting to Know the Camera (continued) Rear View Attach the lens strap and wrist strap as illustrated below. -
Page 27: Led Indicators
Getting to Know the Camera (continued) LED Indicators Indicator Status LED1 Solid orange LED1 Blinking orange LED1 Solid orange LED1 Blinking orange LED1 Blinking orange LED2 Solid green LED2 Solid green LED 1 Blinking orange LED 2 Solid green Self-timer indicator Blinking red * (3) The camera sounds three beeps. -
Page 28: Mode Dial
Getting to Know the Camera (continued) Mode Dial Mode ] Manual record mode ] Record mode ] Playback mode ] Movie mode ] Setup mode Description Use this mode to take still images by manually adjusting camera settings such as white balance, EV compensation and sharpness. Use this mode to take still images. -
Page 29: Status Lcd
Getting to Know the Camera (continued) Status LCD... -
Page 30: Lcd Monitor Indicators
Getting to Know the Camera (continued) LCD Monitor Indicators The displayed indicators when recording images: The displayed indicators when recording video clips:... - Page 31 Getting to Know the Camera (continued) The displayed indicators when playing still images back: The displayed indicators when playing video clips back: NOTE • If no operation is performed for 90 seconds, the LCD Monitor will be automatically turned off.
-
Page 32: Installing And Removing The Batteries
Installing and Removing the Batteries This camera uses four AA batteries. Acceptable batteries include alkaline, Ni-MH and lithium. Loading the Batteries IMPORTANT • Before you load or remove the batteries, be sure to turn the camera off. • The camera may not start normally if you load batteries with the power on. If this happens, turn the camera off, and then turn it on again. -
Page 33: Removing The Batteries
Installing and Removing the Batteries (continued) Close and lock the battery cover firmly. Removing the Batteries To remove the batteries, open the battery cover, remove batteries and close the battery cover. IMPORTANT • Pay attention while removing the batteries to prevent the camera or batteries from dropping by accident. •... -
Page 34: Battery Status
Installing and Removing the Batteries (continued) Battery Status The following battery status is displayed on the LCD monitor when the camera is turned on. Icon IMPORTANT • Before you load or remove the batteries, be sure to turn the camera off. •... -
Page 35: Using The Ac Power Adapter
Using the AC Power Adapter Open the jack cover and connect one end of the AC power adapter to the DC IN jack on the camera. Connect the other end to an electrical outlet. IMPORTANT • When the image is being recorded to the SD memory card or the internal memory, the LED 1 is blinking orange. -
Page 36: Loading And Removing The Sd Memory Card
The camera comes with 8MB of internal memory, allowing you to store images and video clips in the camera. However, you can expand the memory capacity by using an optional SD memory card so that you can store more images and video clips.The SD version working on PDR-2300 is 1.01. Loading the SD Memory Card Make sure the camera is off. -
Page 37: Turning The Power On/Off
Turning the Power On/Off Turning the Power On Slide the [POWER] switch to turn the camera on. Remove the lens cap during photography. In the [ ], [ ] or [ camera body. When the camera is turned on, the Auto Power Off function starts to work. -
Page 38: How To Hold Your Camera
How to Hold Your Camera When taking a picture, remember to hold the camera firmly and prevent your finger or straps from covering the lens or flash. Right Holding the camera by using both hands with your arms firmly held against the sides of your chest. Wrong Holding the camera with your fingers covered over the lens. -
Page 39: How To Press The Shutter Button
How to Press the Shutter Button The shutter button can be pressed down in two stages: halfway down and fully down. When pressing the shutter button halfway down, the camera adjusts the exposure and focus. When pressing the shutter button fully down, the camera takes a picture. - Page 40 • If the image cannot be focused in dark places, the focus is automatically fixed to infinity. When the flash is used at this time, PDR-2300 will detect the distance to the subject by emitting the pre-flash and then focus at the subject.
-
Page 41: Choosing The Language
Choosing the Language When you first turn the camera on, the language setting screen appears, prompting you to choose a language for displayed information on the LCD monitor. Follow the steps below to set the language. Select a language that you require by using the [ The provided languages are [ENGLISH], [FRANÇAIS], [DEUTSCH], [ESPAÑOL], [ Press the [OK] button to confirm. -
Page 42: Setting The Date And Time
Setting the Date and Time When you first turn the camera on, the language setting screen prompts. Once the language is set, the date and time setting screen follows to appear, allowing you to define. You can also skip this step by pressing the [OK] button repeatedly. Enter the values of the [YEAR], [MONTH], [DAY] and [TIME] fields by using the [ ] button. -
Page 43: Setting The Image Resolution And Quality
Setting the Image Resolution and Quality The resolution and quality settings determine the size and compression ratio of your images and how many images can be stored in internal memory or on the SD memory card. The higher resolution and quality produce the large size and less compressed image but take up more space in memory. - Page 44 Setting the Image Resolution and Quality (continued) The table below shows the approximate shots that you can take at each setting based on 8MB internal memory (7MB internal memory for storing image/video clip files) or a 8MB SD memory card. Resolution Full size: ]1600x1200 pixels...
-
Page 45: Taking Pictures
Taking Pictures The camera is equipped with an optical viewfinder and a 1.6" LCD monitor to compose pictures. Taking pictures by using the viewfinder can conserve battery power. If the battery level is low and no extra batteries are handy, we recommend that you compose pictures by using the viewfinder. -
Page 46: Using The Lcd Monitor
Taking Pictures (continued) Using the LCD Monitor Turn the camera on by sliding the [ POWER ] switch. Turn the mode dial to the [ mode. Turn the LCD monitor on by pressing the [ and compose the picture with it. Press the shutter button down halfway (the camera adjusts the exposure and the focus), then press it the rest of the way down. -
Page 47: Reviewing The Last Picture In The Record Mode
Reviewing the Last Picture in the Record Mode The camera is equipped with the [ ] button, allowing the most recent image to be displayed on the LCD monitor in the [ ] mode. However, you can only view the last image with this function. To view all your recorded images, go to the [ ] mode. -
Page 48: Using The Optical Zoom
Using the Optical Zoom The lens moves during the zoom photography. Zoom photography allows you to take telephoto and wide-angle shots. The subject appears closer by pressing the Telephoto button and appears farther away by pressing the Wide-angle button. Turn the camera on. Turn the mode dial to the [ Turn the LCD monitor on by pressing the [ Press the Telephoto button to enlarge the subject. -
Page 49: Using The Digital Zoom
Using the Digital Zoom By using the digital zoom function, images can be enlarged the center of the screen so that the subject appears closer. However, the more the image is enlarged, the grainier the image will become. The digital zoom function is only available when you set the LCD monitor and the digital zoom to on. -
Page 50: Using The Self-Timer
Using the Self-timer The self-timer duration is 10 seconds (default) or 2 seconds. After the activation of the self-timer by pressing the shutter button, the self-timer LED starts blinking slowly for 7 seconds and then blinking faster for the rest of 3 seconds. With this design, you can get in the frame when taking group pictures. -
Page 51: Using The Macro Mode
Using the Macro Mode Use the macro mode to shoot a close-up of the subject, such as flowers or insects. The effective range is between 20cm and infinity. Turn the camera on. Turn the mode dial to the [ Press the [ ] button. -
Page 52: Using The Flash
Using the Flash The flash is designed to function automatically in dark places. You can take a picture with the suitable flash setting according to the different conditions. If you change the flash setting, the camera will remain in that setting even when the camera is turned off. - Page 53 Using the Flash (continued) The camera provides 5 flash modes: Auto (default), Red-eye reduction, Forced flash, Off, Night Shot, which can be changed cyclically by pressing the flash button on the top of the camera. The table below tells you how to choose the appropriate flash mode while shooting.
-
Page 54: Taking Pictures Manually
Taking Pictures Manually You can take pictures by manually adjusting conditions such as white balance, EV compensation and sharpness. For white balance, EV compensation and sharpness information, refer to WHITE BALANCE, EV COMPENSATION and SHARPNESS in Manual Record menu. To take pictures manually: Turn the camera on. -
Page 55: Changing The System Settings (Rec Mode)
Changing the System Settings (Rec Mode) Record Menu You can use the record menu/manual record menu to change LCD brightness, enable digital zoom, and determine the conditions such as white balance, EV compensation and sharpness. To do this, press the [MENU] button and then scroll through the options by using the [ LCD BRIGHTNESS This option adjusts the brightness of the LCD monitor (-5 to +5). -
Page 56: White Balance (Manual Mode Only)
Changing the System Settings (Rec Mode) (continued) WHITE BALANCE (Manual mode only) The image appears different under different color of lighting. Human eyes can solve this problem. But for camera, you need to make adjustments. Normally, the camera adjusts the white balance automatically. However, if the image appears in strange colors, we recommend that you change the white balance setting. -
Page 57: Sharpness (Manual Mode Only)
Changing the System Settings (Rec Mode) (continued) • Negative (-) Compensation • Spotlight subjects, particularly against dark backgrounds • Copying of printed text (white characters on black paper) • Scenes with low reflectivity, such as shots of green or dark foliage SHARPNESS (Manual mode only) This option sets the level of image sharpness. -
Page 58: Playing Back Images
Playing Back Images In the [ ] mode, you can view, magnify, delete your images or play video clips back. This mode even provides thumbnail images display and slide show, allowing you to quickly search for the image that you want or play the images back one by one automatically. -
Page 59: Zooming Images In And Out
Zooming Images in and out This mode allows you to enlarge your image on the selected portion of the image with 4X magnification to check for small details. Turn the mode dial to the [ camera powered on. Select the image that you want to view by using the ] button. -
Page 60: Displaying Thumbnail Images
Displaying Thumbnail Images This function allows you to view 9 thumbnail images on the LCD monitor at the same time, which can quickly search for the image that you want. Turn the mode dial to the [ Press the [ The image information appears on the LCD monitor. -
Page 61: Slideshow Display
Slideshow Display Slideshow function enables you to play your images back in order automatically, which is very useful and convenient for checking recorded images and for presentations. Turn the mode dial to the [ camera powered on. Press the [ MENU ] button and move to SLIDE SHOW by using the [ Set the playback interval by using the [ button and press the [OK] button. -
Page 62: Protecting Images
Protecting Images/Video Clips You can protect your desired images/video clips from being accidentally erased by using the protect function. To protect an image/video clip , follow the steps below: Protecting an Image/Video Clip Turn the mode dial to the [ camera powered on. -
Page 63: Removing The Protection
Protecting Images/Video Clips (continued) For the video clip, the protection icon will display on the right bottom as illustrated. To protect more images/video clips, repeat steps 2 to 4 in “Protecting an Image/Video Clip”. IMPORTANT • The protected image/video clip cannot be erased except using FORMAT MEDIA function (refer to FORMAT MEDIA in Setup menu). -
Page 64: Dpof Settings
DPOF Settings DPOF is the abbreviation for Digital Print Order Format, which allows you to embed printing information on your memory card. You can select the pictures to be printed and how many prints to make by using the DPOF menu on the camera and insert the memory card to the card-compatible printer. - Page 65 • When using the shutter button to enable the DPOF setting, the default setting is size=standard, and quantity=1. IMPORTANT • The PDR-2300 may take several minutes to process the DPOF-setting images. Please wait until this processing is complete. ] mode with the camera powered on.
-
Page 66: Deleting Images
Deleting Images You can delete one image/video clip or all images/video clips at a time depending how long you press the [ To delete one image at a time: Turn the mode dial to the [ camera powered on. Select the image/video clip you want to delete by using the [ Select [YES], and press the [OK] button. -
Page 67: Changing The System Settings (Playback Mode)
Changing the System Settings (Playback Mode) Playback Menu You can use the playback menu to automatically display your images one by one or configure DPOF setting, etc. To do this, press the [MENU] button and then move through the options that you want to configure by using the [ button. -
Page 68: Protect
Changing the System Settings (Playback Mode) (continued) PROTECT Refer to page 62 for PROTECTING IMAGES. DPOF Refer to page 64 for DPOF SETTINGS. EXIT This option exits the playback menu and then returns to the [ You can also press the [ MENU ] button again to exit. ] mode. -
Page 69: Recording Video Clips
Recording Video Clips The movie mode allows you to record video clips in Motion JPEG AVI format at the resolution of 320 x 240 pixels. Turn the camera on by sliding the [POWER] switch. Turn the mode dial to the [ The recordable movie time is displayed on the status LCD and the LCD monitor. -
Page 70: Reviewing Video Clips
Reviewing Video Clips To view the recorded video clips, follow the steps below. Turn the mode dial to the [ Select the video clip that you want to view by using the [ Press the shutter button to start. To pause playback at any time, press the shutter button again. To stop playback, press the [ Pressing the shutter button or the [ follows:... -
Page 71: About The Software Application
• Use of the supplied software applications and Instruction Manual is allowed only on one personal computer. • Toshiba Corporation is not liable whatsoever for any damages to the user or a third party as a result of use of a device with the supplied software applications and Instruction Manual. -
Page 72: System Requirements
System Requirements To install the supplied software, you computer must conform to the system requirements below. Memory Free Space on Hard Disk Color Monitor Required Devices *Proper connections with not all PCs will be assured. When using Mac OS 9.0 or 9.1, you need to install CarbonLib 1.3 or later. You can download the program from the web site of Apple Computer, Inc. -
Page 73: Connecting To A Computer Running Windows
Connecting to a Computer Running Windows The computer must have Windows 98, Window 2000, Windows Me or Windows XP pre-installed. Installing ACDSee™ Insert the supplied CD-ROM into the CD-ROM drive. The screen for selecting the displayed language appears. Click [ Click [ Follow the on-screen instructions to complete the installation. -
Page 74: Installing The Usb Driver
The screen for selecting the displayed language appears. Click [ Click [ Follow the on-screen instructions to complete the installation. Restart you computer after installing the USB driver. Installing the USB driver for use in Windows 2000/Me/XP is not necessary. PDR-2300 conforms with USB Mass Storage Class. -
Page 75: Connecting To The Pc
Connecting to a Computer Running Windows(continued) Connecting to the PC Turn the computer and camera on. Connect one end of the USB cable to the USB port on the computer, and the other end to the USB connector on this camera. Follow the on-screen instructions to complete the installation. -
Page 76: Connecting To A Macintosh Running Mac Os 9.0 Or Later
Connecting to a Macintosh Running Mac OS 9.0 or Later The Macintosh must have Mac OS 9.0 or later pre-installed. Installing ACDSee™ Insert the supplied CD-ROM into the CD-ROM drive. The screen for selecting the displayed language appears. Click [ Click [ Follow the on-screen instructions to complete the installation. -
Page 77: Connecting To The Macintosh
Connecting to a Macintosh Running Mac OS 9.0 or Later (continued) Connecting to the Macintosh For Mac OS 9.0 or later users, the computer will recognize the camera and load its own USB driver while the USB cable is connected so that installing the USB driver is not necessary. Turn the computer and camera on. -
Page 78: Disconnecting The Camera From The Computer
Disconnecting the Camera from the Computer For Computers Running Windows 98: Turn the camera off, and then remove the USB cable from the computer and camera. For Computers Running Windows 2000, Windows Me or Windows XP: Double-click [ window appears. Select the USB disk removal, and then follow the on-screen instructions. After finishing the operations, remove the USB cable from the computer and camera. -
Page 79: Using Acdsee
Using ACDSee™ Installing ACDSee™ allows you to view a list of recorded images and transfer processed images from the computer to the camera. Transferring Recorded Images to the Computer Connect this camera to the computer by using the USB cable. ACDSee™... - Page 80 Using ACDSee™ (continued) Select a copy destination, and then click “Paste” in the Edit menu. The image is transferred successfully and displayed in the selected destination. IMPORTANT It is recommended that you use the AC power adapter as a power supply for the camera while transferring images from the camera to you computer to prevent recorded images from being damaged.
-
Page 81: Copying Processed Images To The Camera
Using ACDSee™ (continued) Copying Processed Images to the Camera You can process recorded images on the computer, make copies of them and send them back to the camera. Connect this camera to the computer by using the USB cable. ACDSee™ is automatically activated. Select the image that you want to copy, and then select “Copy to Camera”... - Page 82 Using ACDSee™ (continued) Select a post-conversion image size, and then click “OK.” The image is named “ACDXXX.jpg” and is copied to the XXXACDSE folder on the SD memory card in the camera. original size of copied image. 1024x768 or larger 640x480 to 1024x768 640x480 or smaller NOTE...
-
Page 83: Installing Directx
Installing DirectX For Windows Only Insert the supplied CD-ROM into the CD-ROM drive. The screen for selecting the displayed language appears. Click [ Click [ Follow the on-screen instructions to complete the installation. -
Page 84: File Structure
The images taken on the Toshiba PDR-2300 Digital Still Camera are stored in the SD memory card as shown below. About Still Image Data On the PDR-2300, still image data is saved in Exif format. This format is a JPEG data, which contains a thumbnail image and photographic settings. -
Page 85: Changing The System Settings (Setup Mode)
Changing the System Settings (Setup Mode) You can select your preferences on the camera in the [ to the option you want to configure by using the [ DATE/TIME Refer to page 42 for SETTING THE DATE AND TIME. LANGUAGE Refer to page 41 for CHOOSING THE LANGUAGE. -
Page 86: Version Info
Changing the System Settings (Setup Mode) (continued) [NTSC] : select this format when located in the U.S.A., Canada, Japan, Korea, Taiwan, Central America, Mexico, etc. [PAL] : select this format when located in Australia, Austria, Belgium, China, Denmark, Finland, Germany, Great Britain, Holland, Italy, Kuwait, Malaysia, New Zealand, Singapore, Spain, Sweden, Switzerland, Thailand, Norway, etc. -
Page 87: Reset To Default
Changing the System Settings (Setup Mode) (continued) RESET TO DEFAULT If you want to restore all settings to their original status, select [YES] by using the [ necessary and then press the [OK] button. The following table shows the default setting for each item. Item Image Resolution Image Quality... -
Page 88: Connecting The Camera To Other Devices
Connecting the Camera to Other Devices... -
Page 89: Camera Specifications
Camera Specifications Item Description Sensor Approx. 2.14 megapixels (effective pixels: approx. 2.06 megapixels), 1/2.7" CCD Resolution 1600x1200 pixels; 800x600 pixels 1.6" color TFT LCD Self-timer 2/10 seconds delay Shutter speed 1/3~1/1000 second Zoom 3 x optical zoom, 2 x digital zoom Capture modes Still photographs or video recording Memory type... - Page 90 Camera Specifications (continued) Item Flash settings Flash effective range Lens Exposure compensation White balance Compressed format Standards Language supported Interface Operating environment Power Tripod socket Dimensions Weight *Design and specifications are subject to change without notice. Description Auto, Red-eye Reduction, Forced Flash, Off, Night Shot 0.5m ~ 2.5m Auto focus zoom lens -f :5.4 ~ 16.2mm (equivalent to 36mm ~ 108mm on a 35mm camera)
-
Page 91: Messages Displayed On The Lcd Monitor
Messages Displayed on the LCD Monitor The following warning messages are displayed on the LCD monitor. Message MEDIA FULL WRITE PROTECT NO IMAGES PROTECT Meaning Fairly consumed Nearly exhausted Completely exhausted No space left in the SD memory card. You cannot take photographs. The SD memory card is locked. -
Page 92: Troubleshooting
Troubleshooting When the camera does not operate properly, check the following items and find the solution for each problem. Problem Cause The batteries are running out. The power cannot be turned on. The AC power adapter plug is disconnected from an electrical outlet. - Page 93 Troubleshooting (continued) Problem Cause Internal memory full or the SD memory card full. No enough space in the SD memory card. No photograph is taken The SD memory card is write-protected. when the shutter button is released. The SD memory card is not formatted. The SD memory card is damaged.
-
Page 94: Glossary
A file system standard defined by the JEIDA (Japan Electronic Industry Development Association) that is required for exchanging data between digital still cameras or a digital camera and a printer. This standard defines the hierarchy and file names used when storing image files on memory cards or other recording medium. - Page 95 The Secure Digital (SD) Memory Card is a flash memory storage device designed by the consortium of Matsushita Electronic (Panasonic), SanDisk and Toshiba to meet the security, capacity, performance and environmental requirements inherent in emerging audio and video consumer electronics devices. This...
-
Page 96: Exposure Compensation
Glossary (continued) ● Formatting Transforming the contents of the SD Memory Card to a recordable state. (This is sometimes called “initialization”.) ● Exposure Compensation When the screen contains an extremely bright or dark object, the camera automatically adjusts the brightness, resulting in the subject being reproduced darker or lighter. Exposure compensation adjusts for this. -
Page 97: Global Contacts
Global Contacts Country/Region Company Name Canada Toshiba America Information Systems, Inc. China Hong Kong Toshiba Hong Kong Ltd. France Toshiba Systems (France) Germany Toshiba Europe Gmbh Italy Toshiba Europe Gmbh Sede Secondaria in Italia Mexico Toshiba de Mexico, S.A. de C.V. -
Page 98: For Customers In The United States And Canada
There are links, updates and notices for special options at the Toshiba Digital Community, such as special adapter mounts for Tele-photo, Wide-angle, and other filters and lenses designed specifically for your digital camera.
Need help?
Do you have a question about the PDR-2300 and is the answer not in the manual?
Questions and answers