Advertisement
Available languages
Available languages
LOW-PRESSURE
CO₂ SYSTEM
BIO-CO
BIO-CO
PRO
PRO
2
2
Model 125
250
/
INSTRUCTION
MANUAL
125
Model
Aquariums up to
125 L / 33 US Gal
Reaction Chamber Volume
Reaction Chamber Volume
1 L
CO₂ System Set Up
1
2
Unscrew and remove
Fill Bubble Counter with tap
Spare Gasket #11. This is a
water to 3/4 capacity.
replacement part for Gasket
#2 in step 4.
7
8
Add granulated white sugar
Add room temperature tap
(sold separately)
water (70 – 75 °F / 21 – 24 °C)
Model 125: Add 250 g / 300 ml / 1 1/4 cups
to canister interior fill line.
Model 250: Add 500 g / 600 ml / 2 1/2 cups
13
Position Nano Diffuser within bottom half
of aquarium in an area with strong water
movement to ensure even C0₂ distribution.
CO₂ System Recharging
CUSTOMER SUPPORT
If you have any questions or need help operating this product, please contact our Customer Support team
before returning it to your retailer. Most inquiries can be resolved promptly with a phone call. Please have
all relevant information available (i.e. model number, age of product, details of your aquarium setup, etc.).
CALL US TOLL-FREE
Canada only: 1-800-554-2436 between 8 AM and 4:30 PM Eastern Standard Time.
Rolf C. Hagen Inc., 20500 Trans Canada Hwy, Baie-D'Urfé, QC, H9X 0A2
U.S. only: 1-800-724-2436 between 9 AM and 4 PM Eastern Standard Time.
Rolf C. Hagen (U.S.A.) Corp., 305 Forbes Blvd, Mansfield, MA 02048
U.K. only: 01977 521015 between 9 AM and 5 PM Monday to Thursday, and 4 PM on Friday (excluding Bank Holidays).
Rolf C. Hagen (UK) Ltd, Customer Service Department California Drive, Whitwood Ind Est., Castleford West Yorkshire WF10 5QH
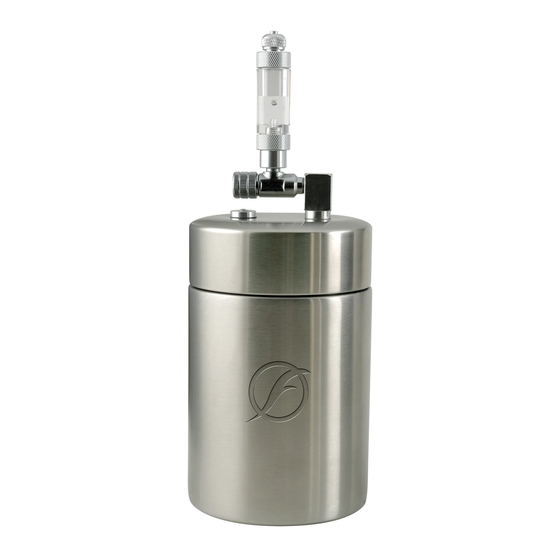
125
Model
1. Bubble Counter
2. Gasket
3. Precision Regulator
4. Pressure Release Valve
5. Stainless-Steel Reaction Chamber
6. Nano Bubble Diffuser
7. Check Valve
8. Booster x 1
9. Activator x 1
10. Airline Tubing
11. Spare Gasket
1.
3.
4.
250
Model
Aquariums up to
250 L / 66 US Gal
2 L
3
Screw Bubble Counter top
back on.
9
Hand-tighten Reaction Chamber lid and ensure
Precision Regulator is fully closed.
14
15
Measure Airline Tubing and cut
Install Check Valve outside of aquarium, about halfway between Bubble Counter and
to appropriate length, ensuring
top of aquarium. Ensure black side of Check Valve is facing upward.
a straight path from aquarium
edge to Bubble Counter without
kinks or loops.
IMPORTANT: As a pressurized system,
Precision Regulator must be fully opened
to completely exhaust C0₂ supply and
facilitate opening Reaction Chamber lid.
Made in PRC
250
Model
1. Bubble Counter
2. Gasket
3. Precision Regulator
4. Pressure Release Valve
5. Stainless-Steel
Reaction Chamber
6. Nano Bubble Diffuser
7. Check Valve
8. Booster x 2
9. Activator x 2
10. Airline Tubing
11. Spare Gasket
3.
6.
4.
11.
2.
5.
7.
8.
5.
9.
10.
4
Before installing Bubble Counter,
ensure Gasket is seated properly
on Precision Valve top channel.
10
Loosen locking screw, feed
Airline Tubing through to top
of Bubble Counter.
CO₂
Flow
The Fluval Bio-CO₂- System is guaranteed for defective parts and workmanship for a period of 3 years from the date
of purchase. This guarantee is valid with proof of purchase only. The guarantee is limited to repair or replacement
only and does not cover consequential loss, loss or damage to livestock and personal property or damage to
animate or inanimate objects, irrespective of the cause thereof. This guarantee is valid only under normal operating
conditions for which the unit is intended. It excludes any damage caused by unreasonable use, negligence, improper
installation, tampering, abuse or commercial use. The warranty does not cover wear and tear or parts which have
not been adequately or correctly maintained. THIS DOES NOT AFFECT YOUR STATUTORY RIGHTS.
BONUS
v
LIMITED TIME OFFER! Register this product online within 30 days of purchase and Fluval will extend
your current warranty at no charge. The extended warranty is subject to provisions outlined within the
standard Fluval warranty. Complete details and registration available at:
Ver.: 30/23-NA
IMPORTANT SAFETY INSTRUCTIONS
READ & FOLLOW ALL SAFETY INSTRUCTIONS
1.
and all the important notices on the product before using.
Failure to do so may result in the loss of fish life and/or
11.
damage to the product.
1.
2. WARNING – Close supervision is necessary when any product
2.
is used by or near children. This product is not a toy.
3. CAUTION – Unplug or switch off all appliances in the
aquarium before carrying out maintenance.
4. This product is a low-pressure Bio-C0₂ system for use in
ornamental household aquariums only. Do not use this
product for other than intended use. The use of attachments
not recommended or sold by the product's manufacturer may
cause an unsafe condition and will invalidate your warranty.
5. This unit is designed for use in freshwater aquariums only
with a maximum depth of 60 cm / 24".
Model 125 is rated for aquariums up to 125 L / 33 US Gal.
Model 250 is rated for aquariums up to 250 L / 66 US Gal.
6. Do not clean unit, or any parts of it in the dishwasher.
It is not dishwasher safe.
6
5
Model 125: Add 1 Booster packet & 1 Activator packet
Screw the Bubble Counter into place.
Model 250: Add 2 Booster packets & 2 Activator packets
zaa
11
And then retighten locking screw.
16
With the Precision Regulator fully closed, allow 24 hours
for C0₂ fermentation period. Once completed, open
Precision Regulator and adjust as needed.
1. Remove Reaction Chamber lid.
2. Empty all interior contents down a drain (100% biodegradable).
3. Thoroughly rinse out Reaction Chamber and dry using a soft cloth
(do not use soap or detergent).
4. Repeat set up steps 6-9.
3 YEAR STANDARD WARRANTY
2 YEARS
+
FluvalAquatics.com/warranty
12
Attach Airline Tubing
to Nano Bubble Diffuser.
EXTENDED
WARRANTY
Advertisement
Table of Contents

Related Manuals for Fluval BIO-CO2 PRO 125


Summary of Contents for Fluval BIO-CO2 PRO 125
- Page 1 3 YEAR STANDARD WARRANTY The Fluval Bio-CO₂- System is guaranteed for defective parts and workmanship for a period of 3 years from the date If you have any questions or need help operating this product, please contact our Customer Support team of purchase.
- Page 2 GARANTIE DE TROIS (3) ANS Le système Bio-CO₂ Fluval est garanti contre tout défaut de pièces et de fabrication pour une période de trois (3) ans à partir de la Si vous avez des questions sur ce produit ou besoin d’aide pour le faire fonctionner, n’hésitez pas à...
Need help?
Do you have a question about the BIO-CO2 PRO 125 and is the answer not in the manual?
Questions and answers