Table of Contents
Advertisement
Advertisement
Table of Contents

Related Manuals for Fluval FX5


Summary of Contents for Fluval FX5
- Page 1 USER MANUAL GUIDE DE L’UTILISATEUR BENUTZERHANDBUCH MANUAL DE INSTRUCCIONES...
- Page 2 FLUVAL...
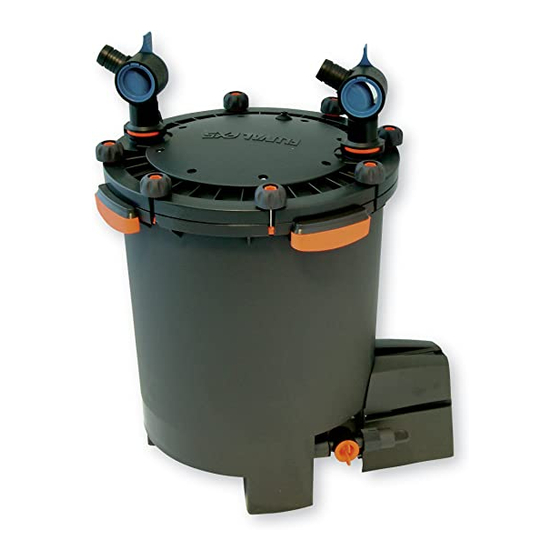
- Page 3 PRODUCT PARTS Hosing AquaStop valves (3) Filter baskets with foam inserts Rim connectors (2) Filter lid Foam (6) Rim connector clips (6) Lid fasteners (8) T handles (2) Small suction cups (4) Filter canister Media baskets (3) Intake assembly Purge valve Output assembly Drain cap Metal clamps (2)
- Page 4 Filtration avancée Fluval .......FR-13 Filtración avanzada Fluval ......ES-13 Masses filtrantes Fluval .........FR-14 Medios filtrantes Fluval .........ES-14 Masses filtrantes Fluval Lab Series....FR-16 Medios de la Serie Lab de Fluval ....ES-16 Entretien Mantenimiento Drainage du boîtier Vaciado del vaso Drainage de la soupape Vaciado con la válvula de vaciado ..ES-17...
- Page 5 READ AND FOLLOW ALL SAFETY INSTRUCTIONS To guard against injury, basic safety precautions should be observed when handling the Fluval Canister Filter, including the following: 1. READ AND FOLLOW ALL SAFETY INSTRUCTIONS 3. Close supervision is necessary when any appliance is used by or near children.
- Page 6 HIGH PERFORMANCE CANISTER FILTER The Fluval Canister Filter offers unparalleled The FX5’s stack of media baskets allow multiple filtration power, maximum versatility and options to modify water with scientific incredible control in fine-tuning water precision. Use one type of media in each basket, characteristics.
- Page 7 “click,” you know the connection is secure and watertight. Lift-Out Stack of Media Baskets The lift-out stack of media baskets is at the heart of Fluval multi- stage filtration. These large capacity baskets enable you to stack filtration media in the precise combination of layers that will work best for your aquarium.
- Page 8 Clog-Proof Intake Strainer The wide, rounded mouth of the FX5 intake strainer is shaped to siphon water quickly. Covered by a fine screen that’s beveled to repel debris, it is virtually clog-proof, so there is never a build-up of solids that could impede water flow.
- Page 9 INSTALLATION AND USE IMPORTANT: Read all instructions before beginning. • For best results, top off water in aquarium before beginning setup. • Allow 45-60 minutes for setup and installation. • Tools required: Phillips screwdriver and utility knife. (NOTE: For an unusually shallow aquarium, the intake tube may need to be cut;...
- Page 10 INSTALLATION AND USE 2. Place the two rim connectors over the back top edge of the aquarium. Place one just above the spot where you want to place the intake tube; place the other just over the spot where you want to position the output nozzle. Be sure that the long end of the bracket is on the inside of the aquarium.
- Page 11 INSTALLATION AND USE 3. Prepare intake connections 1. Connect the hosing to one of the three valves: a. Loosen one of the metal clamps, and slide it onto one end of the hosing. b. Push the end of the hosing onto the valve; push it all the way, as far as it will go.
- Page 12 INSTALLATION AND USE 4. Prepare output connections 1. Connect the hosing to the second valve (just as for the intake hosing): a. Loosen the second metal clamp, and slide it onto the factory-finished end of the hosing (not the cut end). b.
- Page 13 (Media not included. See “About Media” for detailed descriptions of all media available from Fluval). Leave at least 0.5 in. (1cm) free space on top of the media, so the baskets will fit together properly. 6. Stack the baskets, carefully aligning them, so that all shapes match.
- Page 14 INSTALLATION AND USE 7. Move the filter canister to its final position. 8. Be certain the purge valve is in the vertical (closed) position. 9. Pour about 2 gallons (8 liters) of water into the filter canister. IMPORTANT: Correct water volume is necessary for system priming.
- Page 15 INSTALLATION AND USE 6. Install the filter 1. Once the filter unit is in its final position, make sure that the aquarium has the appropriate amount of water. Important Reminders: • The filter lid must be at least 7.8 in. (20 cm) below your aquarium’s water level but never more than 4.9 ft.
- Page 16 INSTALLATION AND USE 7. Start the Filter 1. Check your installation. Before turning the filter on, be sure that: a. The purge valve is in the closed (vertical) position, and its rubber cap is secured in place by the lock nut. b.
- Page 17 Many media types provide both mechanical filtering and Fluval offers a wide variety of filter media materials. biological treatment, creating an excellent Some perform more than one job. This is the true environment for beneficial bacteria to proliferate.
- Page 18 A-1456 (500g) A-1457 (1100g) Fluval BioMax ceramic rings have a complex pore system where beneficial bacteria can thrive. With more capacity than most biological filter media, BioMax helps reduce ammonia and nitrite. Plus, the rings allow ideal water movement throughout the media, to ensure optimal contact time for efficient biological filtration.
- Page 19 (Middle Media Basket) A-1465 (600g) Fluval Peat Granules are the all-natural way to soften aquarium water and achieve the pH levels required for breeding and rearing certain tropical fish. Peat contains humic acid, tanning agents, and trace elements that are essential for various life processes.
- Page 20 (Middle or Bottom Media Baskets) A-1502 (150g) Fluval Lab Series Nitrate Remover is a high capacity laboratory developed ion exchange resin. Developed from a pure high grade strong base anion exchange resin, Nitrate Remover rapidly and selectively removes nitrate and eliminates toxic nitrite in a matter of hours, resulting in a healthy environment for your fish.
- Page 21 (not supplied) that is long enough to reach from the canister to a drain or basin. Fluval ribbed hosing item number A-20015 (sold separately) is recommended as it will secure tightly to the purge valve using the lock nut connector.
- Page 22 MAINTENANCE FILTER PUMP DRAINING Filter Pump Draining To use the filter pump to drain the water from the filter canister you will need to prepare a drainage hose using the third Aquastop Valve (drainage hose and clamp not included). To prepare the drainage hose attach the third Aquastop Valve to a 1”...
- Page 23 MAINTENANCE MEDIA CARE Cleaning or Replacing Media 1. Move the filter to an appropriate area convenient for maintenance. 2. Loosen and remove the eight lid fasteners; remove the filter lid and set aside. Be careful not to damage the inlet stem connected to the lid. 3.
- Page 24 MAINTENANCE MEDIA CARE/PURGE VALVE 2. Replace Filter Lid. a. Inspect the Lid Gasket for wear and tear. b. Place filter lid back on canister. There is only one orientation possible. Gently press the lid down until the output tube, affixed to the inside of the filter canister, is firmly seated in the output (OUT) valve lid opening.
- Page 25 (not supplied) to the Purge valve, and position the other end in an appropriate basin or discharge drain. If not using the Fluval ribbed hosing it may be necessary to use a clamp to secure the hose in place. 5. a. First, turn the Purge valve to the open (horizontal) position (rotate it counter-clockwise).
- Page 26 MAINTENANCE PUMP CARE Pump Care: Impeller Magnet Replacement WARNING: ALWAYS DISCONNECT ALL APPLIANCES IN THE AQUARIUM FROM ELECTRICITY SUPPLY BEFORE PLACING HANDS IN THE WATER, BEFORE PUTTING ON OR TAKING OFF PARTS, AND WHENEVER THE FILTER EQUIPMENT IS BEING INSTALLED, MAINTAINED OR HANDLED. Prior to performing pump care the FX 5 filter must be completely emptied of water, media baskets, and media.
- Page 27 CHANGING AQUARIUM WATER 6. Re-attach the pump unit to the canister using the 4 fixing screws with a Phillips screw-driver (cross headed). While re- assembling the pump, the 4 fixing screws should be gently screwed until pump motor cover and canister are securely attached.
- Page 28 CHANGING AQUARIUM WATER Disconnect the AquaStop valve and output hosing from OUT connection on the canister lid. Then connect the third AquaStop valve and drainage hose (prepared in Step 1 above) in the OUT connection. Position the open end of the drainage hose in an appropriate drain.
- Page 29 REPLACEMENT PARTS PART NUMBER PART NUMBER A. Lid Fasteners A-20214 K. Intake Strainer A-20220 B. T-bar Handle A-20240 L. Intake Stem A-20224 C. Filter Lid (O-ring) A-20210 M. Rim Connector & clips (3) A-20230 D. Rim connector Suction Cup d20 4 A-20232 N.
- Page 30 Media/Water Changed Date ________________________________________________________ __________________________ ________________________________________________________ __________________________ ________________________________________________________ __________________________ ________________________________________________________ __________________________ ________________________________________________________ __________________________ ________________________________________________________ __________________________ ________________________________________________________ __________________________ ________________________________________________________ __________________________ ________________________________________________________ __________________________ ________________________________________________________ __________________________ ________________________________________________________ __________________________ ________________________________________________________ __________________________ ________________________________________________________ __________________________ ________________________________________________________ __________________________ ________________________________________________________ __________________________ ________________________________________________________ __________________________ ________________________________________________________ __________________________ ________________________________________________________ __________________________ ________________________________________________________ __________________________ ________________________________________________________ __________________________...
Need help?
Do you have a question about the FX5 and is the answer not in the manual?
Questions and answers