Table of Contents
Advertisement
Quick Links
Advertisement
Table of Contents

Related Manuals for Saunum Luxury


Summary of Contents for Saunum Luxury
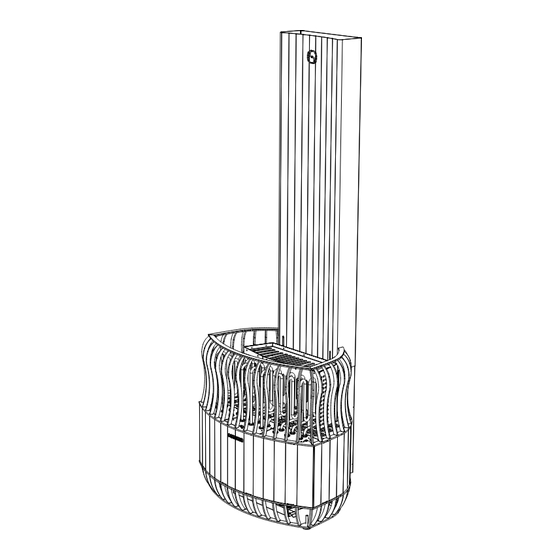
- Page 1 Saunum Luxury heater with a sauna room indoor climate device...
- Page 2 A moist steamy sauna, a therapeutic salt sauna, or a healthy Finnish sauna. In ordinary saunas, the stone volume of the aroma sauna – all of these functions are available on Saunum’s sauna heater is generally small. Such an arrangement can devices to create a truly relaxing sauna experience.
-
Page 3: Table Of Contents
Solving problems ____________________________________ Maintenance _______________________________________ Sauna room _________________________________________ Sauna room ventilation _______________________________ Power of the heater __________________________________ INSTALLING Saunum Saunas OÜ Safety distances _____________________________________ Before the installation _________________________________ congratulates you Dimensions _______________________________________ Product completeness _________________________________ on choosing a heater with... -
Page 4: Safety Information
The control device must correspond to the over to the owner or maintenance provider. power of the heater used according to Ta- Before using the Saunum Luxury heater ble 1. with an indoor climate device (hereinafter ‘sauna climate device’), read the installation The control device must have the ability to and safety instructions. -
Page 5: Heating The Sauna Room
The operating time of the sauna climate temperature and lowest airflow rate. device model Saunum Luxury Experience • the direction of the air flow – the air may be adjusted by a separate control de- intake from the upper and the out- vice. -
Page 6: Use Of Himalayan Salt Balls
We recommend using a long spoon to ma- THROWING WATER burnt on the heated rocks, but instead are neuver the salt balls through the bottom dispersed in the room by means of Saunum SALT BALLS ON THE HEATER grille and then gently drop the salt balls in fan spreading the fragrance evenly in the the sockets. -
Page 7: Warnings
SOLVING PROBLEMS When loading the stones, note: • Make sure you have proper ventila- tion in the sauna room. Saunum is • Use different size of stones to tightly not responsible for possible salt cor- rosion of equipment and machinery. -
Page 8: Maintenance
MAINTENANCE • Increase the selected temperature • Check the stones. Stones that are THE SAUNA CLIMATE DEVICE IS MAKING NOISE. on the control device. placed too tightly, stones falling down/sinking closer over time, or • Make sure that the power of the •... -
Page 9: Sauna Room
Saunum possible from the sauna climate device. The Use a 10% citric acid solution to remove Luxury are given in Table 1 (see pages 6–7). diameter of the air extraction pipe must be scale and rinse with water. -
Page 10: Safety Distances
BEFORE THE 100–150 mm INSTALLATION Non-combustible material • It must also be ensured that the The installation of the sauna climate device must be performed by a qualified electri- upper edge of the fan outlet of the cian. The connection of the device must be sauna climate device is lower than the lower edge of the bench. -
Page 11: Product Completeness
423 mm PRODUCT COMPLETENESS 844 mm 599 mm A - Flue E - Bottom grille B - Stone basket F - Side panels C - Front panel covering the electronics G - Heating element tunnel D - Salt ball tray H - Flue bottom mount 844 mm... - Page 12 INSTALLATION 3. Fix the flue to previously determined po- 4. Remove the side panels from the heater sition using two bolts and the slots in the main frame by pulling them towards you- bottom mount. self. 2. Slide the flue on to the flue mount. 1.
- Page 13 6. Re-position the side panels. 7. Install the salt balls (see USE OF HIMA- LAYAN SALT BALLS). 8. Install the heating element tunnel by positioning it in the stone basket partially covering the heating elements. When posi- tioning, notice that there is a slot in the tun- nel for each heating element and use the top view for reference.
-
Page 14: Electrical Connections
ELECTRICAL CONNECTIONS Now bring the power cable to the connec- Then pull the cables through the diagonal Connect the sauna climate device to the To access the electrical connections you tors. First, insert the cables through the chute. control device. Power of the heater is con- need to first remove the front panel by pull- cable glands which are located in the rear figurable on site according to the sauna... - Page 15 NB! The sauna climate device may only ble 1 (see pages 6–7) in this manual. Luxury kit) and power cables. the heating elements absorbing moisture be connected by a professional electri • Protective earthing (PE) must be con- from the air (storage, transport).
- Page 16 13.2kW 13.2 kW GROUP 2 GROUP 1 Group 1: 6 x 2200 W Group 2: Dissabled GROUP 1 GROUP 2 R2 R3 R4 R6 R7 R8 R1 R5 R9 * For the 12 kW configuration Group 2 (elements 1, 5 and 9) is dissabled.
- Page 17 16.6 kW 16.6 kW GROUP 2 GROUP 1 Group 1: 6 x 1660 W Group 2: 3 x 2200 W GROUP 1 GROUP 2 R2 R3 R4 R6 R7 R8 R1 R5 R9 In 16.6 kW configuration Group 1 uses a delta configuration. Each line of the triangle has 2 elements in se- ries.
- Page 18 19.8 kW 19.8 kW GROUP 2 GROUP 1 Group 1: 6 x 2200 W Group 2: 3 x 2200 W GROUP 1 GROUP 2 R2 R3 R4 R6 R7 R8 R1 R5 R9 In 19.8 kW configuration both Groups use a star connection. All 4 of the included jumpers must be installed according to the draw- ing: 3 slot on terminals 1–3, 2 slot...
-
Page 19: Failiure Ofa Heating Element
SAUNUM 60 W stones. chosen one. Heater will now work with full LUXURY HEATER SiHF 5 x 0,75 mm FS 5 FS 4 FS 3 FS 2 FS 1 2 0 A... -
Page 20: Warranty
1. Routine maintenance and cleaning 1. Disconnect from power. due to the use of substandard materials of the device and replacement of or the quality of the assembly, Saunum’s Element failure in Group 2 2. Remove the stones. the components due to normal... -
Page 21: Installation Report
INSTALLATION REPORT You can find the list of Saunum Saunas OÜ’s recommended installation maintenance professionals on the Saunum Date of purchase: _________________________________________________________ Saunas OÜ website www.saunum.com or by contacting us at info@saunum.com Heater type: ____________________________________________________________ Saunum’s device maintenance instructions Sticker/serial number: Date of installation: ___________ can be found in the instructions for use.
Need help?
Do you have a question about the Luxury and is the answer not in the manual?
Questions and answers