
Related Manuals for Saunum Professional


Summary of Contents for Saunum Professional
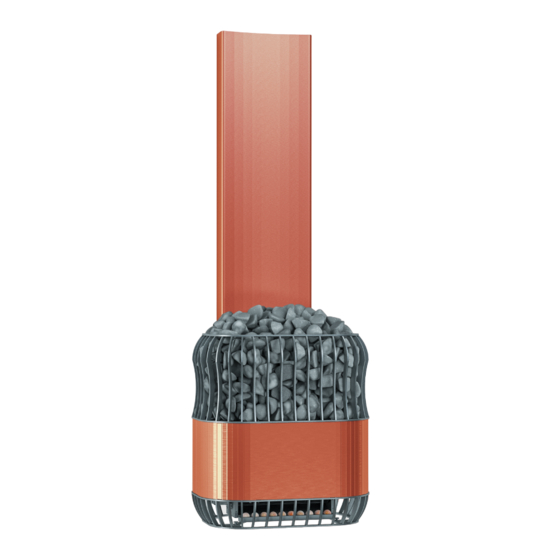
- Page 2 Steam room heater with air conditioner Professional instructions for use and installation...
- Page 3 Manufacturer: Saunum Saunas OÜ Address: Järvevana tee 7b, 10138, Tallinn, Estonia Certifies that the product Saunum Professional complies with the requirements of the following Council of Europe directives, provided that the installation has been carried out in accordance with the installation instructions issued by the equipment manufacturer and the instructions EN 60204-1 ‘Safety of machinery.
- Page 4 Saunum Saunas OÜ congratulates you on choosing an innovative steam room heater with air conditioner!
-
Page 5: Safety Information
Warranty Before using the Professional heater with air conditioner (hereinafter ‘sauna climate device’), read the installation and safety instructions. The sauna climate device is intended for heating the steam room at 60...95 •... - Page 6 Saunum Professional C 23 kW C 40A 10/1,5 20-32 ¹ Saunum Professional C – corner-mounted Professional heater Table 1. 1. INSTRUCTIONS FOR USE When turning on the sauna climate device, check: • the direction of air flow – the intake of air from the upper and the outlet 1.1 Heating the steam room...
- Page 7 1.2.1. Adjusting the temperature Saunum recommends the temperature range of 65...80 °C for sauna proce- dures. Please note! It is recommended to keep the air circulation fan of the sauna climate device turned off while heating the steam room! 1.2.
- Page 8 • Make sure that the sauna user is not allergic to salt treatment. Saunum nation of temperature and humidity. is not responsible for the side effects of salt treatment.
- Page 9 Make sure that the power of the heater is not too high. If the power of the device immediately and have the device inspected by a person the heater is suitable for the steam room, it will take 45–90 minutes to authorised by Saunum. reach the desired temperature in a properly insulated steam room. •...
- Page 10 Loading stones has a great effect on the operation of the heater. The wooden surfaces of the steam room become dirtier over time. This process may be accelerated by: Important: • sunlight; • The diameter of the stones must be 10–15 cm. •...
- Page 11 Generally, the fan does not need to be cleaned more than once a year. The CAUTION! Before maintaining and cleaning the sauna climate device, fan may only be cleaned by a person authorised by Saunum. the device must be disconnected from the mains and the moving parts of Using compressed air to clean the fan can cause irreversible damage to the the device must completely stop.
-
Page 12: Installation Instructions
1.5. The optimal sauna sizes for The air in the steam room must be changed at least six times an hour. the sauna climate device Saunum Professional are given in Table 1. The When using mechanical air extraction, place the air supply above the sauna height of the sauna is usually 2,100…2,300 mm. - Page 13 • the power and type of the heater are suitable for the given steam room. splash-proof and its maximum height from the floor can be up to 500 mm. The recommended steam room volume is given in Table 1; The connecting cable must be a rubber insulated type H07RN-F cable or •...
- Page 14 Table 1. Please note! The sauna climate device may only be connected by a professional electrician in accordance with the applicable regulations. 3.3.1. Electric heater insulation resistance During the final inspection of the electrical installation, a ‘leakage’ may be...
- Page 15 Figures Figure 1. Sauna Professional dimensions...
- Page 16 Figures Flue Lõõr Stone area Kiviruum Power cable Toitekaabel Steam cooling Leiliõhu jahutus damper siiber Figure 2. Sauna Professional device parts...
- Page 17 Figures Figure 3. Sauna Professional C dimensions...
- Page 18 Figures Flue Lõõr Stone area Kiviruum Power cable Toitekaabel Steam cooling Leiliõhu jahutus damper siiber Figure 4. Sauna Professional C device parts...
- Page 19 ASSEMBLING THE HEATER PROFESSIONAL C 1. Eemaldage tagumised katteplekid. 1. Remove the rear cover plates. M5 bolts (4 pcs.) have been used to Kumbagi kattepleki kinnitamiseks on kasutatud M5 polte (4tk). fasten both cover plates. 2. Install the flue. The flue is attached to the heater from the rear with 2.
- Page 20 5. Place the device in the space to be installed in the room. 5. Asetage seade paigaldatavasse kohta ruumis. 6. Kontrollige, et seade oleks loodis. Vajadusel reguleerige 6. Check that the device is level. If necessary, adjust the height of the legs seadme all asetsevate jalgade kõrgust soovitud tulemuse saavutamiseks.
- Page 21 ASSEMBLING THE HEATER PROFESSIONAL 1. Remove the rear cover plates. M5 bolts (4 pcs.) have been used to fasten both cover plates. 1. Eemaldage tagumised katteplekid. Kumbagi kattepleki kinnitamiseks on kasutatud M5 polte (4tk). 2. Paigaldage lõõr. Lõõri kinnitaatakse kerisele tagumisest 2.
- Page 22 5. Place the device in the space to be installed in the room. 5. Asetage seade paigaldatavasse kohta ruumis. 6. Check that the device is level. If necessary, adjust the height of the legs 6. Kontrollige, et seade oleks loodis. Vajadusel reguleerige under the device to achieve the desired result.
Need help?
Do you have a question about the Professional and is the answer not in the manual?
Questions and answers