Table of Contents
Advertisement
CROSSWAVE® HF2
WET & VACUUM HARD FLOOR CLEANER
3847 SERIES
Important Safety Instructions ................................ 2
What's in the Box? .........................................................3
Assembly ..............................................................................3
Filling the Clean Water Tank....................................4
Cleaning Your Floors ....................................................5
Emptying the Dirty Water Tank ............................6
Using the Clean-Out Cycle ....................................... 7
After-Cleaning Care ......................................................8
Changing the Brush Roll ............................................9
Storing Your Machine ...................................................9
Troubleshooting .............................................................10
Limited Warranty ............................................................11
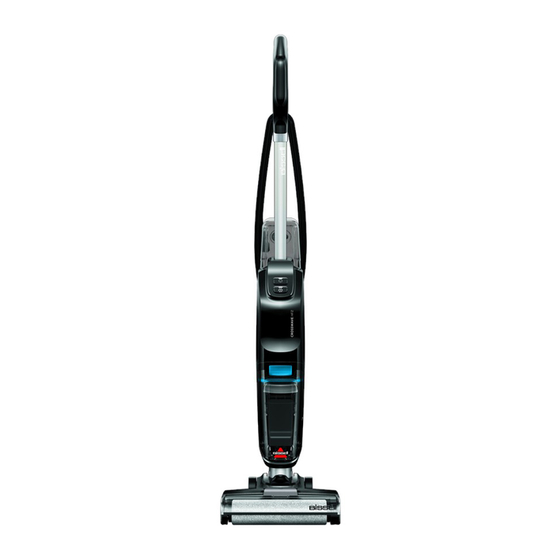
Product Overview
1. Handle
2. Power Button
3. Clean-Out Cycle Button
4. Clean Water Tank
5. Dirty Water Tank
Removal Button
6. Dirty Water Tank
with Filter
7. Brush Roll Window
Release Button
8. Brush Roll Window
1
2
3
5
6
7
8
4
Advertisement
Table of Contents

Subscribe to Our Youtube Channel
Related Manuals for Bissell CROSSWAVE HF2


Summary of Contents for Bissell CROSSWAVE HF2
-
Page 1: Table Of Contents
CROSSWAVE® HF2 WET & VACUUM HARD FLOOR CLEANER 3847 SERIES Important Safety Instructions ........ 2 What’s in the Box? ............3 Assembly ................3 Filling the Clean Water Tank........4 Cleaning Your Floors ............5 Emptying the Dirty Water Tank ......6 Using the Clean-Out Cycle ........7 After-Cleaning Care ............8 Changing the Brush Roll ..........9 Storing Your Machine ...........9... -
Page 2: Important Safety Instructions
For indoor use only. collection points. Please contact your local authority for further details of your nearest designated collection Use only BISSELL® cleaning formulas point. intended for use with this machine. Protection against moving parts. Disconnect power before servicing. -
Page 3: What's In The Box
Spares may be coins, etc. obtained from your BISSELL supplier. If for any reason the plug • Do not pick up anything that is burning or smoking, such as is cut off, it must be disposed of, as it is an electric shock hazard cigarettes, matches or hot ashes. -
Page 4: Filling The Clean Water Tank
Natural Multi-Surface Pet Cleaning Solution, Multi-Surface Cleaning Solution, Multi-Surface Pet Cleaning Solution, Wood Floor Cleaning Solution WARNING To reduce the risk of fire and electric shock due to internal component damage, use only BISSELL cleaning fluid intended for use with the appliance. 4 BISSELLdirect.co.uk... -
Page 5: Cleaning Your Floors
Cleaning Your Floors 1. Unwrap cord. To easily 2. Plug in machine. 3. Recline machine. unwrap, turn Quick Release™ Cord Wrap down. 4. Press power button to turn 5. Brush roll starts spinning. 6. Use steady forward and machine ON. Brush roll will not spin when backward strokes to ensure machine is upright. -
Page 6: Emptying The Dirty Water Tank
Emptying the Dirty Water Tank 1. Empty dirty water tank 2. Turn power OFF and unplug 3. Press button on top of dirty when water reaches “MAX” machine. water tank, grab front handle line. Do not let water overfill. and pull out. 4. -
Page 7: Using The Clean-Out Cycle
Using the Clean-Out Cycle Note: Empty dirty water tank before beginning and make sure filter stays dry. Use clean-out cycle after each use. 1. Make sure water reaches the 2. Plug in machine. 3. Place machine in storage clean-out cycle line on clean tray. -
Page 8: After-Cleaning Care
After-Cleaning Care 1. Turn power OFF and unplug 2. Remove brush roll window 3. If brush roll window or tray machine. and brush roll following steps are dirty, wipe excess dirt and on page 9. Rinse brush roll. water to clean. 4. -
Page 9: Changing The Brush Roll
Changing the Brush Roll 1. Press button and pull up on 2. Pull tab to remove brush roll. 3. Reinstall brush roll. Place tab to remove brush window. end of brush into right side of foot. 4. Press tab of brush down to 5. -
Page 10: Troubleshooting
Troubleshooting Below are some of the issues you may run into. If you don’t see the issue you’re experiencing below, visit support.BISSELL.co.uk or contact BISSELL Consumer Care. Problem Possible Cause Remedies Clean water tank may be Refill and reinstall the clean water tank. -
Page 11: Limited Warranty
BISSELL does not exclude or limit in any way its liability for (a) death or personal injury caused by our negligence or the negligence of our employees, agents or subcontractors; (b) fraud or fraudulent misrepresentation; (c) or for any other matter which cannot be excluded or limited under law. - Page 12 But wait, there’s more! Join us online for a complete guide to your new product, including troubleshooting, parts and more. Go to support.BISSELL.co.uk. INFO VIDEOS PARTS ©2023 BISSELL Inc. All rights reserved. Part Number 1636767 06/23 v5...
Need help?
Do you have a question about the CROSSWAVE HF2 and is the answer not in the manual?
Questions and answers