Advertisement
Quick Links
Advertisement

Related Manuals for Swing-N-Slide PB 8272T


Summary of Contents for Swing-N-Slide PB 8272T
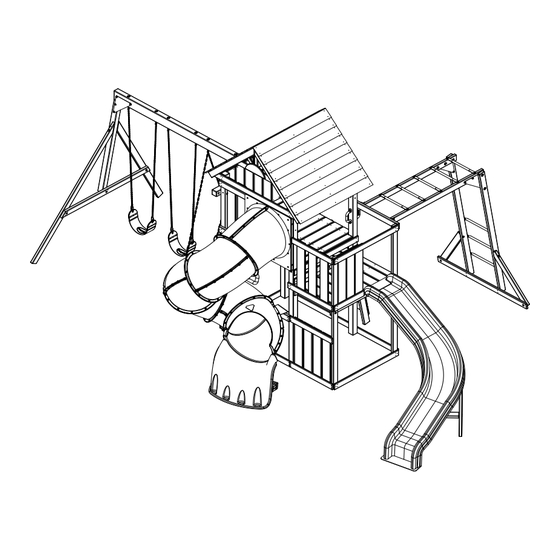
- Page 1 PB 8272T IMPORTANT!! PLEASE READ BEFORE BEGINNING ASSEMBLY!! ASSEMBLY INSTRUCTIONS...
- Page 4 6 ft. 6 ft. Denotes Use Zone with Protective Surfacing L+6 ft. 6 ft. Denotes Use Zone with Protective Surfacing 6 ft. 6 ft. 6 ft. Use Zone for Single-Axis Swings Use Zone for Multi-Axis Swings...
- Page 5 PLAYSET SAFETY ZONE 20'-10" 11'-4" 28'-0" 32'-10" 10 3 83 to Swing Hanger Pivot 8 Minimum...
- Page 6 REMEMBER- If you are missing anything, please DO NOT RETURN to the store where purchased. Contact our Customer Service Department at 1-800-888-1232 or email us at: service@swing-n-slide.com For ease in inventorying your wooden playset parts all have been marked with a part number. Look for the part number typically located on the end of the part.
- Page 7 (4) [PF 6062] 1’’ x 3-3/8’’ x 42-1/2’’ ROOF A-FRAME TOWER COMPONENTS (7) [PF 6008] 3/4’’ x 5-3/8’’ x 42’’ PB 8272T (2) [PF 6013] 5/8’’ x 5-3/8’’ x 22-3/4’’ ROCKWALL BOARD (10) [PF 6000] 5/8’’ x 5-3/8’’ x 33-3/4’’...
- Page 8 TOWER MODULE SA6051 / SA6022 COMPONENTS CONT.
- Page 9 TOWER MODULE SA6051 / SA6022 HARDWARE...
- Page 10 TERRACE MODULE SA6001 BOARD LIST (1) [PF 6061] 1-1/2’’ x 1-1/2’’ x 40’’ (2) [PF 6028] 1-3/8’’ x 3’’ x 79’’ (2) [PF 6026] 1’’ x 3-3/8’’ x 42’’ (3) [PF 6005] 3/4’’ x 3-3/8’’ x 42’’ (4) [PF 6025] 3/4’’ x 3-3/8’’ x 29-1/4’’ (3) [PF 6024] 3/4’’...
- Page 11 MONKEY BAR SA6006 BOARD LIST (1) [PF 6041] 1-3/8’’ x 3-3/8’’ x 29-1/4’’ (2) [PF 6042] 1-3/8’’ x 3-3/8’’ x 32’’ (2) [PF 6043] 1-3/8’’ x 3-3/8’’ x 60’’ (2) [PF 6045] 1-3/8’’ x 3-3/8’’ x 79-7/8’’ (1) [PF 6044] 1’’ x 3-3/8’’ x 58’’ MONKEY BAR HARDWARE...
- Page 12 SIDEWINDER WOOD ROOF BOARD LIST BOARD LIST (2) [PF 6147] 1-3/8’’ x 3-3/8’’ x 36’’ (2) [PF 6148] 1-3/8’’ x 3-3/8’’ x 15-1/4’’ (18) [PF 6055] 1/2’’ x 5’’ x 47-1/2’’ SHINGLE (2) [PF 6061] 1-1/2’’ x 1-1/2’’ x 40’’ ROOF HARDWARE SIDEWINDER SLIDE HARDWARE...
- Page 13 TURBO TUBE SLIDE BOARD LIST (2) [PF 6144] 1-3/8’’ x 3-3/8’’ x 47-1/2’’ (1) [PF 6143] 1-3/8’’ x 3-3/8’’ x 46’’ (1) [PF 6142] 1-3/8’’ x 3-3/8’’ x 30-5/8’’ (1) [PF 6141] 1-3/8’’ x 3-3/8’’ x 24-5/8’’ (1) [PF 6140] 1-3/8’’ x 3-3/8’’ x 23-5/8’’ (3) [PF 6138] 1-3/8’’...
- Page 14 STEP 1 6’’ 47-1/2’’ 6’’ 59-1/4’’ FRAME A 1-1/2’’ Hint!! Use parts from your Tower Box. BOTH SIDES Note:...
- Page 15 STEP 2 6’’ 47-1/2’’ 6’’ 59-1/4’’ 31’’ FRAME B 1-1/2’’ JOINTS Note:...
- Page 16 STEP 3 59-1/4’’ FRAME A...
- Page 17 STEP 4 FRAME B FRAME A...
- Page 18 STEP 5...
- Page 19 STEP 6 16-1/2’’ 16-1/2’’ TOP VIEW...
- Page 20 STEP 7...
- Page 21 STEP 8 Hint!! Use parts from your Turbo Tube Slide Box.
- Page 22 STEP 9 FRAME A Hint!! Use parts from your Terrace Box.
- Page 23 STEP 10 FRAME C...
- Page 24 STEP 11...
- Page 25 STEP 12 FRAME C Hint!! Use parts from your Monkey Bars Box.
- Page 26 STEP 13 FRAME C...
- Page 27 STEP 14 10-5/8’’ 10-5/8’’ TOP VIEW...
- Page 28 STEP 15...
- Page 29 STEP 16...
- Page 30 STEP 17...
- Page 31 STEP 18 1/8’’ GAP BETWEEN BOARDS INSIDE VIEW...
- Page 32 STEP 19...
- Page 33 STEP 20 PRE-DRILL (4) 1/8’’ HOLES FROM BACK SIDE Hint!! Use parts from your Tower Box.
- Page 34 STEP 21...
- Page 35 STEP 22...
- Page 36 STEP 23 TOP OF BEAM SUPPORT POST...
- Page 37 STEP 24 NOTE:...
- Page 38 STEP 25...
- Page 39 STEP 26...
- Page 40 STEP 27...
- Page 41 STEP 28...
- Page 42 STEP 29...
- Page 43 STEP 30 CENTERED...
- Page 44 STEP 31 CENTERED...
- Page 45 STEP 32 UNDERSIDE VIEW Hint!! Use parts from your Wood Roof Box.
- Page 46 STEP 33 NOTE:...
- Page 47 STEP 34...
- Page 48 STEP 35 ALIGN SCREWS WITH PRE DRILLS...
- Page 49 STEP 36...
- Page 50 STEP 37...
- Page 51 STEP 38 5/8’’ GAP BETWEEN ALL BOARDS...
- Page 52 STEP 39 30-1/2’’ 13’’ Attach brace here 12’’ 59’’...
- Page 53 STEP 40 49-1/4’’ 38-1/4’’ 27-1/4’’ 16-1/4’’ 5-1/4’’ 19’’ Hint!! Use parts from your PLACE NO BOLTS Monkey Bar Box. HERE...
- Page 54 STEP 41 36-1/4’’ 24-1/2’’ 12-3/4’’ 22’’...
- Page 55 STEP 42...
- Page 56 STEP 43 Hint!! Use parts from your Turbo Tube Slide Box.
- Page 57 STEP 44 24-5/8’’...
- Page 58 STEP 45 FLUSH WITH OUSTIDE POST FLUSH WITH OUSTIDE POST...
- Page 59 STEP 46 NOTE:...
- Page 60 STEP 47...
- Page 61 STEP 48...
- Page 62 STEP 49 It is helpful to use a screwdriver to hold eye bolt in place when TOP VIEW tightening lock nut.
- Page 63 STEP 50 Tighten clips securely with a wrench. ini u between Glider and ground. Ad ust Chains at Top. FINAL INSPECTION !IMPORTANT! Inspect and con r tightness of all Lock-Nuts and Quick Links. !IMPORTANT! Attach (2) Chains per Swing Hanger using quick links ini u between Glider and ground.
- Page 64 STEP 51 PLASTIC COATED END Swing Seat Asse bly...
- Page 65 STEP 52 Note: Keep as little play as possible using any of the holes in the strap that work best. TIP:...
- Page 66 Please complete your warranty registration to properly validate your product warranty. Register your product online at: www.OnlineWarranty.net Swing-N-Slide® takes great pride in the quality and durability of our products. Our Manufacturer’s Limited Warranty providing quality residential playground products. MANUFACTURER’S LIFETIME LIMITED WARRANTY Swing-N-Slide®...
- Page 67 PRODUCT WARRANTY & REGISTRATION Please register online to properly initiate your product warranty & registration Bene ts of registering online: Quick & simple from home or mobile Record your purchase in our system Initiate product warranty Improved customer support Register your product online at www.OnlineWarranty.net...
- Page 68 1-800-888-1232 Available Monday - Friday 7a - 5p (CST) Technical support fro experienced Swing-N-Slide custo er service representatives who have actually built a swing set the selves.
Need help?
Do you have a question about the PB 8272T and is the answer not in the manual?
Questions and answers