Table of Contents
Advertisement
• Updated information (the latest Instruction Manual, etc.) is available from
<https://www.kenwood.com/cs/ce/>.
Model name indication position
See "Removing the trim plate" (P.19)
Trim plate
Take the time to read through this instruction manual.
Familiarity with installation and operation procedures will help you obtain the best performance from your new
receiver.
For your records
Record the serial number, found on the back of the unit, in the spaces designated on the warranty card, and in the space
provided below. Refer to the model and serial numbers whenever you call upon your KENWOOD dealer for information or
service on the product.
Model DMX129BT Serial number
US Residence Only
Register your KENWOOD product at www.kenwood.com/usa/
© 2023 JVCKENWOOD Corporation
3-12, Moriyacho, Kanagawa-ku, Yokohama-shi, Kanagawa, 221-0022, Japan
DMX129BT
MONITOR WITH RECEIVER
INSTRUCTION MANUAL
Register Online
B5K-1096_ref_K_En_00
Advertisement
Table of Contents

Related Manuals for Kenwood dmx129bt


Summary of Contents for Kenwood dmx129bt
- Page 1 Record the serial number, found on the back of the unit, in the spaces designated on the warranty card, and in the space provided below. Refer to the model and serial numbers whenever you call upon your KENWOOD dealer for information or service on the product.
-
Page 2: Table Of Contents
Register your smartphone to the unit ...........11 • When you purchase optional accessories, check with Bluetooth Setup ....................11 your KENWOOD dealer to make sure that they work Receive a phone call ..................12 with your model and in your area. Make a phone call ....................12 •... -
Page 3: Getting Started
Getting Started [Reverse with ATT (-20dB)] Turn the ignition key of your car to ACC. The unit is turned on, please read the warning and When the gear is shifted to the reverse (R) press “Agree” to enter the screen. position, the volume of the device is adjusted. -
Page 4: Basics
Basics Basics Ñ Turning off the power Functions of the Buttons on the Front Panel Press and hold the <8MENU> button. Ñ Adjusting the volume Press the <+> or <–> button. 1 Remote Sensor • Receives the remote control signal. 2 8MENU •... -
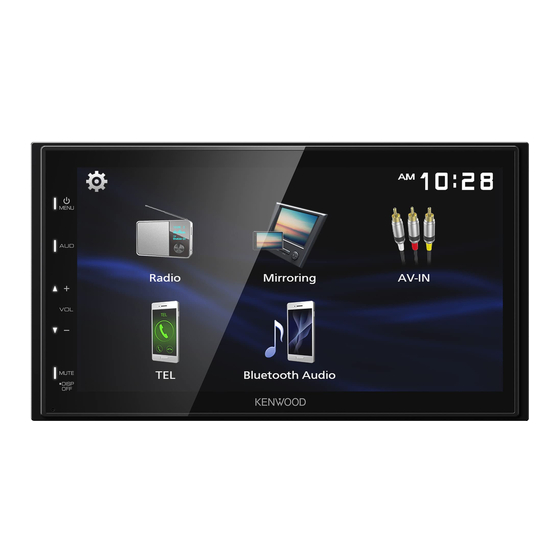
Page 5: Home Screen Descriptions
• When iPhone is connected. [Mirroring] Displays the Mirroring screen. (P.9) • When android device with “Mirroring OB for KENWOOD” application installed is connected. 4 Switches to an external component connected to the AV-IN input terminal. (P.10) 5 Displays the Hands Free screen. (P.12) 6 Plays a Bluetooth audio player. -
Page 6: Radio
Radio Radio Radio Basic Operation Radio Setup Press the <8MENU> button. Touch [ ]. Touch [Radio]. Set each item as follows. Ñ Source control screen [Auto Store] Automatically searches and stores the 6 stations with the strongest signals for the selected band. 1 Displays the information of the current station: “Auto Store”... -
Page 7: Usb
Ñ For Video playback Preparation When the operation buttons are not displayed Ñ Connecting a USB device on the screen, touch the display. Remove the cap of the USB terminal. Connect the USB device with the USB cable. The unit reads the device and playback starts. Ñ... -
Page 8: Iphone
iPhone iPhone Preparation 1 Artwork (Shown if the track contains artwork) 2 Displays the information of the current file. Ñ Connecting iPhone 3 Playing time/File number • For details about connecting iPhone, see page Play time bar : For confirmation of current playing 21 . -
Page 9: Mirroring
Ñ Connecting Android smartphone Download Mirroring App from Google Play. Install the latest version of the Mirroring application “Mirroring OB for KENWOOD” on your Android. • You can display the same screen of the Android Remove the cap of the USB terminal. -
Page 10: External Components
External Components External Components Ñ To adjust the parking guidelines Using external audio/video players ✎ NOTE Ñ Starting playback • Install the rear view camera in the appropriate position according to the instruction manual Connect an external component to the AV-IN supplied with the rear view camera. -
Page 11: Bluetooth
Bluetooth units. Delete unnecessary registration. (P.11) Turn on the Bluetooth function on your smartphone/cell-phone. Search the unit (“DMX129BT”) from your smartphone/cell-phone. If a PIN code is required, enter the PIN code (“0000”). • appears when the Bluetooth smartphone is connected. -
Page 12: Receive A Phone Call
Bluetooth Receive a phone call Make a phone call Touch [Û]. Press the <8MENU> button. Touch [TEL]. See the table below for each operation method. • [Ý] : Reject an incoming call. Ñ Operations during a call Call by entering a phone number 1) Enter a phone number with number keys. -
Page 13: Playing Bluetooth Audio Device
Bluetooth Call by voice 1 Displays the information of the current file. You can make a voice call using the voice 2 Playing time/File number recognition function of the Bluetooth smartphone. Play time bar : For confirmation of current playing 1) Touch [ ... -
Page 14: Controlling Audio
Controlling Audio Controlling Audio Equalizer Control You can adjust various settings such as audio balance or subwoofer level. Press the <AUD> button. Press the <AUD> button. Touch [Equalizer]. See the below for each operation method. Set each item as follows. Controlling General Audio 1 You can select frequency bar and adjust its level. -
Page 15: Speaker / X'over Setup
Controlling Audio Speaker / X’over setup Listening Position DTA Press the <AUD> button. Press the <AUD> button. Touch [Speaker / X’over]. Touch [Position DTA]. Touch the speaker to set up. Touch [Delay]. Touch [T] or [U] to adjust the delay time of the selected speaker. -
Page 16: Remote Control
Remote control Ñ Basic Operation This unit can be operated using the remote control KCA-RCDV340 (optional accessory). • Aim the remote control directly at the remote sensor on the faceplate. CAUTION • DO NOT expose the remote sensor to bright light •... -
Page 17: Installation
Installation Installation Before Installation • Connect the speaker wires correctly to the terminals to which they correspond. The unit may be Before installation of this unit, please note the damaged or fail to work if you share the ¤ wires or following precautions. -
Page 18: Installing The Unit
Installation Ñ Supplied accessories for installation Installing the unit Ñ Non-Japanese cars (3 m) Bend the tabs of the mounting sleeve with a screwdriver or similar utensil and attach it in place. NOTE (M5 × 8 mm) (M5 × 6 mm) •... - Page 19 Installation Ñ Microphone unit Ñ Removing the unit 1) Check the installation position of the microphone 1) Remove the trim plate by referring to step 1 in (accessory 4). “Removing the trim plate”. 2) Clean the installation surface. 2) Insert the extraction key (accessory 2) deeply into 3) Remove the separator of the microphone the slot as shown.
- Page 20 Installation Ñ Connecting wires to terminals Light Blue/Yellow (Steering remote control wire) Accessory 4: To steering remote Bluetooth Microphone To use the steering wheel remote control feature, you need an exclusive remote adapter (not supplied) matched to your car. Light Green (Parking sensor wire) USB terminal (1.0 m) Accessory 9: Extension cable...
- Page 21 Installation Ñ Connecting an iPhone/Android Android smartphone USB cable M4x6 REAR OUT FRONT OUT AV IN 1 3 5 7 2 4 6 8 1 3 5 7 iPhone 2 4 6 8 CAM IN VIDEO OUT VIDEO IN Lightning-USB cable Accessory 5 Accessory 6 Speaker impedance: 4-8 Ω...
-
Page 22: About This Unit
About this Unit About this Unit More information Ñ Acceptable Video files Video Video codec Audio codec Ñ Usable USB device format This unit can play MPEG1/ MPEG2/ MPEG4/H.264/ MPEG-1 MPEG-1 MPEG Audio Layer 2 MKV/ MP3/WMA/ AAC/ WAV/ FLAC/ OGG files stored (.mpg, .mpeg) in a USB mass storage class device. -
Page 23: Troubleshooting
About this Unit Ñ AV-IN Troubleshooting No picture appears on the screen. What appears to be trouble is not always serious. • Turn on the video component if it is not on. Check the following points before calling a service •... -
Page 24: Specifications
About this Unit Ñ Bluetooth section Specifications Technology Ñ Monitor section : Bluetooth Ver.5.0 Frequency Picture Size : 2.4 – 2.48 GHz : 6.75 inches (diagonal) wide : 151.8 mm (W) × 79.7 mm (H) Maximum Communication range 5-15/16 × 3-1/8 inch : Line of sight approx. -
Page 25: Copyrights
About this Unit Ñ Audio section Copyrights Maximum Power (Front & Rear) Bluetooth® word mark and logos are registered : 45 W × 4 trademarks owned by the Bluetooth SIG, Inc. and any use of such marks by JVCKENWOOD Corporation is Full Bandwidth Power (Front &... - Page 26 About this Unit – Redistributions in binary form must reproduce the Ñ FCC CAUTION above copyright notice, this list of conditions and the Changes or modifications not expressly approved by following disclaimer in the documentation and/or the party responsible for compliance could void the other materials provided with the distribution.
- Page 27 Trade Name: KENWOOD Products: MONITOR WITH RECEIVER La operación de este equipo esta sujeta a las Model Name: DMX129BT siguientes dos condiciones: Responsible Party: JVCKENWOOD USA (1) es posible que este equipo o dispositivo no cause CORPORATION interferencia perjudicial y...
Need help?
Do you have a question about the dmx129bt and is the answer not in the manual?
Questions and answers
Every time I set the clock for central time; it returns to Eastern time