Table of Contents
Advertisement
Available languages
Available languages
Quick Links
• For detailed operations and information, refer to the INSTRUCTION MANUAL
on the following website:
• Pour plus d'informations et de détails sur les opérations, reportez-vous au
MODE D'EMPLOI sur le site Internet suivant:
• Para obtener información y detalles sobre las operaciones, consulte el
MANUAL DE INSTRUCCIONES en el siguiente sitio web:
<https://www.kenwood.com/cs/ce/>
Model name indication position
See "Removing the trim plate" (P.13)
Position d'indication du nom du modèle
Reportez-vous à la section « Retrait de la
plaque de garniture » (P.29)
Trim plate
Plaque de garniture
Placa de montaje
Take the time to read through this instruction manual.
Familiarity with installation and operation procedures will help you obtain the best performance from your new
receiver.
For your records
Record the serial number, found on the back of the unit, in the spaces designated on the warranty card, and in the space
provided below. Refer to the model and serial numbers whenever you call upon your KENWOOD dealer for information or
service on the product.
Model DMX129BT Serial number
US Residence Only
Register your KENWOOD product at www.kenwood.com/usa/
© 2023 JVCKENWOOD Corporation
3-12, Moriyacho, Kanagawa-ku, Yokohama-shi, Kanagawa, 221-0022, Japan
DMX129BT
MONITOR WITH RECEIVER
Quick Start Guide
ÉCRAN AVEC RÉCEPTEUR
Guide de démarrage rapide
MONITOR CON RECEPTOR
Guía de inicio rápido
Posición de la indicación del nombre del
modelo
Consulte "Retirada del marco"
Register Online
(P.45)
B5K-1096-00b EN (K)
Advertisement
Chapters
Table of Contents

Related Manuals for Kenwood DMX129BT


Summary of Contents for Kenwood DMX129BT
- Page 1 Record the serial number, found on the back of the unit, in the spaces designated on the warranty card, and in the space provided below. Refer to the model and serial numbers whenever you call upon your KENWOOD dealer for information or service on the product.
-
Page 2: Table Of Contents
Receive a phone call .................... 9 • When you purchase optional accessories, check with Make a phone call ....................9 your KENWOOD dealer to make sure that they work with your model and in your area. Playing Bluetooth Audio Device ..............10 •... -
Page 3: Getting Started
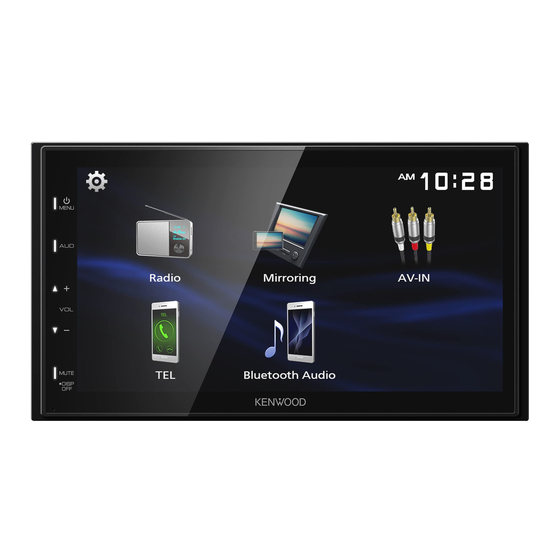
Getting Started [Reverse with ATT (-20dB)] Turn the ignition key of your car to ACC. The unit is turned on, please read the warning and When the gear is shifted to the reverse (R) press “Agree” to enter the screen. position, the volume of the device is adjusted. -
Page 4: Basics
When the screen is off, touch the display to turn When android device with “Mirroring OB for on the screen. KENWOOD” application installed is connected. 6 Reset 4 Switches to an external component connected to • If the unit or the connected unit fails to operate the AV-IN input terminal. -
Page 5: Radio
Radio Radio Radio Basic Operation Radio Setup Press the <8MENU> button. Touch [ ]. Touch [Radio]. Set each item as follows. Ñ Source control screen [Auto Store] Automatically searches and stores the 6 stations with the strongest signals for the selected band. 1 Displays the information of the current station: “Auto Store”... -
Page 6: Usb
Ñ For Video playback Preparation When the operation buttons are not displayed Ñ Connecting a USB device on the screen, touch the display. Remove the cap of the USB terminal. Connect the USB device with the USB cable. The unit reads the device and playback starts. Ñ... -
Page 7: Iphone
iPhone iPhone Preparation 1 Artwork (Shown if the track contains artwork) 2 Displays the information of the current file. Ñ Connecting iPhone 3 Playing time/File number • For details about connecting iPhone, see page Play time bar : For confirmation of current playing 15 . -
Page 8: External Components
External Components External Components Ñ To adjust the parking guidelines Using external audio/video players ✎ NOTE Ñ Starting playback • Install the rear view camera in the appropriate position according to the instruction manual Connect an external component to the AV-IN supplied with the rear view camera. -
Page 9: Bluetooth
Touch [TEL]. Turn on the Bluetooth function on your See the table below for each operation method. smartphone/cell-phone. Search the unit (“DMX129BT”) from your smartphone/cell-phone. If a PIN code is required, enter the PIN code (“0000”). • appears when the Bluetooth smartphone is connected. -
Page 10: Playing Bluetooth Audio Device
Controlling Audio Controlling Audio Bluetooth Playing Bluetooth Audio Device You can adjust various settings such as audio balance or subwoofer level. Press the <8MENU> button. Press the <AUD> button. Touch [Bluetooth Audio]. See the below for each operation method. Ñ Source control screen Controlling General Audio Press the <AUD>... -
Page 11: Installation
Installation Installation Before Installation • Connect the speaker wires correctly to the terminals to which they correspond. The unit may be Before installation of this unit, please note the damaged or fail to work if you share the ¤ wires or following precautions. -
Page 12: Installing The Unit
Installation Installation Ñ Supplied accessories for installation Installing the unit Ñ Non-Japanese cars (3 m) Bend the tabs of the mounting sleeve with a screwdriver or similar utensil and attach it in place. NOTE (M5 × 8 mm) (M5 × 6 mm) •... - Page 13 Installation Ñ Microphone unit Ñ Removing the unit 1) Check the installation position of the microphone 1) Remove the trim plate by referring to step 1 in (accessory 4). “Removing the trim plate”. 2) Clean the installation surface. 2) Insert the extraction key (accessory 2) deeply into 3) Remove the separator of the microphone the slot as shown.
- Page 14 Installation Installation Ñ Connecting wires to terminals Light Blue/Yellow (Steering remote control wire) Accessory 4: To steering remote Bluetooth Microphone To use the steering wheel remote control feature, you need an exclusive remote adapter (not supplied) matched to your car. Light Green (Parking sensor wire) USB terminal (1.0 m))
- Page 15 Installation Ñ Connecting an iPhone/Android Android smartphone USB cable M4x6 REAR OUT FRONT OUT AV IN 1 3 5 7 2 4 6 8 1 3 5 7 iPhone 2 4 6 8 CAM IN VIDEO OUT VIDEO IN Lightning-USB cable Accessory 5 Accessory 6 Speaker impedance: 4-8 Ω...
-
Page 16: About This Unit
About this Unit About this Unit More information Ñ Acceptable Video files Video Video codec Audio codec Ñ Usable USB device format This unit can play MPEG1/ MPEG2/ MPEG4/H.264/ MPEG-1 MPEG-1 MPEG Audio Layer 2 MKV/ MP3/WMA/ AAC/ WAV/ FLAC/ OGG files stored (.mpg, .mpeg) in a USB mass storage class device. -
Page 17: Copyrights
About this Unit – Redistributions in binary form must reproduce the Copyrights above copyright notice, this list of conditions and the Bluetooth® • The word mark and logos are registered following disclaimer in the documentation and/or trademarks owned by the Bluetooth SIG, Inc. and any other materials provided with the distribution. -
Page 18: Avant L'utilisation
Enregistrer votre smartphone dans l’appareil ........25 • Lorsque vous achetez des accessoires en option, Recevoir un appel ....................25 vérifiez auprès de votre revendeur KENWOOD qu’ils Passer un appel .....................25 fonctionneront avec votre modèle et dans votre région. Utilisation d’un appareil audio Bluetooth en lecture ....26 •... -
Page 19: Mise En Route
Mise en route Tournez la clé de contact de votre véhicule sur [Revers avec ATT (-20dB)] la position ACC. Lorsque l’engrenage est déplacé en position de L’appareil se met en marche, Veuillez lire l’ avertissement revers (R), le volume de l’appareil est réglé. et appuyer sur “Agree”... -
Page 20: Les Bases
Affiche l’écran de miroitage. l’affichage pour activer l’écran. Lorsqu’un appareil Android avec l’application Réinitialisation « Mirroring OB for KENWOOD » installée est • Si l’appareil ou l’appareil qui y est connecté ne connecté. fonctionne pas correctement, appuyer sur ce 4 Passe à élément externe connecté à la borne bouton pour que l’appareil retrouve les réglages... -
Page 21: Radio
Radio Radio Utilisation de base de la radio Configuration radio Appuyez sur le bouton <8MENU> . Toucher [ ]. Toucher [Radio]. Réglez chaque option comme suit. Ñ Écran de commande de source [Auto Store] Recherche et enregistre automatiquement les 6 1 Affiche les informations concernant la station en stations avec les signaux les plus puissants pour la cours :... -
Page 22: Usb
Ñ Pour la lecture de vidéo Préparation Lorsque les touches de fonctionnement ne sont Ñ Connecter un périphérique USB pas affichées à l’écran, toucher l’écran. Retirer le capuchon de la borne USB. Branchez le périphérique USB avec le câble USB. L’appareil lit le périphérique et la lecture commence. -
Page 23: Iphone
iPhone iPhone Préparation Options de lecture Ñ L’écran de commande de la source vous Ñ Connexion d’un iPhone permet de gérer la musique que vous • Pour en savoir plus sur la connexion iPhone, voir écoutez. 31 . Retirer le capuchon de la borne USB. Branchez l’iPhone. -
Page 24: Composants Externes
Composants Externes Composants Externes Ñ Pour régler les instructions de parking Utilisant des lecteurs audio/vidéo externes ✎ REMARQUE • Installez la caméra de recul dans la position Ñ Démarrer la lecture appropriée en fonction du mode d’emploi fourni avec la caméra de recul. Connecter un composant externe à... -
Page 25: Bluetooth
Veuillez consulter le tableau ci-dessous pour Activer la fonction Bluetooth sur votre smartphone/téléphone portable. chaque méthode de fonctionnement. Recherchez l’appareil (“DMX129BT”) à partir de votre smartphone/téléphone portable. Si un code PIN est requis, entrez le code PIN (« 0000 »). •... -
Page 26: Utilisation D'un Appareil Audio Bluetooth En Lecture
Contrôle de l’audio Bluetooth Bluetooth Utilisation d’un appareil audio Vous pouvez régler différents paramètres, comme Bluetooth en lecture la balance audio ou le niveau du caisson de graves par exemple. Appuyez sur le bouton <8MENU>. Appuyez sur le bouton <AUD>. Appuyez sur [Bluetooth Audio]. -
Page 27: Installation
Installation Installation Avant l’installation • Fixez les fils à l’aide de colliers et enroulez le ruban de vinyle autour des fils qui entre en contact avec les Avant d’installer cet appareil, veuillez prendre les parties métalliques afin de protéger les fils et éviter mesures de précaution suivantes. -
Page 28: Installation De L'appareil
Installation Installation Ñ Accessoires fournis pour l’installation Installation de l’appareil Ñ Voitures non-japonaises (3 m) Courbez les languettes de la douille de montage à l’aide d’un tournevis ou d’un outil similaire, puis fixez-la en place. REMARQUE (M5 × 8 mm) (M5 ×... - Page 29 Installation Installation Ñ Microphone Ñ Retrait de l’appareil 1) Vérifiez la position d’installation du microphone 1) Retirez la plaque de garniture en vous référant à l’ (accessoire 4). étape 1 dans «Retrait de la plaque de garniture». 2) Nettoyez la surface d’installation. 2) Insérez la clé...
- Page 30 Installation Installation Ñ Connexion des câbles sur les contacts électriques Bleu ciel/Jaune (Câble de la télécommande au volant) Accessoire 4: Vers la télécommande au volant microphone Bluetooth Pour utiliser la fonction de télécommande au volant, vous avez besoin d’un adaptateur de télécommande spécial (non fourni) qui correspond à...
- Page 31 Installation Installation Ñ Branchement d'un iPhone/Android Smartphone Android Câble USB M4x6 REAR OUT FRONT OUT AV IN 1 3 5 7 2 4 6 8 1 3 5 7 iPhone 2 4 6 8 CAM IN VIDEO OUT VIDEO IN Câble Lightning-USB Accessoire 5 Accessoire 6...
-
Page 32: À Propos De Cet Appareil
À propos de cet appareil À propos de cet appareil Ñ Fichiers vidéo acceptés Plus d’informations Format vidéo Codec vidéo Codec Audio Ñ Périphérique USB utilisable MPEG-1 (.mpg, MPEG-1 MPEG Audio .mpeg) Layer 2 Cet appareil peut lire les fichiers MPEG1/ MPEG2/ MPEG-2 (.mpg, MPEG-2 MPEG Audio... -
Page 33: Copyrights
À propos de cet appareil À propos de cet appareil – Redistributions in binary form must reproduce the Copyrights above copyright notice, this list of conditions and the • La marque et les logos Bluetooth sont des marques following disclaimer in the documentation and/or Bluetooth®... -
Page 34: Antes De La Utilización
Registre su teléfono inteligente en la unidad ........41 • Cuando compre accesorios opcionales, pregunte a Reciba una llamada telefónica ..............41 su distribuidor KENWOOD si dichos accesorios son Realice una llamada telefónica ..............41 compatibles con su modelo y en su región. -
Page 35: Inicio
Inicio [Guidelines SETUP] Coloque la llave de encendido del coche en la Si selecciona [ON] para [Parking Guidelines], podrá posición ACC. ajustar las pautas de aparcamiento. Consulte Para La unidad se pone en marcha, Por favor, lea el aviso ajustar las pautas de aparcamiento (P.40). y pulse “Agree”... -
Page 36: Conceptos Básicos
Muestra la pantalla Duplicación. encender la misma. Cuando está conectado un dispositivo Android 6 Restablecer con la aplicación “Mirroring OB for KENWOOD” • Si la unidad o el equipo conectado no instalada. funcionan correctamente, la unidad restablece 4 Cambia a un componente externo conectado a la la configuración de fábrica al pulsar este botón. -
Page 37: Radio
Radio Radio Manejo básico de radio Configuración de radio Pulse el botón<8MENU> . Toque [ ]. Toque [Radio]. Ajuste cada elemento del modo siguiente. Ñ Pantalla de control de fuente [Auto Store] Busca y guarda automáticamente las 6 emisoras con 1 Muestra información sobre la emisora actual: las señales más fuertes de la banda seleccionada. -
Page 38: Usb
Preparativos Ñ Para la reproducción de video Si los botones de operación no se visualizan en Ñ Conexión de un dispositivo USB la pantalla, toque la pantalla. Retire la tapa del terminal de USB. Conecte el dispositivo USB con el cable USB. La unidad lee el dispositivo y se inicia la reproducción. -
Page 39: Iphone
iPhone iPhone Preparativos Operaciones de reproducción Ñ Controle la música que está escuchando Ñ Conexión de iPhone en la pantalla de control de fuente. • Para obtener detalles acerca de la conexión de un iPhone, consulte la página Retire la tapa del terminal de USB. Conecte el iPhone. -
Page 40: Componentes Externos
Componentes externos Componentes externos Ñ Para ajustar las pautas de aparcamiento Uso de reproductores de audio/ vídeo exteriores ✎ NOTA • Instale la cámara de retrovisión en la posición correcta, de conformidad con el manual de instrucciones Ñ Inicio de la reproducción suministrado con la cámara de retrovisión. -
Page 41: Bluetooth
Consulte la tabla de abajo para cada método de Active la función Bluetooth en su teléfono inteligente/teléfono móvil. funcionamiento. Busque la unidad (“DMX129BT”) en su teléfono inteligente/teléfono móvil. Si se requiere un código PIN, introduzca el código PIN (“0000”). •... -
Page 42: Reproducir Dispositivos De Audio Bluetooth
Control del audio Bluetooth Bluetooth Reproducir dispositivos de audio Puede configurar diversos ajustes como el balance Bluetooth del audio o el nivel del subwoofer. Pulse el botón <AUD> . Pulse el botón <8MENU> . Consulte lo siguiente para cada método de Toque [Bluetooth Audio]. -
Page 43: Instalación
Instalación Instalación Antes de la instalación • Asegure los cables con las abrazaderas de cable y envuelva cinta de vinilo alrededor de los cables que Antes de la instalación de esta unidad, tenga en entren en contacto con los elementos metálicos cuenta las precauciones siguientes. -
Page 44: Instalación De La Unidad
Instalación Instalación Ñ Accesorios suministrados para la Instalación de la unidad instalación Ñ Coches no japoneses (3 m) Doble las lengüetas del manguito de montaje con un destornillador o similar y fíjelo. NOTA (M5 × 6 mm) (M5 × 8 mm) •... - Page 45 Instalación Ñ Unidad de micrófono Ñ Desmontaje de la unidad 1) Compruebe la posición de instalación del 1) Retire el marco según las indicaciones del paso 1 de micrófono (accesorio 4). “Retirada del marco”. 2) Limpie la superficie de instalación. 2) Introduzca la llave de extracción (accesorio 2) 3) Extraiga el separador del micrófono (accesorio 4) y profundamente en la ranura tal y como se muestra.
- Page 46 Instalación Instalación Ñ Conectar los cables a los terminales Azul claro/Amarillo (cable del mando a distancia de la dirección) Accesorio 4: Al mando a distancia de la dirección Micrófono Bluetooth Para utilizar la función de mando a distancia en el volante es necesario un adaptador remoto exclusivo (no suministrado) apropiado para su vehículo.
- Page 47 Instalación Ñ Conexión de un iPhone/Android Teléfono inteligente Android Cable USB M4x6 REAR OUT FRONT OUT AV IN 1 3 5 7 2 4 6 8 1 3 5 7 iPhone 2 4 6 8 CAM IN VIDEO OUT VIDEO IN Cable Lightning-USB Accesorio 5 Accesorio 6...
-
Page 48: Acerca De Esta Unidad
Acerca de esta unidad Acerca de esta unidad Más información • Aunque los archivos de audio cumplen los estándares anteriores, puede que no sea posible la reproducción según los tipos o condiciones del Ñ Dispositivos USB que pueden utilizarse medio o dispositivo. Esta unidad puede reproducir archivos MPEG1/ MPEG2/ MPEG4/H.264/MKV/ MP3/WMA/ AAC/ WAV/ Ñ... -
Page 49: Derechos De Autor
Acerca de esta unidad – Redistributions in binary form must reproduce the Derechos de autor above copyright notice, this list of conditions and the Bluetooth® • La marca denominativa y los logos de following disclaimer in the documentation and/or marcas registradas propiedad de Bluetooth SIG, Inc. other materials provided with the distribution. - Page 50 Acerca de esta unidad Acerca de esta unidad This transmitter must not be co-located or operated in For USA conjunction with any other antenna or transmitter. Ñ FCC CAUTION For Canada Changes or modifications not expressly approved by Ñ ISED CAUTION the party responsible for compliance could void the This device contains licence-exempt transmitter(s)/ user’s authority to operate the equipment.
- Page 51 KENWOOD de equipos eléctricos y electrónicos Products: MONITOR WITH RECEIVER al final de la vida útil (aplicable a los Model Name: DMX129BT países que hayan adoptado sistemas Responsible Party: JVCKENWOOD USA independientes de recogida de residuos) CORPORATION 4001 Worsham Avenue, Long Beach, CA 90808, U.S.A.
Need help?
Do you have a question about the DMX129BT and is the answer not in the manual?
Questions and answers