Advertisement
Quick Links
Advertisement

Related Manuals for Conspit CPP.LITE


Summary of Contents for Conspit CPP.LITE
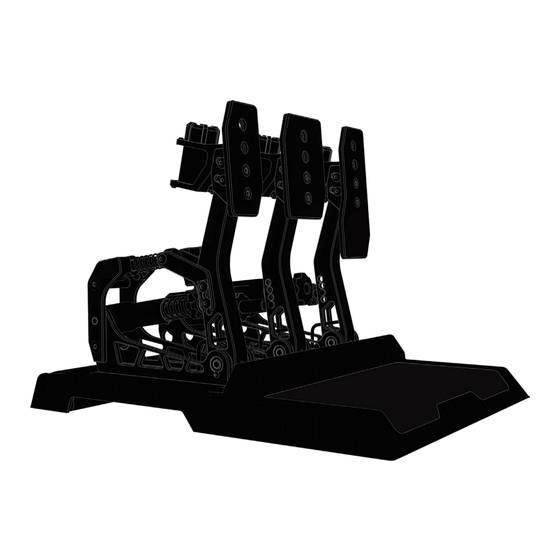
- Page 1 CONSPIT CPP.LITE Quick Guide Elite Sim-racing Development...
-
Page 2: Product Disclaimer
If you have any questions about this Disclaimer or the following product safety tips and operating specifications, you can consult through support@conspit.com. In the process of reading this Disclaimer and the following product safety tips and operating specifications, you should immediately stop using this product if you do not agree with any of the contents. - Page 3 - If the product is damaged or cannot be used properly, please stop using it immediately and consult CONSPIT's after-sales customer service. Continuing to use it may cause further damage to the product. - Do not attempt to repair the product or its accessories by yourself.
-
Page 4: Packing List
Packing List (B) (B) (A) CPP.LITE 3 CPP.LITE 2 Base Mounting Plate -Throttle, Brake and -Throttle and Brake Pedals Clutch Pedals (D) (E) M8x12mm M8x16mm (C) Rounded head bolts Hex bolts Stickers (6 pieces) (4 pieces) (F) (G) (H) Hex wrench 6.0... -
Page 5: Installation Sequence
Install The CPP.LITE To The Base Mounting Plate * Precautions during installation The product contains small parts. Please avoid accidental swallowing. It is forbidden to disassemble modular units such as hydraulic brake system, clutch modules. Avoid using excessive force to prevent screw damage and other potential risks. - Page 6 (2) Thread all data and rumble motor cables through the lumbar hole on the base mounting plate. (3) Mount the pedal set to the base mounting plate. The figure below takes the throttle pedal as an example The brake and clutch pedals are installed in the same way M8*12mm Rounded head bolts - 5 -...
-
Page 7: Data Cable Connection
(4) Flip the base mounting plate to the bottom side and connect all cables shown as below. * In order to ensure the stability of data transmission, the data cable must be ensured no entanglement or crushing during assemble. Rumble Motor Connector Data Cable... - Page 8 Rumble Motor Connection (5) Connect the power connector and USB connector to the control board through the openings reserved for passing wire. connector Power connector Power and USB Connection - 7 -...
- Page 9 Install The Pedal Set To The Rig 4×M6 4×M8 275.2 CPP.LITE Drilling Template - 8 -...
- Page 10 (1) Mount CPP.LITE to the rig M8*16mm hex bolts ( 4 pieces) - 9 -...
- Page 11 (2) Mount CPP.LITE to Aluminum Profile-based Rig 40 Series T-Slot Aluminum Profile is recommended M8*16mm hex bolts (4 pieces) - 1 0 -...
- Page 12 Fine Tune Your CPP.LITE CPP series provides versatile adjustable space, with throttle, brake, and clutch supporting stepwise force adjustment as well as further fine-tuning without limitations. Pedal Pad Angle Adjustment The angle adjustment range of the pad is 0° to 15°, with 0° being when the plate is perpendicular to the pedal base.
- Page 13 Pedal Pads Height Adjustment Throttle Pedal Feel Adjustment Different pedal force can be adjusted by changing the locking pin position. The pedal force varies with the corresponding position. Pedal force increases sequentially from bottom to top. - 1 2 -...
- Page 14 Pedal force and travel can be further fine-tuned by turning the knob. Brake Pedal Feel Adjustment By changing the locking pin position, the pedal force can be stepped change. 1. Turn the knob counter- clockwise to completely 2. Press the brake pedal 1~2 times release the preload pressure 3.
- Page 15 The four positions of the locking pin simulate different brake pedal feel of various vehicles. When the hydraulic sensor reaches its maximum capacity (100 bar), the corresponding pedal force on the pedal pad is shown in the table below: Type Pedal Force Formula Racing Car 800N...
- Page 16 Hydraulic Preload of the brake can be adjusted by turning the knob with the adjustment tool. * Do not increase the Hydraulic Preload (turning the knob clockwise) excessively Clutch Pedal Feel Adjustment The clutch travel and engagement point can be adjusted by turning the knob. - 1 5 -...
- Page 17 Driver Installation And Set-Up (1) Visit www.conspit.com and download CONSPIT_LINK. (2) Access the pedals settings page (3) Calibration of the pedals 2. Click "Min" to calibrate the 3. Click "Max" to calibrate minimum value when the pedal the maximum value when is completely released.
Need help?
Do you have a question about the CPP.LITE and is the answer not in the manual?
Questions and answers
what is the output voltage and amperage for the DC power cable for the conspit lite pedals I have lost my power pack.