Table of Contents
Troubleshooting

Subscribe to Our Youtube Channel
Related Manuals for ZyXEL Communications NR2301


Summary of Contents for ZyXEL Communications NR2301
- Page 1 User’s Guide NR2301 5G NR Portable Router Default Login Details Version 1.00 Ed 1, 11/2023 LAN IP Address http://192.168.1.1 Login admin Password See the NR2301’s LCD About screen Copyright © 2023 Zyxel and/or its affiliates. All Rights Reserved.
- Page 2 Every effort has been made to ensure that the information in this manual is accurate. Related Documentation • Quick Start Guide The Quick Start Guide shows how to connect the NR2301. NR2301 User’s Guide...
-
Page 3: Table Of Contents
Contents Overview Contents Overview Get to Know Your NR2301 ........................9 User’s Guide ............................21 Web Configurator ..........................22 Tutorials ..............................27 Technical Reference ........................37 Network Status ............................38 User List ..............................40 WI-FI SETTINGS ............................47 Device Status ............................55 Network Settings ........................... -
Page 4: Table Of Contents
Chapter 1 Get to Know Your NR2301 ........................9 1.1 Overview ............................9 1.2 Applications ............................9 1.3 Ways to Manage the NR2301 ....................... 10 1.4 Hardware Description ........................10 1.4.1 Power Button ......................... 11 1.4.2 Hardware Connections ......................11 1.4.3 Reset the NR2301 ........................11 1.5 LCD Screens ............................ - Page 5 3.1 Overview ............................27 3.2 WiFi Network Setup ......................... 27 3.2.1 Changing Security on a WiFi Network ................27 3.2.2 Connecting to the NR2301’s WiFi Network Using WPS ............28 3.3 MAC Filter ............................32 3.3.1 Configuring a Blacklist ......................32 3.4 Device Maintenance ........................
- Page 6 9.15 Power Save ........................... 97 9.16 Technical Reference ........................98 9.16.1 NAT Port Forwarding: Services and Port Numbers ............98 9.16.2 NAT Port Forwarding Example ................... 98 9.16.3 Trigger Port Forwarding ...................... 99 9.16.4 Trigger Port Forwarding Example ..................99 NR2301 User’s Guide...
- Page 7 Chapter 10 Troubleshooting..........................109 10.1 Overview ............................. 109 10.2 Power ............................109 10.3 NR2301 Access and Login ......................109 10.4 Internet Access ........................... 111 10.5 IP Address Setup ......................... 112 10.6 WiFi Connections ........................115 10.7 Getting More Troubleshooting Help ..................115 Appendix A Legal Information ......................
-
Page 8: Document Conventions
Firewall > Port Trigger means you first click APP MODULE in the menus, then Firewall and finally the Port Trigger tab to get to that screen. Icons Used in Figures Figures in this user guide may use the following generic icons. The NR2301 icon is not an exact representation of your device. NR2301... -
Page 9: Get To Know Your Nr2301
The NR2301 has 5G NR download speeds of up to 3.4 Gbps and 4G LTE download speeds of up to 1.6 Gbps, increasing internet speed and reducing network latency. It also supports the WiFi 6 (11ax) standard, offering speeds of up to 1.8 Gbps with 2x2 UL/DL MU-MIMO. -
Page 10: Ways To Manage The Nr2301
Chapter 1 Get to Know Your NR2301 USB Tethering A computer with Windows or Mac OS can connect to the NR2301’s USB 3.0 port with a USB 3.0 cable to access the Web Configurator without installing any drivers. Wireless LAN (WiFi) The NR2301’s WiFi allows access to high-speed broadband service and local management. -
Page 11: Power Button
External Antenna Port 1.4.1 Power Button Use the power button on the right side panel to turn the NR2301 on or off. To turn on, press the power button for 4 to 5 seconds until the LCD screen turns on. -
Page 12: Lcd Screens
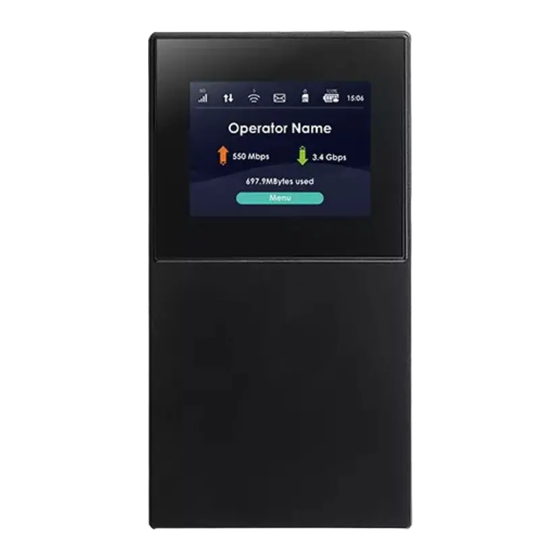
Chapter 1 Get to Know Your NR2301 1.5 LCD Screens This section describes the labels or icons displayed on the LCD screen of your NR2301. The following Home screen displays when the NR2301 is powered on and finishes initializing. Note: The LCD screen turns off after 30 seconds if it is idling. Press the power button once to turn the LCD screen on again. -
Page 13: Lcd Menu Screen
This displays your NR2301’s Internet Service Provider. This displays the NR2301’s speed when receiving/transmitting data to/from the Internet. This displays the mobile data used in total by the NR2301. Select this to enter and navigate the NR2301’s menu. 1.5.1 LCD Menu Screen Press the Select button to select the Menu button on the LCD Home screen. -
Page 14: Ssid & Password Setting
Select Next to show 5GHz SSID & Password. Select Back to return to the Menu screen. From a WiFi client enter and the displayed SSID and Password to connect wirelessly to the NR2301. Alternatively, use the QR code to scan the SSID and password. -
Page 15: Network Connection
The following table describes the labels in this screen. Table 3 Network Connection Screen LABEL DESCRIPTION Connect Status This displays the WAN network status of the NR2301. Operator This displays the service provider’s name of your 4G/5G network (WAN). NR2301 User’s Guide... -
Page 16: Data Plan Limitation
1.5.4 Data Plan Limitation The Data Plan Limitation screen displays the amount of mobile data usage and limit for the NR2301 if it is enabled. In the LCD Menu screen, press the down button to go to Data Plan Limitation and the Select button to select it. -
Page 17: Wi-Fi Settings
WPS activated. Then, the two devices connect and set up a secure network by themselves. You can use the LCD of the NR2301 to activate WPS in order to quickly set up a WiFi network with security. -
Page 18: Viewing Sms
Select the Enable button to start WPS pairing. Press the WPS button on another WPS-enabled device within range of the NR2301 within 120 seconds. Note: You must activate WPS on the NR2301 and on another device within 2 minutes of each other. -
Page 19: Fota Screen
Firmware Over the Air (FOTA) allows for timely and automatic firmware upgrades. Use the Fota screen to display the current firmware version and check for firmware updates automatically or manually. By default, the NR2301 checks for firmware update automatically. It will do so each time it is turned on and connected to the Internet. - Page 20 This displays the model name of your NR2301 FW version This displays the present firmware version of your NR2301. This displays the serial number issued by the manufacturer for your NR2301. This displays the MAC address of the NR2301. IMEI This displays the International Mobile Equipment Number (IMEI) which is the serial number of the built-in 4G/5G module.
-
Page 21: User's Guide
User’s Guide... -
Page 22: Web Configurator
2.2 Accessing the Web Configurator Use the included USB cable to connect your NR2301 to a computer (refer to the Quick Start Guide). Make sure your computer has an IP address in the same subnet as the NR2301. Your computer should have an IP address from 192.168.1.2 to 192.168.1.254. -
Page 23: Navigating The Web Configurator
You can also set the length of inactive time before the NR2301 automatically logs the user out of the Web Configurator. Click Apply to save the change. Click Return to exit the screen without saving the changes. -
Page 24: Title Bar
Table 8 Title Bar: Web Configurator Icons LABEL DESCRIPTION Unread messages This shows the number of unread SMS messages in the NR2301. Click this to go to the APP MODULE > Messages screen to read the messages. Battery The shows the battery status. -
Page 25: The Main Window
The following table introduces the menus. Table 9 Menus Summary LINK DESCRIPTION NETWORK STATUS Use this screen to view the network status of the NR2301 and devices connected to it. USER LIST Online Users Use this screen to view and configure clients that are currently connected to the NR2301. - Page 26 DHCP Use this screen to configure DHCP settings on the NR2301. Package Settings Use this screen to set up a limited allowance of data on the NR2301. Firewall Use these screens to configure IP and URL filters, port forward, port trigger, UPnP, remote management, and DMZ.
-
Page 27: Tutorials
H A P T E R Tutorials 3.1 Overview This chapter shows you how to use the NR2301’s various features. • WiFi Network Setup • MAC Filter • Device Maintenance 3.2 WiFi Network Setup In this example, you want to set up a WiFi network so that you can use your notebook or other devices like a smart phone to connect to the NR2301 (for configuration). -
Page 28: Connecting To The Nr2301'S Wifi Network Using Wps
3.2.2 Connecting to the NR2301’s WiFi Network Using WPS This section shows you how to connect a WiFi device to the NR2301’s WiFi network using WPS. WPS (WiFi Protected Setup) is a security standard that allows devices to connect to a router securely without you having to enter a password. - Page 29 Windows 10. Make sure that your NR2301 is turned on, and your notebook is within range of the NR2301’s WiFi signal. Log into the NR2301’s Web Configurator, and then go to the APP MODULE > WPS screen. Enable WPS (A) and click Apply (B).
- Page 30 Chapter 3 Tutorials The NR2301 sends the WiFi network settings to Windows using WPS. Windows displays “Getting settings from the router”. NR2301 User’s Guide...
- Page 31 Enable WiFi on the device you want to connect to the WiFi network. Then, note down the WPS PIN in the device’s WiFi settings. Log into NR2301’s Web Configurator, and then go to the APP MODULE > WPS screen. Enable WPS (A), and then click Apply (B).
-
Page 32: Mac Filter
Within 2 minutes, enable WPS on the WiFi device. The NR2301 authenticates the WiFi device using the PIN, and then sends the WiFi network settings to the device using WPS. This process may take up to 2 minutes. The WiFi device is then able to connect to the WiFi network securely. - Page 33 Chapter 3 Tutorials Open the USER LIST > Forbidden Users screen. Click the Add Wi-Fi User button. Enter the MAC address and name of the device that you want to block access to the NR2301 in the pop-up screen. Click Apply.
-
Page 34: Device Maintenance
Chapter 3 Tutorials This device is now added to the blacklist and cannot access the NR2301. If you want to allow it to access the NR2301, turn the switch button on 3.4 Device Maintenance This section shows you how to upgrade device firmware, back up the device configuration and restore the device to its previous or default settings. -
Page 35: Backing Up The Device Configuration
Back up a configuration file allows you to return to your previous settings. Go to the APP MODULE > Configuration Backup screen. Click Backup to save the NR2301's configuration file with a “.bin” extension to your computer. 3.4.3 Restoring the Device Configuration This section shows you how to restore a previously-saved configuration file from your computer to your NR2301. - Page 36 Chapter 3 Tutorials The NR2301 automatically restarts after the configuration file is successfully uploaded. Wait for one minute before logging into the NR2301 again. NR2301 User’s Guide...
-
Page 37: Technical Reference
Technical Reference... -
Page 38: Network Status
Use the NETWORK STATUS screen to check status information about the NR2301. 4.2 NETWORK STATUS This screen is the first thing you see when you log into the NR2301. You can also click NETWORK STATUS from the Menu list to access this screen. - Page 39 CPU Occupancy This field displays what percentage of the NR2301’s processing ability is currently used. When this percentage is close to 100%, the NR2301 is running at full load, and the throughput is not going to improve anymore. NR2301 User’s Guide...
-
Page 40: User List
H A P T E R User List 5.1 Overview Use the USER LIST screens screen to view and manage the NR2301’s clients. You can also allow or deny clients’ access to the NR2301. 5.2 Online Users Click USER LIST from the Menu list to display the Online Users screen. Use this screen to view and configure the clients currently connected to the NR2301. -
Page 41: Offline Users
DESCRIPTION Device This field displays the name of the client that is currently connected to the NR2301. Its connected time duration is also displayed. If you want to change the name of the device, click on its name and enter the new name in the Alias field of the following screen. - Page 42 NR2301. If the client connects to the NR2301, it will be added to the Online Users screen. If the MAC filer mode is set as White List, this client will be automatically added to the Allow Users list. The client may connect to the NR2301 again without entering the SSID and password.
-
Page 43: Forbidden Users
DESCRIPTION Device This field displays the name of the client that is not allowed to access the NR2301. If you want to change the name of the device, click on its name and enter the new name in the Alias field of the following screen. Click OK to save the change. -
Page 44: Allow Users
NR2301. If the client connects to the NR2301, it will be added to the Online Users screen. If the client is not connected to the NR2301, it will be added to the Offline Users list. -
Page 45: Mac Filter Mode
NR2301. If the client is connecting to the NR2301, it will be added to the Online Users screen. If the client is not connecting to the NR2301, it will be added to the Offline Users list. - Page 46 Section 5.4 on page 43 for more information. Select White List to permit the devices listed in the Allow Users screen to access the NR2301. Devices not listed will be denied access to the NR2301. See Section 5.5 on page 44 for more information.
-
Page 47: Wi-Fi Settings
H A P T E R WI-FI SETTINGS 6.1 Overview This chapter discusses how to configure the WiFi network settings in your NR2301. 6.1.1 What You Need to Know Every WiFi network must follow these basic guidelines. • Every WiFi client in the same WiFi network must use the same SSID. -
Page 48: The Wi-Fi Settings Screen
Use this screen to enable the wireless LAN, enter the SSID, and configure security and other WiFi settings. Note: If you are configuring the NR2301 from a device connected to the wireless LAN and you change the NR2301’s SSID, channel or security settings, you will lose your WiFi connection when you press Apply to confirm. - Page 49 Chapter 6 WI-FI SETTINGS Figure 23 WI-FI SETTINGS > Wi-Fi Settings NR2301 User’s Guide...
- Page 50 Turn the switch button on to activate WiFi on the NR2301. Wi-Fi Band Select whether the NR2301 uses the 2.4 GHz WiFi band, the 5 GHz WiFi band, or both. Frequency Turn the switch button on to have the 2.4G and 5G wireless LAN share the same SSID.
- Page 51 Select one of the following for the 2.4G network: • 2.4 GHz (b): allows either IEEE 802.11b compliant WLAN devices to associate with the NR2301. In this mode, all WiFi devices can only transmit at the data rates supported by IEEE 802.11b. •...
-
Page 52: Guest Wi-Fi
Chapter 6 WI-FI SETTINGS 6.3 Guest Wi-Fi The Guest Wi-Fi screen allows you to enable and configure guest WiFi network settings on the NR2301. This is an isolated network for guest clients accessing the WiFi network to secure the WiFi keys and settings of the NR2301. -
Page 53: Advanced Settings
The Advanced Settings screen allows you to enable and configure a time schedule to disable the NR2301’s WiFi network. The WiFi network is disabled during the configured time period and all clients (including guest WiFi clients) cannot access it. It will be enabled automatically after this time period. - Page 54 Enter the time period in 24-hour format of the schedule. The WiFi network is disabled during the configured time period and all clients (including guest WiFi clients) cannot access it. It will be enabled automatically after this time period. Apply Click Apply to save your changes back to the NR2301. NR2301 User’s Guide...
-
Page 55: Device Status
H A P T E R Device Status 7.1 Overview Use the Device Status screens to view the NR2301’s device status information, network information, and the SIM card usage details. Figure 26 APP MODULE: Device Status 7.2 Status Use the Status screen to check status information about the NR2301. - Page 56 This field displays whether the NR2301 is connected to the Internet. WAN IP This field displays the current WAN IP address of the NR2301 in the WAN. This field displays the DNS server address assigned by the ISP. WAN IPv6 This field displays the current WAN IPv6 address of the NR2301 in the WAN.
-
Page 57: Statistics
Table 19 APP MODULE > Status (continued) LABEL DESCRIPTION Software Version This field displays the current version of the firmware inside the NR2301. Hardware Version This field displays the hardware version of the NR2301. MAC Address This field displays the MAC address of the NR2301. -
Page 58: Network Information
Connection Status This displays whether the NR2301 is connected to the Internet. RAT Mode This displays the network mode that the NR2301 used to register with the service provider's mobile network. Network Operator This displays the name of the service provider. - Page 59 IMSI is a unique 15-digit number used to identify a user on a network. Roaming This displays whether the NR2301 is connected to another service provider’s mobile network using roaming. Operation Band This displays the network type and the frequency band used by the mobile network to which the NR2301 is connecting.
-
Page 60: Network Settings
Network Settings 8.1 Overview Use the Network Settings screens to configure the NR2301’s network, APN, roaming, and DHCP settings. You can also view available Public Land Mobile Networks (PLMNs) and select your preferred network. Figure 30 APP MODULE: Network Settings 8.2 Network Settings... - Page 61 DESCRIPTION Network Settings Connect Mode Select Auto to have the NR2301 connect to the mobile network automatically after it has been restarted or registered. If you select Manual, you can manually connect or disconnect the NR2301's mobile network connection in the NETWORK STATUS screen. See Chapter 4 on page 38 for more information.
-
Page 62: Network Operators
DESCRIPTION Network Mode Select the type of the network (5G-SA, 5G-NSA, or 4G) to which you want the NR2301 to connect. Otherwise, select Auto to have the NR2301 connect to an available network using the default settings on the SIM card. If the currently registered mobile network is not available or the mobile network’s signal strength is too low, the NR2301 switches to another... -
Page 63: Dhcp
PLMN This shows the PLMN number. Search Click Search so the NR2301 can search for PLMNs in the area. You need a working SIM card to be able to scan for PLMNs. Return Click this button to return to the APP MODULE list. - Page 64 Chapter 8 Network Settings The NR2301 has built-in DHCP server capability that assigns IP addresses to systems that support DHCP client capability. Use the DHCP screen to enable the DHCP server. To access this screen, click APP MODULE > DHCP.
- Page 65 LABEL DESCRIPTION IP Address Enter the LAN IPv4 IP address you want to assign to the NR2301 in dotted decimal notation, for example, 192.168.1.1 (factory default). Subnet Mask Type the subnet mask of your network in dotted decimal notation, for example 255.255.255.0 (factory default).
-
Page 66: Device Management
H A P T E R Device Management 9.1 Overview Use the Device Management screens to configure advanced settings on the NR2301. Figure 34 APP MODULE: Device Management 9.2 Package Settings Use the Package Settings screen to enable mobile data usage control and set a data limit for a certain period of time. - Page 67 Click Apply to save your changes back to the NR2301. Data Used This displays the mobile data used by the NR2301 so far. Calibration Click this to manually set the amount of data used in the following screen and click Save to apply the setting.
- Page 68 Specify the amount of data that can be transmitted via the mobile connection daily. Daily Alarm Threshold Specify the percentage of data usage the NR2301 has to reach to display a notification on the NR2301’s LCD Home screen and Web Configurator’s Main screen. Apply Click Apply to save your changes back to the NR2301.
- Page 69 Package Data Specify the amount of data that can be transmitted via the mobile connection monthly. Package Bill Day Select the day of the month on which the NR2301 restarts calculating the amount of data per month. Alarm Threshold Select the percentage of data usage the NR2301 has to reach to display a notification on the NR2301’s LCD Home screen and Web Configurator’s Main screen.
- Page 70 Select the day, month, and year on which the NR2301 restarts calculating the amount of data. Alarm Threshold Select the percentage of data usage the NR2301 has to reach to display a notification on the NR2301’s LCD Home screen and Web Configurator Main screen. Apply Click Apply to save your changes back to the NR2301.
-
Page 71: Firewall
Specify the amount of data that can be transmitted via the mobile connection. Alarm Threshold Select the percentage of data usage the NR2301 has to reach to display a notification on the NR2301’s LCD Home screen and Web Configurator’s Main screen. -
Page 72: Ip Filter
This is the index number of the entry. Enter the IP address of the Internet service which you do not want the NR2301’s clients to access. You can configure up to 10 entries. Click the X next to an entry to clear it. -
Page 73: Url Filter
The file path is the characters that come after the first slash in the URL. For example, with the URL www.zyxel.com.tw/news/pressroom.php, the file path is news/pressroom.php. Since the NR2301 checks the URL’s domain name (or IP address) and file path separately, it will not find items that go across the two. For example, with the URL www.zyxel.com.tw/news/pressroom.php, the NR2301 would find “tw”... -
Page 74: Port Forward
LABEL DESCRIPTION Turn the switch button on to enable URL filter on the NR2301 and block the users on your network from accessing certain web sites. This is the index number of the entry. Type a keyword in this field. You may use any character (up to 64 characters). Wildcards are not allowed. - Page 75 80 and FTP on port 21. See Section 9.16.1 on page 98 more information. To access this screen, click APP MODULE > Firewall > Port Forward. Figure 42 APP MODULE > Firewall > Port Forward NR2301 User’s Guide...
-
Page 76: Port Trigger
Trigger port forwarding allows computers on the LAN to dynamically take turns using the service. The NR2301 records the IP address of a LAN computer that sends traffic to the WAN to request a service with a specific port number (a “trigger” port). When the NR2301's WAN port receives a response with a specific port number, the NR2301 forwards the traffic to the LAN IP address of the computer that sent the request. - Page 77 Enter a port number or the ending port number in a range of port numbers. Trigger Port The trigger port is a port that causes (or triggers) the NR2301 to record the IP address of the LAN computer that sent the traffic to a server on the WAN.
-
Page 78: Port Filter
Table 34 APP MODULE > Firewall > Port Filter LABEL DESCRIPTION Turn the switch button on to enable port filter on the NR2301. The port filter rules block clients from accessing specific Internet services. This is the index number of the entry. Port Start Enter the beginning port number of the source that defines the traffic type. -
Page 79: Upnp
Section 9.16.6 on page 100 for more information. Use the UPnP screen to enable or disable UPnP on the NR2301. To access this screen, click APP MODULE > Firewall > UPnP. Figure 45 APP MODULE > Firewall > UPnP NR2301 User’s Guide... -
Page 80: Remote
UPnP on the NR2301. Be aware that anyone could use a UPnP application to open the Web Configurator's login screen without entering the NR2301's IP address (although you must still enter the password to access the Web Configurator). -
Page 81: Dmz Settings
Chapter 9 Device Management 9.3.8 DMZ Settings A client in the Demilitarized Zone (DMZ) is no longer behind the NR2301 and therefore can run any Internet applications such as video conferencing and Internet gaming without restrictions. This, however, may pose a security threat to the NR2301. -
Page 82: Vpn
Use the VPN screen to enable and configure VPN client settings. You can configure up to 10 VPN client rules but only one rule can be used at a time. A VPN client rule has the NR2301 use VPN to connect through the Internet to a remote private network and let the NR2301's LAN devices also access the remote private network. -
Page 83: Messages
Note: You can store an approximate total of 500 messages, which includes Inbox, Outbox, and Draft box altogether. 9.5.1 Inbox Use this screen to view messages received by the NR2301. To access this screen, click APP MODULE > Messages > Inbox. Figure 49 APP MODULE > Messages > Inbox... -
Page 84: Outbox
This field displays the date and time the message was received. 9.5.2 Outbox Use this screen to view messages sent from the NR2301. To access this screen, click APP MODULE > Messages > Outbox. Figure 50 APP MODULE > Messages > Outbox The following table describes the labels in this screen. -
Page 85: Drafts
Chapter 9 Device Management 9.5.3 Drafts Use this screen to view messages not yet sent from the NR2301. To access this screen, click APP MODULE > Messages > Drafts. Figure 51 APP MODULE > Messages > Drafts The following table describes the labels in this screen. -
Page 86: Pin Settings
Click this to cancel the message and return to the Messages screen. 9.6 PIN Settings Use the PIN Settings screens to enable PIN code authentication on the NR2301. To access this screen, click APP MODULE > PIN Settings. NR2301 User’s Guide... -
Page 87: Admin Settings
Click this button to return to the APP MODULE list. 9.7 Admin Settings Use the Admin Settings screens to change the NR2301’s system password and time-out setting. It is strongly recommended that you change your NR2301's system password. To access this screen, click APP MODULE > Admin Settings. -
Page 88: Update
Click this button to return to the APP MODULE list. 9.8 Update Use the Update screens to upload new firmware to your NR2301. You can download new firmware releases or check for new firmware online to use to upgrade your NR2301’s performance. -
Page 89: Online Update
Firmware Over the Air (FOTA) allows for timely and automatic firmware upgrades. By default, FOTA is enabled on the NR2301 and it checks for firmware updates automatically. It will do so each time it is turned on and connected to the Internet. You can disable it in the NR2301’s LCD screen. See... -
Page 90: Configuration Backup
Figure 56 APP MODULE > Update > Firmware Management 9.9 Configuration Backup Backup configuration allows you to back up (save) the NR2301’s current configuration to a file with a “bin” extension on your computer. Once your NR2301 is configured and functioning properly, it is highly recommended that you back up your configuration file before making configuration changes. -
Page 91: Device Reboot
9.10 Device Reboot Use the Device Reboot screen to restart the NR2301. You can also set a schedule to reboot the NR2301. System restart allows you to reboot the NR2301 without turning the power off. Click Restart to reboot the... -
Page 92: Diagnosis
Chapter 9 Device Management NR2301. Wait a few minutes until the login screen appears. If the login screen does not appear, type the IP address of the NR2301 in your Web browser. To access this screen, click APP MODULE > Device Reboot. - Page 93 Chapter 9 Device Management To access this screen, click APP MODULE > Diagnosis. Figure 59 APP MODULE > Diagnosis NR2301 User’s Guide...
-
Page 94: Wps
See Section 9.16.11.3 on page 104 for more information about WPS. Note: The NR2301 applies the security settings of the main SSID profile (see Chapter 6 on page 48). Note: If WPS is enabled, UPnP will automatically be turned on. -
Page 95: Ddns
Users can always use the same domain name instead of a different dynamic IP address that changes each time to connect to the NR2301 or a server in your network. Note: The NR2301 must have a public global IP address and you should have your registered DDNS account information on hand. -
Page 96: Vpn Passthrough
Enter the password assigned to you. DDNS State This displays the current DDNS status. Apply Click Apply to save your changes back to the NR2301. Return Click this button to return to the APP MODULE list. 9.14 VPN Passthrough Use the VPN Passthrough screen to allow VPN traffic including the L2TP, IPSec, and PPTP network protocols to operate through the NR2301. -
Page 97: Power Save
Select the number of minutes after which the NR2301 activates power saving and enters sleep mode. In Power Saving the NR2301 turns off its WiFi connections to save battery power when the USB port is not connected, and there are no WiFi clients associating with the NR2301. Then click Apply to save your changes back to the NR2301. -
Page 98: Technical Reference
Chapter 9 Device Management 9.16 Technical Reference The following section contains additional technical information about the NR2301 features described in this chapter. 9.16.1 NAT Port Forwarding: Services and Port Numbers A port forwarding set is a list of inside (behind NAT on the LAN) servers, for example, web or FTP, that you can make accessible to the outside world even though NAT makes your whole inside network appear as a single machine to the outside world. -
Page 99: Trigger Port Forwarding
Trigger port forwarding solves this problem by allowing computers on the LAN to dynamically take turns using the service. The NR2301 records the IP address of a LAN computer that sends traffic to the WAN to request a service with a specific port number and protocol (a "trigger" port). When the NR2301's WAN port receives a response with a specific port number and protocol ("incoming"... -
Page 100: Two Points To Remember About Trigger Ports
9.16.5 Two Points To Remember About Trigger Ports Trigger events only happen on data that is coming from inside the NR2301 and going to the outside. If an application needs a continuous data stream, that port (range) will be tied up so that another computer on the LAN cannot trigger it. -
Page 101: Pptp
When you connect to a remote network (B) through a PPTP VPN, all of your traffic goes through the PPTP VPN gateway (X). Figure 67 PPTP VPN Example VPN Tunnel NR2301 User’s Guide... -
Page 102: L2Tp
Figure 68 L2TP VPN Overview 9.16.11 WiFi Protected Setup (WPS) Your NR2301 supports WiFi Protected Setup (WPS), which is an easy way to set up a secure wireless network. WPS is an industry standard specification, defined by the WiFi Alliance. - Page 103 94). Press the button on one of the devices (it does not matter which). For the NR2301 you must press the WPS button for more than five seconds. Within two minutes, press the button on the other device. The registrar sends the network name (SSID) and security key through a secure connection to the enrollee.
- Page 104 If the registrar is already part of a network, it sends the existing information. If not, it generates the SSID and WPA2-PSK randomly. The following figure shows a WPS-enabled client (installed in a notebook computer) connecting to a WPS-enabled access point. NR2301 User’s Guide...
- Page 105 When WPS is activated on both, they perform the handshake. In this example, AP1 is the registrar, and Client 1 is the enrollee. The registrar randomly generates the security information to set up the network, since it is unconfigured and has no existing information. NR2301 User’s Guide...
- Page 106 In step 3, you add another access point (AP2) to your network. AP2 is out of range of AP1, so you cannot use AP1 for the WPS handshake with the new access point. However, you know that Client 2 supports the registrar function, so you use it to perform the WPS handshake instead. NR2301 User’s Guide...
- Page 107 If this happens, open the access point’s configuration interface and look at the list of associated clients (usually displayed by MAC address). It does not matter if the access NR2301 User’s Guide...
- Page 108 Check the MAC addresses of your wireless clients (usually printed on a label on the bottom of the device). If there is an unknown MAC address you can remove it or reset the AP. NR2301 User’s Guide...
-
Page 109: Troubleshooting
• IP Address Setup 10.2 Power The NR2301 does not turn on. The LCD display is not on. Make sure the built-in battery is charged. Press the power button to turn the NR2301 on. See (Chapter 1 on page 11.) If the problem continues, contact the vendor. - Page 110 Chapter 1 on page 14 for more information). If this does not work, you have to reset the device to its factory defaults. To reset your NR2301 press the RESET button for 3 seconds. I can access the Login screen, but I cannot log in to the NR2301.
-
Page 111: Internet Access
I cannot access the Internet through a 4G or 5G wireless WAN connection. Make sure you insert a 4G or 5G SIM card into the card slot before turning on the NR2301. If your SIM card has a PIN code, connect to the Web Configurator (http://192.168.1.1) using the user name (Default: admin) and password (check the NR2301’s About screen for the default password (see... -
Page 112: Ip Address Setup
Reboot the NR2301. The Internet connection is slow or intermittent. There might be a lot of traffic on the network. If the NR2301 is sending or receiving a lot of information, try closing some programs that use the Internet, especially peer-to-peer applications. - Page 113 Chapter 10 Troubleshooting Click Change adapter settings. Right-click the Ethernet icon, and then select Properties. NR2301 User’s Guide...
- Page 114 Click Internet Protocol Version 4 (TCP/IPv4) and then click Properties. Select Use the following IP address and enter an IP address from 192.168.1.2 to 192.168.1.254. The Subnet mask will be entered automatically. Click OK when you are done and close all windows. NR2301 User’s Guide...
-
Page 115: Wifi Connections
10.6 WiFi Connections I cannot access the NR2301. Make sure WiFi is enabled on the NR2301. You can enable or disable the NR2301’s WiFi network using the Wi-Fi Setting screen on the NR2301’s LCD screen. See Chapter 1 on page Make sure the WiFi adapter (installed on your computer) is IEEE 802.11 compatible and supports the... -
Page 116: Appendix A Legal Information
Zyxel tímto prohlašuje, že tento zařízení je ve shodě se základními požadavky a dalšími příslušnými ustanoveními směrnice (Czech) 2014/53/EU. Dansk (Danish) Undertegnede Zyxel erklærer herved, at følgende udstyr udstyr overholder de væsentlige krav og øvrige relevante krav i direktiv 2014/53/EU. NR2301 User’s Guide... - Page 117 2. The regulatory limits for maximum output power are specified in EIRP. The EIRP level (in dBm) of a device can be calculated by adding the gain of the antenna used (specified in dBi) to the output power available at the connector (specified in dBm). NR2301 User’s Guide...
- Page 118 Cuando este producto alcance el final de su vida útil, llévelo a un punto limpio. Cuando llegue el momento de desechar el producto, la recogida por separado éste y/o su batería ayudará a salvar los recursos naturales y a proteger la salud humana y medioambiental. NR2301 User’s Guide...
- Page 119 切勿重摔或撞擊設備,並勿使用不正確的電源變壓器。 • 若接上不正確的電源變壓器會有爆炸的風險。 • 請勿隨意更換產品內的電池。 • 如果更換不正確之電池型式,會有爆炸的風險,請依製造商說明書處理使用過之電池。 • 請將廢電池丟棄在適當的電器或電子設備回收處。 • 請勿將設備解體。 • 請勿阻礙設備的散熱孔,空氣對流不足將會造成設備損害。 • 請插在正確的電壓供給插座 ( 如 : 北美 / 台灣電壓 110V AC,歐洲是 230V AC)。 • 假若電源變壓器或電源變壓器的纜線損壞,請從插座拔除,若您還繼續插電使用,會有觸電死亡的風險。 • 請勿試圖修理電源變壓器或電源變壓器的纜線,若有毀損,請直接聯絡您購買的店家,購買⼀個新的電源變壓器。 • 請勿將此設備安裝於室外,此設備僅適合放置於室內。 • 請勿隨⼀般垃圾丟棄。 • 請參閱產品背貼上的設備額定功率。 • 請參考產品型錄或是彩盒上的作業溫度。 NR2301 User’s Guide...
- Page 120 To obtain the services of this warranty, contact your vendor. Open Source Licenses This product may contain in part some free software distributed under GPL license terms and/or GPL-like licenses. To request the source code covered under these licenses, please go to: https://service-provider.zyxel.com/global/en/gpl-oss-software-notice NR2301 User’s Guide...
-
Page 121: Index
FOTA 19, 89 Calibration certifications Channel channel General wireless LAN screen Configuration restore guest WiFi network 91, 92 Connect Mode content filtering by keyword (in URL) copyright CPU Occupancy IMSI Current SIM Volume International Mobile Subscriber Identity NR2301 User’s Guide... - Page 122 RAT Mode Reboot Received Signal Strength Indicator RSSI Reference Signal Receive Power RSRP NAT Traversal Reference Signal Received Quality Network Information RSRQ Network Mode Remote management Network Status Restore configuration 91, 92 Roaming Roaming Mode router features NR2301 User’s Guide...
- Page 123 Trigger port forwarding SSID example Wireless security process overview troubleshooting type wireless security Wireless tutorial 102, 104 example Universal Plug and Play limitations Application Security issues example UPnP push button URL Filter USB Tethering User List User Name NR2301 User’s Guide...
Need help?
Do you have a question about the NR2301 and is the answer not in the manual?
Questions and answers