Focusrite Vocaster Two - USB Person Podcasting Audio Interface Manual
- User manual (34 pages)
Advertisement
Overview
Introduction
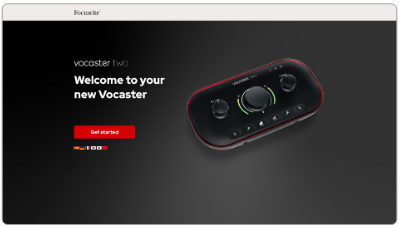
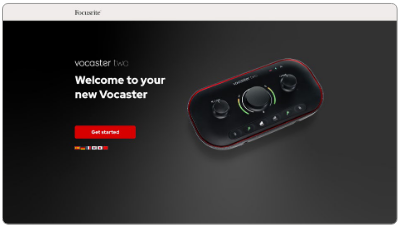
Welcome to your new Vocaster Two audio interface. Vocaster Two has been designed to let you create professional podcasts with the minimum of hassle.
Content creators of all kinds - vloggers, voiceover artists, streamers, audiobook creators, and more – can use Vocaster Two and the included Vocaster Hub software to record quality audio to your computer, camera or iPad.
We've designed Vocaster Two for users of all experience levels. With features such as Auto Gain and Enhance you can achieve clear and consistent recordings quickly.
The Vocaster Hub software is designed with simplicity in mind. The on-screen mixer lets you get the perfect balance when you record, along with access to the essential recording controls.
The Vocaster Two interface has two independent, high-quality microphone preamps, so you can record live guest interviews using separate microphones, for the best audio results.
Connect Vocaster Two to a computer via its USB-C port and the cable provided. You can either live-stream audio in real time, or record sound for later edit and upload.
Vocaster Two also allows two-way connection via cable or Bluetooth to a compatible phone, letting you record interviews or other audio from your phone to your computer or camera. You can also record to the audio track of a camera in perfect sync with your video. You can monitor your stream or recording process on either headphones or loudspeakers.
The Vocaster Two interface and the included Vocaster Hub control software support both Mac and Windows.
Vocaster Two is also compatible with Apple iPads with a USB-C port, so you can take advantage of the additional portability and convenience the tablet format provides.
If you can't find what you need in this User Guide, please visit support.focusrite.com, which has a Getting Started section, setup guides and technical support.
Hardware features
Vocaster Two allows you to connect either one or two high quality microphones to a computer running macOS or Windows: this will let you achieve a much better audio recording than you would get by using the microphone built into most laptops or tablets.
The microphone inputs accept a range of microphone models, including both dynamic and condenser types. If you are using a condenser microphone, Vocaster Two can provide the phantom power (48V) it needs to operate.
The microphone signals route to your computer's audio recording software via the USB-C connection at up to 24-bit resolution, 48 kHz sample rate. (24-bit/48 kHz is the standard for most podcasts.)
If you don't already have recording software, we recommend Hindenburg. This is included in the software package available to you free of charge as a Vocaster owner.
A 3.5 mm jack socket allows you to connect a phone to Vocaster Two: alternatively, you can connect to the phone using Bluetooth. A second, similar socket allows connection to a video camera.
The phone connector is a TRRS: TRRS means you get audio both in and out of the phone, so you can record audio from the phone, and the phone can also hear the other audio sources you are recording to your show.
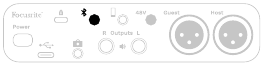
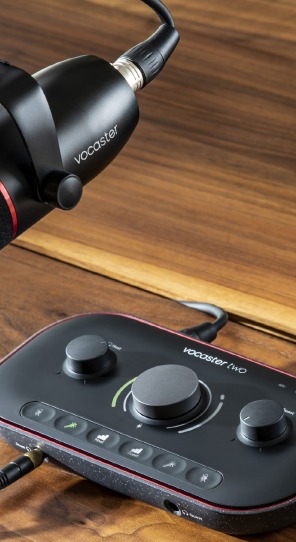
Vocaster Two has outputs for both headphones and speakers: two front panel ¼' TRS sockets for host and guest headphones, and two rear panel ¼' TRS sockets for connection to speakers.
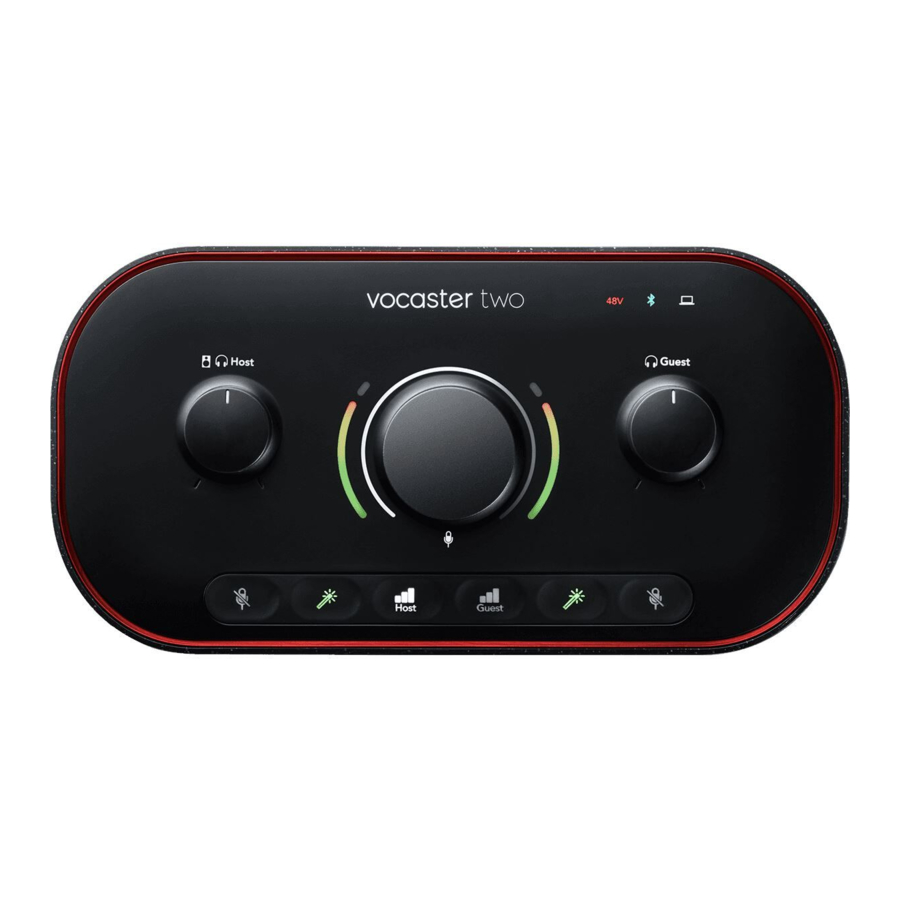
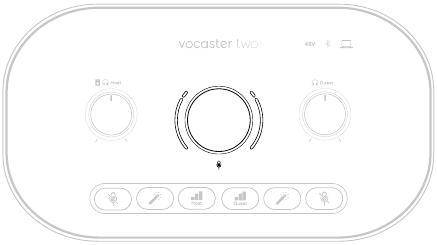
The top panel has a multi-function knob for controlling the gain of either microphone, and two separate knobs - one for each pair of headphones - for setting listening level.
The "Host" control also sets the volume in external monitor speakers, if you are using them. The microphone control is surrounded by two halo meters showing the microphone signal level and a separate halo displaying the gain setting.
Two sets of three illuminated buttons select the microphone input's Auto Gain function, activate its Enhance feature and mute each microphone.
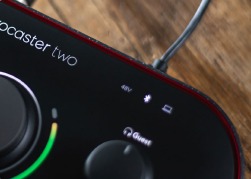
There are also LEDs to show when phantom power, a Bluetooth connection, and the USB connection are active.
In the Box
Along with your Vocaster Two you will find:
- USB cable, Type 'A' to Type 'C'
- Getting Started Information (printed inside the box)
- Important Safety Information
As a Vocaster Two owner, you are also entitled to a selection of third-party software, including the Hindenburg DAW (Digital Audio Workstation) recording application.
Go to focusrite.com/Vocaster to see what's available.
System requirements
The easiest way to check your computer's operating system (OS) is compatible with the Vocaster Two is to use our Help Centre's compatibility articles.
As new OS versions become available over time, you can continue to check for further compatibility information by searching our Help Centre at support.focusrite.com.
Getting Started
When you connect Vocaster Two for the first time, your computer recognises it in the same way as if it were a USB memory stick.
Easy Start Tool
Getting up and running with your Vocaster Two is made easy by our Easy Start Tool. To use this, connect Vocaster Two to your computer with the USB cable supplied, and power it on by pressing the power button next to the rear panel USB port.

The following steps show you what will appear on screen: these help you get set up whether or not you're new to audio interface.
Mac Users
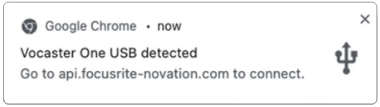
On connecting your Vocaster to your Mac you will see a pop-up and/or a Vocaster icon will appear on the desktop:
Google Chrome pop up
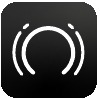
Vocaster Easy Start icon
Double-click on the icon or pop-uo to open the Finder window shown below:
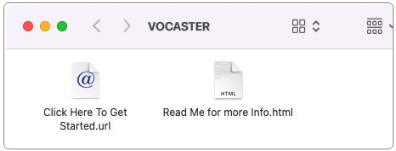
Double-click the Click Here to Get Started.url icon. This redirects you to the Focusrite website, where we recommend you register your Vocaster to access to your included software package:
After you submit the form you can either follow our step-by-step setup guide, which is tailored to how you want to use Vocaster Two, or go straight to your account and download Vocaster Hub control software.
When you connect Vocaster Two, your computer should set it as your default audio device. If this doesn't happen, go to System Preferences > Sound, and ensure the input and output are set to Vocaster Two USB.
Windows Users
On connecting your Vocaster Two to your PC, this notification will appear:
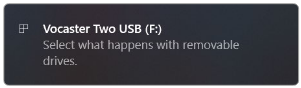
Click on the notification to open the dialogue box shown below:
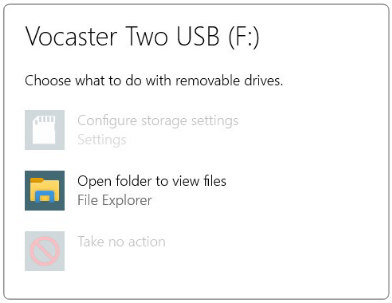
Double-click:
Open folder to view files
this opens an Explorer window:
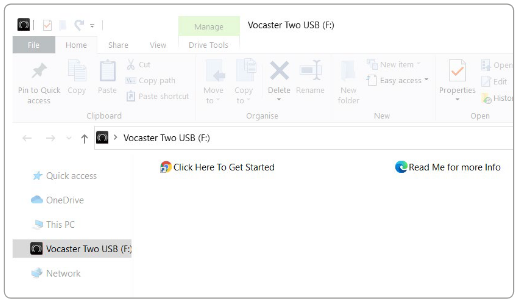
Double-click:
Click Here to Get Started.
This redirects you to the Focusrite website, where we recommend you register your device:
After you submit the form you can either follow our step-by-step setup guide, which is tailored to how you want to use Vocaster Two, or go straight to your account and download Vocaster Hub control software.
When you connect Vocaster Two, your computer should set it as your default audio device. If this doesn't happen, go to Settings > System > Sound, and set Vocaster Two as the Input and Output Device.
iPad Users
NOTE: Before connecting Vocaster Two to your iPad, we recommend you follow the 'Getting Started' section above to ensure your hardware is up to date through Vocaster Hub.
To connect your Vocaster Two to an iPadOS device you need:
- iPad with USB-C port
- USB-C to USB-C cable (or the included cable and an Apple USB-A to C adaptor*)
*This method may require a separate USB hub to provide enough power to your Vocaster.
To make the connections:

- Connect one end of the USB Type-C to C cable (or adaptor) to your iPad.
- Connect the other end of the USB type-C to your Vocaster Two's USB port.
- Connect your headphones or monitor speakers to the Vocaster Two.
Sound from the iPad routes to Vocaster Two's outputs. You can route the microphones and other sources connected to the inputs of Vocaster Two to iOS apps that support audio recording.
All users:
If you have any issues using the Easy Start tool, open the file More Info & FAQs, where you should be able to find answers to your questions.
NOTE: When you install Vocaster Hub on a Windows computer, the driver for Vocaster Two installs automatically. Vocaster Hub and the Vocaster Windows driver are always available to download at any time, even without registering: see 'Manual Registration' below.
Manual Registration
If you decide to register your Vocaster Two later you can do so at register. You need to enter the Unique Product Number (UPN) manually: this number is on the base of the interface itself, and can also be found on the barcode label on the side of the box.
We recommend you download and install our Vocaster Hub software application, as this unlocks the full potential of the interface. You can download Vocaster Hub at any time from downloads.focusrite.com.
Audio Setup in your DAW
Vocaster Two is compatible with any Windows-based Digital Audio Workstation (this is the software you use to record and is referred to as a 'DAW') that supports ASIO or WDM, or any Mac-based DAW that uses Core Audio. After following the Easy Start procedure described above, you can start using Vocaster Two with the DAW of your choice.
Via the USB connection, Vocaster Two lets you record all the sources separately, for mixing later, but also has a Show Mix input which is a stereo mix from Vocaster Hub software.
To allow you to get started if you do not already have a DAW application installed on your computer, Hindenburg is included; this is available to you once you've registered your Vocaster Two. If you need help installing this, please visit Getting Started, where a video tutorial is available.
Operating instructions for Hindenburg can be found in the application's Help files, or at hindenburg.com/academy.
Please note - your DAW may not automatically select Vocaster Two as its default Input/Output (I/O) device. In this case, you must manually select Vocaster Two/ Focusrite USB ASIO as the driver on your DAW's Audio Setup* page. Please refer to your DAW's documentation (or Help files) if you are unsure where to select the ASIO or Core Audio driver.
* Typical names. Terminology may differ slightly between DAWs
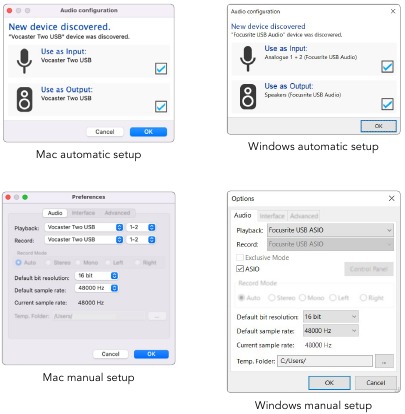
Audio Setup in Hindenburg
The examples opposite show the correct configuration on the Hindenburg audio preferences on Windows and Mac. There are two set ups, automatic and manual:
Preferences page (Mac version), and at the Tools > Options > Audio tab (Windows version).
Tutorial videos explaining how to set up and use Vocaster Two with various DAWs can be found at our Getting Started.
Examples of use
Vocaster Two is the ideal audio interface for podcasting or voice recording using a Mac, PC, or iPad, and can be used by one or two live contributors. A typical set of connection possibilities is shown below.
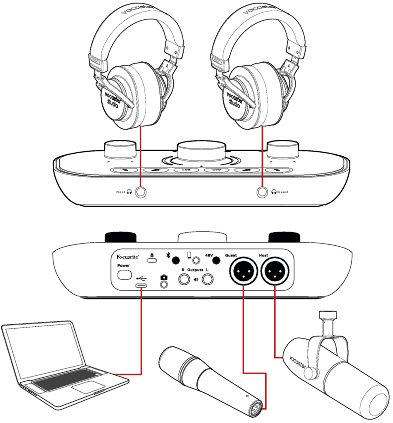
Recording with microphones
This setup shows a typical configuration for recording from two microphones using software on your Mac, PC or iPad. You can record your voice (the Host) and another person (the Guest), while monitoring yourselves and any other audio via headphones.
Apart from the headphone sockets, all Vocaster Two's connections are on the rear panel. Connect your computer or laptop to the USB port (marked ![]() ) using the USB cable supplied. Turn the unit on with the Power button.
) using the USB cable supplied. Turn the unit on with the Power button.
The microphone inputs are XLR sockets and work with microphones with an XLR connector. You can use Vocaster Two with most models of microphone, including dynamic and condenser types.
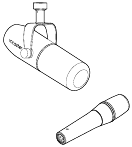
We recommend dynamic microphones for speech recording, as they deliver good quality in the frequency range of the spoken word, and can help reduce unwanted noises in your surroundings from being picked up.
Two types of dynamic microphone
Vocaster Two can provide phantom power (48 volts) at the XLR inputs if you're using a condenser microphone. To enable phantom power, press the Host or Guest button to select the input and push the 48V button on the rear panel: the 48V LED lights red to confirm it's active.
Dynamic microphones don't require phantom power. It's rare, but you can damage some microphones using phantom power. We recommend turning off phantom power when you use a dynamic microphone. If you are unsure whether your microphone needs phantom power, please check its documentation.
Microphone setup
Vocaster Two has two ways of setting the correct microphone levels. 'Gain' is the term we use to describe how much you are boosting a microphone signal.
You can either set the level automatically with Vocaster Two's Auto Gain feature, or manually. Both methods are described in the next sections.
Using Auto Gain
Vocaster Two's Auto Gain feature allows you to get a good recording level without guesswork.
Activate Auto Gain by holding the ![]() button; press the Host or Guest button according to which microphone input is to have its gain set. Or, if you have Vocaster Hub open on your computer, by clicking on the on-screen Auto Gain icon.
button; press the Host or Guest button according to which microphone input is to have its gain set. Or, if you have Vocaster Hub open on your computer, by clicking on the on-screen Auto Gain icon.
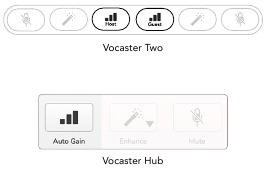
When you activate Auto Gain in software or using the button Vocaster disables all input controls for the other channel.
Now you - or your guest - should speak into the microphone for ten seconds, using a normal speaking voice you will use for the recording itself.
The inner halo on the ![]() knob acts as a count down timer, starting fully white, then extinguishing anticlockwise. A progress bar is also displayed on Vocaster Hub.
knob acts as a count down timer, starting fully white, then extinguishing anticlockwise. A progress bar is also displayed on Vocaster Hub.
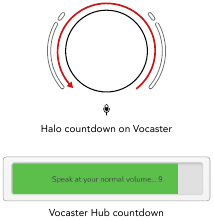
After ten seconds, Auto Gain sets the input level for the microphone and you're ready to start recording.
To apply Auto Gain to the other input, hold the other ![]() button, and repeat the process.
button, and repeat the process.
After using Auto Gain, you can still manually adjust the levels with the gain knob any time you like: short-press the other ![]() button first if the input you want to adjust is not selected.
button first if the input you want to adjust is not selected.
Auto Gain didn't set my input level
If the halos flash amber the signal is too loud or too quiet so Auto Gain couldn't set the correct level and sets it to the minimum or maximum level.
If the halos flash red Auto Gain couldn't set a usable level. This could be due to a Mic Level that was too low:
- Test a different microphone or cable.
- Make sure 48V is on, if you're using a condenser microphone.
- Make sure you switch on your microphone (if it has an on/off switch).
Manual gain adjustment
On Vocaster Two, the large knob marked ![]() is used to set the microphone gain for both the Host and Guest microphones, and the levels to your recording software.
is used to set the microphone gain for both the Host and Guest microphones, and the levels to your recording software.
You can set the gain of the two microphone preamp independently. To select which preamp is to be adjusted, press the Host ![]() or Guest
or Guest ![]() buttons. (A long press activates the Auto Gain function, which is described above.)
buttons. (A long press activates the Auto Gain function, which is described above.)
The buttons light bright white to confirm which preamp is selected.
When you're adjusting the gain by turning the knob, the left halo changes to white to show the gain setting.
The gain knob is surrounded by LED 'halo' indicators: the inner is continuous and the outer shaped as two arcs.
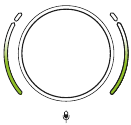
The outer halos light in various colours to show you the microphone signal level: the left halo shows the level for the Host input, the right halo for the Guest.
To set the gain for either microphone preamp, select the input to be adjusted with its ![]() button (a short press) and speak into the microphone as if you were recording, adjusting the gain knob until the halo just starts to turn amber when you speak at your loudest.
button (a short press) and speak into the microphone as if you were recording, adjusting the gain knob until the halo just starts to turn amber when you speak at your loudest.
At this point, turn the knob down a bit until you don't see any amber. If the halos ever turn red at the tops, you will definitely need to turn the gain knob down: red means your recording is likely to distort. (See diagram below.)

You can also adjust the gains from Vocaster Hub by moving the on-screen Mic Level sliders: drag them to the right to increase the gain.
Microphone Mute
Both microphone channels have mute buttons, marked ![]() .
.
You can press these at any time to turn a microphone 'off': the mute and Auto Gain buttons light red and the relevant gain halo pulses red while the microphone is muted. Press the button again to unmute.
You can also click one of the Mute buttons (with the same icon) on Vocaster Hub.
(Broadcasters often refer to this feature as a 'cough switch'.)
Using Enhance
Vocaster Two's Enhance feature optimises the microphones' audio processing to achieve the best possible recording.
It uses compression to control the level of the microphone signal, equalisation to help voice recordings sound clearer and inserts a high pass filter to remove unwanted low frequencies such as rumbling and microphone handling noise.
You can use Enhance on either or both microphone inputs.
Enhance has four presets for you to tailor the sound to your voice or your intended. You can select one of the four presets using the drop-down arrow in Vocaster Hub:
- Clean
- Warm
- Bright
- Radio
To use Enhance, press one of the ![]() buttons. If you have Vocaster Hub open, click the on-screen Enhance icon.
buttons. If you have Vocaster Hub open, click the on-screen Enhance icon.
The button lights green when Enhance is active. Press it again to turn Enhance off.
Listening with headphones

You can connect headphones to the front panel headphone sockets marked ![]() so you and/or your guest can hear what you are recording.
so you and/or your guest can hear what you are recording.
The two sockets provide the same 'default' mix of the two microphones and any other audio sources, such as audio from a phone or computer playback (the Loopback channels). You can adjust the volume of individual audio sources using the mixer in Vocaster Hub.
You can adjust the volume in each pair of headphones independently with the controls on Vocaster Two marked ![]() for the Host and
for the Host and ![]() for the Guest: these controls do not affect your recording level.
for the Guest: these controls do not affect your recording level.
The ![]() Host level controls both the headphones and speaker outputs. When you're using headphones we suggest muting your monitors in Vocaster Hub (See "Listening with speakers").
Host level controls both the headphones and speaker outputs. When you're using headphones we suggest muting your monitors in Vocaster Hub (See "Listening with speakers").
Listening with speakers
 Use the ¼' jacks marked Outputs R and L to connect speakers.
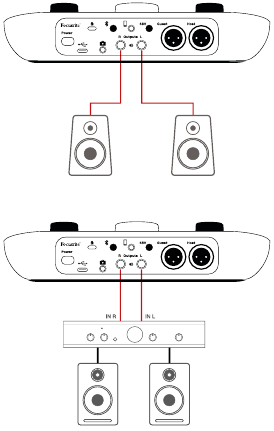
You can connect powered monitors or an amplifier to these outputs. Speaker volume is controlled by the same  knob used for headphones volume.
The outputs are balanced ¼' TRS jack sockets and provide line level. Small powered monitors have unbalanced inputs, typically a 3.5 mm jack plug intended for direct connection to a computer. Separate power amplifiers are likely to have phono (RCA) sockets.
You can also mute the speakers using Vocaster Hub software. Click the speaker icon in the top right of the Vocaster Hub software to toggle mute on (red) or off (black)

NOTE: You can create an audio feedback loop a 3.5 mm jack plug intended for direct if your speakers are active at the same time connection to a computer. Separate power as a microphone! We recommend you turn off amplifiers are likely to have phono (RCA) your speakers while recording podcasts, and sockets. use headphones for monitoring.
Recording a phone
You can connect a phone to Vocaster Two record a conversation, or to record music from the phone.

The rear panel has a phone connector, marked ![]() . This is a 3.5 mm TRRS jack socket, use a 3.5mm TRRS jack cable to connect to the phone's headphone socket, which is normally a 3.5 mm TRRS socket.
. This is a 3.5 mm TRRS jack socket, use a 3.5mm TRRS jack cable to connect to the phone's headphone socket, which is normally a 3.5 mm TRRS socket.
A 3.5mm TRS cable will work, but you may not get two-way communication with your phone guest.
If the phone does not have a 3.5 mm headphone port, you can use a 3.5 mm TRRS headphone adaptor.
The ![]() connector also feeds Vocaster Two's output back to the phone so the person on the phone call can hear the whole podcast mix, but without their own voice. This type of mix is known as 'mixminus': it ensures the caller will not hear their voice delayed or with echoes.
connector also feeds Vocaster Two's output back to the phone so the person on the phone call can hear the whole podcast mix, but without their own voice. This type of mix is known as 'mixminus': it ensures the caller will not hear their voice delayed or with echoes.
The signal level to the phone depends on the setting of the input channel sliders in Vocaster Hub's mixer. The signal fed to the phone is a mono version of the stereo mix, because the phone's input is a mono microphone.
Using Bluetooth
Vocaster Two's Bluetooth connection lets you wirelessly stream audio to* and from Bluetooth devices, such as your phone, to the Vocaster to include in your recording.
To transfer audio between a phone and Vocaster Two, you must pair the two devices.
To pair and get glitch-free audio, Bluetooth needs your device and your Vocaster to be within range of each other. The range is approximately 7 metres in open space: outside this range, the devices may not pair. At the limit of this range, or with obstructions, you might experience problems such as dropouts or glitches.
Your Vocaster can only connect to one Bluetooth device at a time.
*Bluetooth audio can only be sent from Vocaster to phones during phone calls to communicate with your guest. The guest hears a mix-minus, the whole mix, but without their own voice.
To pair a device to your Vocaster's Bluetooth input:
- Press and hold the
![]() button on the rear panel for three seconds. The Bluetooth icon pulses white to show it's in pairing mode.
button on the rear panel for three seconds. The Bluetooth icon pulses white to show it's in pairing mode.
![]()
- Go to the Bluetooth pairing menu on your Bluetooth device and scan for new devices – how this works can vary between devices, so if you're unsure, please see the user guide for your device.
- Choose Vocaster BT from the list of available devices.
- Allow your Bluetooth device to pair with the Vocaster, if prompted.
Vocaster Two's Bluetooth icon lights blue after a few seconds to show your device has connected. When you play audio on your device, it appears in Vocaster Hub's Bluetooth mixer channel, for you to include in your Show Mix and recording.
You can also stream audio from your Bluetooth device to speakers connected to Vocaster Two, and both Host and Guest headphones outputs. Your Vocaster sends its audio, e.g. sounds from your computer and the Host/Guest inputs, back to your phone via Bluetooth for your caller to hear.
You can control Bluetooth audio level in Vocaster Hub, and on your connected device. Level control in Vocaster Hub only controls the Show Mix level and won't affect the Bluetooth L/R recording tracks.
NOTE: Vocaster Two cannot pair with Bluetooth headphones. Vocaster's Bluetooth feature is for streaming Bluetooth audio from a device to the Vocaster and sending Bluetooth audio back to your phone so your guest can hear you.
You can break the Bluetooth connection in three ways.
- Press the
![]() button on Vocaster's rear panel. When you turn Vocaster's Bluetooth connection back on again, the previously connected device reconnects.
button on Vocaster's rear panel. When you turn Vocaster's Bluetooth connection back on again, the previously connected device reconnects. - Turn off Bluetooth on your device. Next time you re-enable Bluetooth on your device, the device reconnects with Vocaster.
- In your device's Bluetooth settings, select the Vocaster and choose the option to Forget Device. (Note the description of this option varies between devices.)
What do the Bluetooth icon's colours mean?
Vocaster Two's Bluetooth icon
 – Grey - Bluetooth is off. Press the
 ![]() button on the back panel to turn on Bluetooth.
button on the back panel to turn on Bluetooth.
![]() – Orange - Bluetooth is on but not connected to a device. If you've paired your device before, make sure it has Bluetooth enabled and is in range of the Vocaster.
– Orange - Bluetooth is on but not connected to a device. If you've paired your device before, make sure it has Bluetooth enabled and is in range of the Vocaster.
If you've not previously paired your Bluetooth device, follow the steps above to pair it for the first time.
 – Pulsing White - Vocaster is in pairing mode. To pair a device, start from step 3 above.
 – Red - Bluetooth connection has failed. Press the
 ![]() button to turn off Bluetooth on your Vocaster, re-enable Bluetooth on your device and repeat the steps above. If the Bluetooth icon stays red, please contact our support team.
button to turn off Bluetooth on your Vocaster, re-enable Bluetooth on your device and repeat the steps above. If the Bluetooth icon stays red, please contact our support team.
![]() – Blue - Vocaster has paired and the a device is ready to stream audio to the Vocaster. To disconnect, press the
– Blue - Vocaster has paired and the a device is ready to stream audio to the Vocaster. To disconnect, press the ![]() button, or disable Bluetooth on your phone/device.
button, or disable Bluetooth on your phone/device.
Recording to a video camera
If you are working with video, you may want to record your audio into a video camera.

Vocaster Two has a dedicated output connector for this purpose, the 3.5 mm TRS jack socket on the rear panel marked ![]() You can connect this output to the audio/ mic input on your camera using a 3.5mm jack-to-jack cable.
You can connect this output to the audio/ mic input on your camera using a 3.5mm jack-to-jack cable.
If your camera input uses a different connector, use a suitable adaptor cable. Ensure you select your camera's external audio source rather than its internal microphone.
The camera output carries the same mix as the USB recording output, and what you hear in your speakers and headphones.
You can set the mix and levels going to the camera using the sliders in Vocaster Hub's mixer.
Vocaster Hub software
As part of the Easy Start registration process, you'll install Vocaster Hub software on your computer. Vocaster Hub gives you access to additional Vocaster Two features - most importantly, it lets you balance your and your guest's voices against any other audio in your mix.

A separate Vocaster Hub User Guide can be downloaded from the downloads area of the Focusrite website. This describes the use of Vocaster Hub in full detail. The following section of this User Guide is limited to an overview of the software's primary features.
To open Vocaster Hub: After you install Vocaster Hub on your computer this icon appears in your applications:

Click it to open Vocaster Hub.
If your Vocaster Two interface is not connected to your computer and powered on, you will see a welcome page.
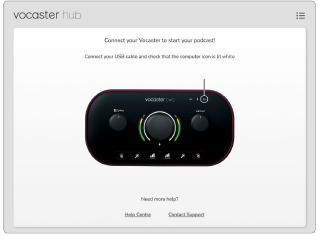
Note the Help Centre or Contact Support links. You can always return to this page by turning the interface off. More guidance on using Vocaster Two, including tutorial videos, are available at these links.
When you connect the interface and power it on, the  icon lights white to confirm the interface is communicating with your computer, and you'll see Vocaster Hub's Control Page:
If the icon lights red, it shows Vocaster Two has not been able to communicate with your computer, and you should check the cable is plugged in correctly.
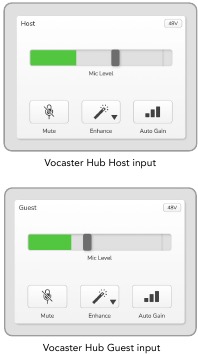
Controlling the microphones
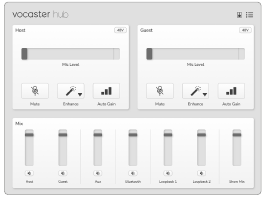
The Host Input and Guest Input panels are where you adjust Vocaster Two's microphone channels:
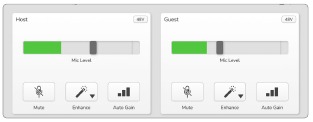
The Mic Level displays for the two microphone inputs work identically. Each is both a level meter and a level control. Click and drag a grey bar to adjust the gain. This control duplicates the rotary gain knob on the interface, and you can adjust the gain with either control.
The colour bar shows the microphone signal level, and again, this duplicates the signal level halo display on the interface.
The bar should remain green most of the time, with amber showing only on the loudest 'peaks'. If it goes red, the gain is set too high.
Below the meter/level display are three buttons which duplicate those on the interface top panel:
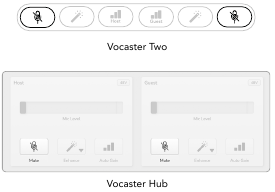
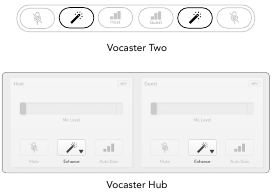
- Mute
![]() – click on this to mute the microphone; the button and the level display show red when mute is active. On the interface, the Mute and Auto Gain buttons light red and the relevant arc pulses red. Click again to unmute.
– click on this to mute the microphone; the button and the level display show red when mute is active. On the interface, the Mute and Auto Gain buttons light red and the relevant arc pulses red. Click again to unmute. - Enhance
![]() – click on this to activate the Enhance feature; the on-screen and hardware buttons both light green. Click again to deactivate.
– click on this to activate the Enhance feature; the on-screen and hardware buttons both light green. Click again to deactivate. - Auto Gain
![]() – click this to start the Auto Gain function; speak normally into the microphone for 10 seconds to calibrate the gain setting.
– click this to start the Auto Gain function; speak normally into the microphone for 10 seconds to calibrate the gain setting.
Controlling your mix
The Mix section of Vocaster Hub allows you to balance the audio inputs and computer outputs making up your Show Mix.
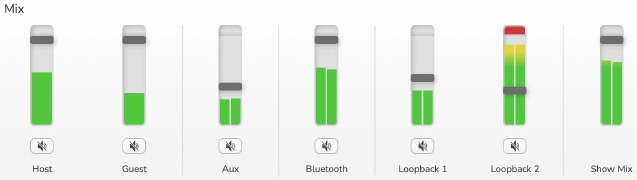
Like the Mic Level control, the 'sliders' are both meters and level control. The sliders affect the headphone/speaker mixes and Show Mix recording but don't affect the level of each channel into your software. The channels of the mixer are (left to right):
- Host (mono) – this is Vocaster Two's Host microphone.
- Guest (mono) – this is Vocaster Two's Guest microphone.
- Aux (stereo) – use this when you have connected a phone to the rear panel
![]() connector. It adjusts the audio level being received from the phone.
connector. It adjusts the audio level being received from the phone. - Bluetooth (stereo) – use this when you're streaming audio wirelessly from a phone or other device using Bluetooth.
- Loopback 1 and Loopback 2 (stereo) – these control the level of two audio sources within your computer: these could be feeds from the internet, prerecorded files, or other sources. In the image below Loopback 2 is 'clipping' so the source level needs turning down to stop the red clip bar appearing.
- Show Mix (stereo) – this shows and controls the overall output level of the mixer.
 connector. It adjusts the audio level being received from the phone.
On the Loopback 2 channel the red part of the meter is the 'Clip Indicator'. This shows you the source is too loud and may distort in your recording. Bluetooth and Loopback are an exception and may show as clipped more often.
Turn down the track's source, not the slider in the mixer. If the Show Mix clips, turn down the tracks in the mixer.
Recording sounds from your computer
Vocaster's Loopback feature lets you record audio sources from within your computer (e.g., the audio output from a web browser).
There are two stereo Loopback sliders on the mixer; these use Vocaster Two's 'virtual' inputs. The virtual inputs don't have connectors on the interface, but you can record them in your DAW in the same way as any other input.
You can feed each Loopback input from a different software application. Which application you use with each Loopback input is configured in the application's output settings.
If you're a Mac User and wish to use both Loopback inputs, we recommend you read this support article.
- Loopback 1 – this input gets its signal from software with its output routing set to Playback 1-2, or software that doesn't support output routing. The software you can use with Loopback 1 includes:
- Internet browsers
- Music playback software such as Spotify or Apple Music
- Video calling and conference software
- Loopback 2 – this input gets its signal from audio software with its output routing set to Playback 3-4. You can configure this in the software's audio settings, but not all software allows output routing selection, so please check your software's user guide for this feature. Software with the ability to feed audio to Loopback 2 includes:
- Other recording or playback software you're using
- VOIP and video conferencing applications
Example of Loopback usage
You might want to use both Loopback inputs when you're recording a show but need independent recordings of other software sounds to mix later. For example, in your show, you want to record your conversation with a guest in a video call in addition to including a sound or jingle playback from another audio playback software.
Your video call software (e.g., Zoom), routes its output to Playback 1-2 by default. This appears as Loopback 1 in the mixer. You can then route the output of your playback software to Playback 3-4, which becomes available as Loopback 2.
In your recording software you can now have separate tracks for recording:
- Loopback 1 appears on your DAW channels 11 and 12
- Loopback 2 appears on your DAW channels 13 and 14
For all further details, please refer to the Vocaster Hub User Guide.
Recording Tracks into Software
Depending on which recording software you use, you can pick from up to 14 channels to record from, to separate tracks.
The fourteen channels you'll see are:
| DAW Input Number | Vocaster Input | Use |
| 1 | Video Call L Video Call R | A mix of all inputs excluding Loopback, this is a mix-minus so a video call guest can hear your whole show without hearing (minus) themselves. |
| 2 | ||
| 3 | Show Mix L Show Mix R | A stereo mix of all the inputs to record your whole show. |
| 4 | ||
| 5 | Host Microphone | The Host microphone input. |
| 6 | Guest Microphone | The Guest microphone input. |
| 7 | Aux L Aux R | Two channels fed from a device connected to the phone input on Vocaster. |
| 8 | ||
| 9 | Bluetooth L Bluetooth R | Two channels fed from the Bluetooth input. |
| 10 | ||
| 11 | Loopback 1 L Loopback 1 R | Signal from software fed from software playback 1-2. |
| 12 | ||
| 13 | Loopback 2 L Loopback 2 R | Signal from software fed from software playback 3-4. |
| 14 |
Hardware Features
Top Panel

The large rotary control adjusts the gain for either microphone input, as selected by the Host and Guest buttons. The gain control has two LED arcs. These have several functions.
The outer LED arcs surrounding the gain knob are 'halo' meters: the one on the left is for the Host microphone input, the one on the right is for the Guest microphone input:
- They show microphone level: green means normal operation, amber shows the signal is close to clipping, and red shows digital clipping, which should always be avoided.
- In addition, each arc pulses red when the corresponding microphone is muted
The thinner inner ring surrounding the gain knob is a multifunction 'halo' LED. This has several functions:
- It illuminates white while microphone gain is being adjusted, to show the current gain setting
- It acts as a countdown timer during an Auto Gain calibration
- Following an Auto Gain calibration of either microphone preamp, it will flash green or red to show a successful or unsuccessful operation (respectively)

Host monitor output level control - sets the output level at both the front panel Host headphone output and the rear panel speaker outputs.
![]()
Guest monitor output level control - sets the output level at the front panel Guest headphone output.
Buttons
![]()
Microphone mute buttons for each microphone input. Press to mute or unmute a microphone channel. LED illuminates red when muting is active.
![]()
Enhance button for each microphone input. Press to activate/deactivate the Enhance function. LED lights green when Enhance is active.
![]()
A short press assigns the gain knob to either the Host or Guest microphone preamp. A long press starts the Auto Gain function: speak normally into the microphone for 10 seconds to set the gain. The LED pulses amber during the process.

Illuminates red when 48V phantom power is active for the currently selected microphone (Host or Guest). Illuminates dim red if phantom power is only enabled for the microphone not currently selected.
Indicators

An LED which illuminates white when the interface has communication with the computer it is connected to, and red if communication fails.
![]()
A multicolour LED which illuminates blue when a phone or other Bluetooth device has connected with Vocaster Two, to allow audio to be sent between the two.
Rear Panel


Press to turn Vocaster Two on and off.
![]()
USB 3.0 port – Type C connector; connect to your laptop or computer with the USB cable supplied.
![]()
Kensington security slot – make your Vocaster Two secure using a Kensington lock.
![]()
3.5 mm TRS jack socket for connecting Vocaster Two to the external audio input of a video camera.
![]()
Enables Bluetooth connectivity: see 'Using Bluetooth' section for full details.
![]()
3.5 mm TRRS jack socket for a wired connection to a compatible phone.
![]()
Outputs L and R – for connecting to monitor loudspeakers. Two ¼' TRS jack sockets; electronically balanced. Either ¼' TRS (balanced connection) or TS (unbalanced connection) jack plugs can be used.
Phantom power switch for microphone inputs – press to enable 48V phantom power at the XLR socket for the currently selected microphone channel.
Host and Guest
XLR sockets for connecting microphones.
On the front:
![]()
Host and Guest headphone output sockets. Connect headphones here. If your headphones use a 3.5mm jack then you need to use a 3.5mm to ¼' jack adaptor.
Specifications
Performance Specifications
These specifications allow you to compare your Vocaster with other devices and make sure they'll work together. If you're not familiar with these specifications, don't worry you don't need to know this information to use your Vocaster with most devices
| Sample Rate | |
| 48 kHz | |
| USB | |
| Version | USB 3.0 |
| Maximum Current | 0.9A |
| Maximum Voltage | 5V |
| Maximum Power | 4.5W |
| Microphone Input | |
| Impedance | 3KΩ |
| Maximum Input Level | +12.5dBu @ minimum gain |
| Gain Range | 70dB |
| THD+N (@ -1dBFS) | ≤-94dB |
| Frequency Response (20Hz @ mininum gain) | 20Hz - 20KHz +0, -0.5 dB |
| Phone Input | |
| Impedance | 16KΩ |
| THD+N (@ -1dBFS) | ≤-94dB |
| Maximum Input Level | 0dBu |
| Frequency Response | 20Hz - 20KHz +0, -0.5 |
| Phone Output | |
| Impedance | 220Ω |
| Maximum Output Level | -26dBu |
| THD+N | -73dB |
| Frequency Response | 20Hz - 20KHz +0dB, -0.5dB |
| Line Outputs | |
| Impedance | 440Ω |
| Maximum Output Level | +14dBu |
| THD+N (@-1 dBFS) | ≤-96dB |
| Frequency Response | 20Hz - 2kHz ±0.15dB |
| Headphone Output | |
| Impedance | 5Ω |
| Maximum Output Level @ 0dBFS | +6.5dBu |
| Maximum Power (mW) | 8.5mW into 270Ω 28mW into 33Ω |
| THD+N | -96dB unloaded |
| Frequency Response | 20Hz - 20KHz ±0.5dB |
| Camera Output | |
| Impedance | 220Ω |
| Maximum Output Level | -24.5dBu |
| THD+N (Max Output, -1dBFS, 22Hz - 22kHz) | -73dB |
| Frequency Response | 20Hz - 20KHz ±0.2dB |
| Bluetooth | |
| Version | 5.0 |
| Range | 7 metres in open space |
Physical And Electrical Characteristics
| Other Audio I/O | |
| Camera output | 3.5 mm TRS jack on rear panel |
| Phone input and output | 3.5 mm TRRS jack on rear panel |
| Loopback inputs | Two (stereo) via Vocaster Hub |
| Microphone Input | |
| Connector | Balanced, via female XLR on rear panel |
| Phantom power | 48V, rear panel switch |
| Weight and Dimensions | |
| Weight | 440g |
| Height | 50mm |
| Width | 224mm |
| Depth | 113mm |
| Analogue Outputs | |
| Main outputs | Balanced, 2 x ¼' TRS jacks |
| Stereo headphone output | ¼' TRS jack on front panel |
| Output level control (main and headphone) | On top panel |
Troubleshooting
For all troubleshooting queries, please visit the Focusrite Help Centre at support.focusrite.com
Documents / Resources
References
![focusrite.com]() Vocaster Range | Focusrite
Vocaster Range | FocusritePlease log in | Customer Portal
Focusrite | Focusrite Downloads
![hindenburg.com]() Hindenburg :: Hindenburg Lessons
Hindenburg :: Hindenburg Lessons![focusrite.com]() Focusrite | Audio Interfaces and Pro Audio Equipment
Focusrite | Audio Interfaces and Pro Audio Equipment
Download manual
Here you can download full pdf version of manual, it may contain additional safety instructions, warranty information, FCC rules, etc.
Download Focusrite Vocaster Two - USB Person Podcasting Audio Interface Manual
Advertisement


Need help?
Do you have a question about the Vocaster Two and is the answer not in the manual?
Questions and answers