Table of Contents
Advertisement
Advertisement
Table of Contents

Subscribe to Our Youtube Channel
Related Manuals for Focusrite vocaster two


Summary of Contents for Focusrite vocaster two
- Page 1 User Guide Tell the world Version 1 Focusrite.com...
-
Page 2: Table Of Contents
Listening with speakers ........19 focusrite.com Tell the world... -
Page 3: Overview
Content creators of all kinds - vloggers, If you can’t find what you need in this User voiceover artists, streamers, audiobook Connect Vocaster Two to a computer via its Guide, please visit support.focusrite.com, creators, and more – can use Vocaster Two USB-C port and the cable provided. -
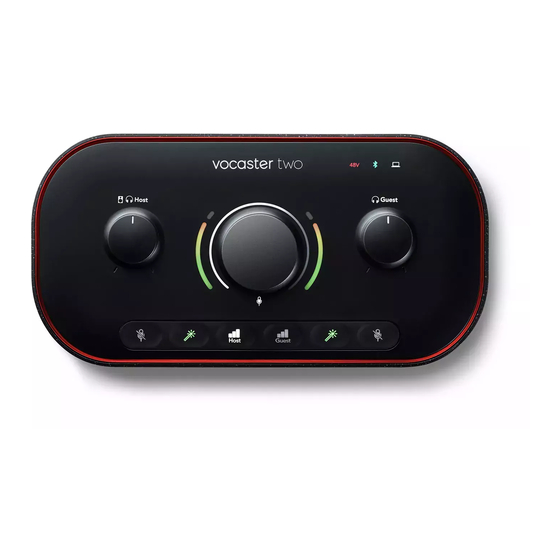
Page 4: Hardware Features
Hardware features A 3.5 mm jack socket allows you to connect The top panel has a multi-function knob for Vocaster Two allows you to connect either a phone to Vocaster Two: alternatively, you controlling the gain of either microphone, one or two high quality microphones to a can connect to the phone using Bluetooth. -
Page 5: In The Box
• USB cable, Type ‘A’ to Type ‘C’ • Getting Started Information (printed inside the box) • Important Safety Information As a Vocaster Two owner, you are also entitled to a selection of third-party software, including the Hindenburg DAW (Digital Audio Workstation) recording application. -
Page 6: Getting Started
GETTING STARTED Getting Started When you connect Vocaster Two for the first time, your computer recognises it in the same way as if it were a USB memory stick. Easy Start Tool Getting up and running with your Vocaster Two is made easy by our Easy Start Tool. -
Page 7: Mac Users
Finder window shown below: follow our step-by-step setup guide, which is appear on the desktop: tailored to how you want to use Vocaster Two, or go straight to your account and download Vocaster Hub control software. When you connect Vocaster Two, your computer should set it as your default audio device. -
Page 8: Windows Users
After you submit the form you can either follow our step-by-step setup guide, which is tailored to how you want to use Vocaster Two, Double-click: or go straight to your account and download Vocaster Hub control software. -
Page 9: Ipad Users
USB Type-C to C cable (or through Vocaster Hub. adaptor) to your iPad. 2. Connect the other end of the USB To connect your Vocaster Two to an type-C to your Vocaster Two’s USB iPadOS device you need: port. 3. Connect your headphones or •... -
Page 10: All Users
Vocaster Hub at any time from questions. available to you once you’ve registered your downloads.focusrite.com. Vocaster Two. If you need help installing this, NOTE: When you install Vocaster Hub on a please visit our Getting Started pages here, Windows computer, the driver for Vocaster Audio Setup in your DAW where a video tutorial is available. -
Page 11: Audio Setup In Hindenburg
Audio Setup in Hindenburg The examples opposite show Tutorial videos explaining how to the correct configuration on the set up and use Vocaster Two with Hindenburg audio preferences on various DAWs can be found at our Windows and Mac. There are two Getting Started pages. -
Page 12: Examples Of Use
EXAMPLES OF USE Examples of use Vocaster Two is the ideal audio interface The microphone inputs are XLR sockets for podcasting or voice recording using and work with microphones with an a Mac, PC, or iPad, and can be used by XLR connector. - Page 13 EXAMPLES OF USE Recording with microphones (cont.) Vocaster Two can provide phantom power (48 volts) at the XLR inputs if you’re using a condenser microphone. To enable phantom power, press the Host or Guest button to select the input and push the 48V button on the rear panel: the 48V LED lights red to confirm it’s...
-
Page 14: Using Auto Gain
EXAMPLES OF USE Using Auto Gain Vocaster Two’s Auto Gain feature allows you to Now you - or your guest - should speak into the To apply Auto Gain to the other input, hold the get a good recording level without guesswork. -
Page 15: Manual Gain Adjustment
EXAMPLES OF USE Manual gain adjustment On Vocaster Two, the large knob marked is used to set the microphone gain for both the Host and Guest microphones, and the levels to your recording software. You can set the gain of the two microphone preamp independently. - Page 16 (See diagram below.) you speak at your loudest. Vocaster Hub Host input Good Level A bit too high Your recording will distort Vocaster Hub Guest input focusrite.com Tell the world...
-
Page 17: Microphone Mute
EXAMPLES OF USE Microphone Mute Using Enhance Both microphone channels have mute Vocaster Two’s Enhance feature optimises To use Enhance, press one of the buttons. If you have Vocaster Hub open, buttons, marked the microphones’ audio processing to achieve the best possible recording. -
Page 18: Listening With Headphones
You can adjust the volume of individual audio sources using the mixer in Vocaster Hub. You can adjust the volume in each pair of headphones independently with the controls on Vocaster Two marked for the Host for the Guest: these controls do not affect your recording level. -
Page 19: Listening With Speakers
Separate power as a microphone! We recommend you turn off amplifiers are likely to have phono (RCA) your speakers while recording podcasts, and sockets. use headphones for monitoring. focusrite.com Tell the world... -
Page 20: Recording A Phone
EXAMPLES OF USE Recording a phone You can connect a phone to Vocaster Two connector also feeds Vocaster record a conversation, or to record music Two’s output back to the phone so the from the phone. person on the phone call can hear the... -
Page 21: Using Bluetooth
To transfer audio between a phone and icon pulses white to show it’s in pairing your Show Mix and recording. Vocaster Two, you must pair the two devices. mode. You can also stream audio from your To pair and get glitch-free audio, Bluetooth... -
Page 22: What Do The Bluetooth Icon's Colours Mean
EXAMPLES OF USE What do the Bluetooth icon’s colours mean? NOTE: Vocaster Two cannot pair with Bluetooth headphones. Vocaster’s Bluetooth feature is for streaming – Red - Bluetooth connection has failed. – Grey - Bluetooth is off. Press the Bluetooth audio from a device to the... -
Page 23: Recording To A Video Camera
Recording to a video camera If you are working with video, you may want to record your audio into a video camera. Vocaster Two has a dedicated output connector for this purpose, the 3.5 mm TRS jack socket on the rear panel marked... -
Page 24: Vocaster Hub Software
VOCASTER HUB SOFTWARE Vocaster Hub software As part of the Easy Start registration process, If your Vocaster Two interface is not When you connect the interface and power you’ll install Vocaster Hub software on your connected to your computer and powered... -
Page 25: Controlling The Microphones
Controlling the microphones The Host Input and Guest Input panels are The bar should remain green most of the where you adjust Vocaster Two’s microphone time, with amber showing only on the loudest channels: ‘peaks’. If it goes red, the gain is set too high. -
Page 26: Controlling Your Mix
VOCASTER HUB SOFTWARE Controlling your mix • Guest (mono) – this is Vocaster Two’s • Loopback 1 and Loopback 2 (stereo) The Mix section of Vocaster Hub allows you to Guest microphone. – these control the level of two audio... -
Page 27: Recording Sounds From Your Computer
There are two stereo Loopback sliders you can use with Loopback 1 includes: settings, but not all software allows on the mixer; these use Vocaster Two’s output routing selection, so please - Internet browsers ‘virtual’ inputs. The virtual inputs don’t have check your software’s user guide for this... -
Page 28: Example Of Loopback Usage
• Loopback 2 appears on your DAW Loopback 1 R channels 13 and 14 Loopback 2 L Signal from software fed from software playback 3-4. Loopback 2 R For all further details, please refer to the Vocaster Hub User Guide. focusrite.com Tell the world... -
Page 29: Hardware Features
Following an Auto Gain calibration of either microphone preamp, it • It illuminates white while microphone will flash green or red to show a gain is being adjusted, to show the successful or unsuccessful operation current gain setting (respectively) focusrite.com Tell the world... - Page 30 Enhance button for each microphone when a phone or other Bluetooth device input. Press to activate/deactivate the has connected with Vocaster Two, to allow Enhance function. LED lights green when audio to be sent between the two. Enhance is active.
-
Page 31: Rear Panel
HARDWARE FEATURES Rear Panel Enables Bluetooth connectivity: see ‘Using Press to turn Vocaster Two on and off. Phantom power switch for microphone inputs – Bluetooth’ section (page 21) for full details. press to enable 48V phantom power at the XLR socket for the currently selected microphone channel. -
Page 32: Specifications
Impedance 440Ω Frequency Response 20Hz - 20KHz +0, -0.5 dB (20Hz @ mininum gain) Maximum Output +14dBu Level Bluetooth THD+N (@-1 dBFS) ≤-96dB Version Frequency Response 20Hz - 2kHz ±0.15dB Range 7 metres in open space focusrite.com Tell the world... -
Page 33: Physical And Electrical Characteristics
Weight 440g Height 50mm Width 224mm Depth 113mm Analogue Outputs Main outputs Balanced, 2 x ¼’ TRS jacks Stereo headphone output ¼’ TRS jack on front panel Output level control On top panel (main and headphone) focusrite.com Tell the world... -
Page 34: Troubleshooting
TROUBLESHOOTING Troubleshooting Credits For all troubleshooting queries, please visit Focusrite would like to thank the following the Focusrite Help Centre at members of the Vocaster team for their hard support.focusrite.com work to bring you this product. Adrien Fauconnet, Alex Middleton-Dalby,...
Need help?
Do you have a question about the vocaster two and is the answer not in the manual?
Questions and answers