Toa F-2322C Instruction Manual
Toa f-2322c: user guide
Hide thumbs
Also See for F-2322C:
- Specifications (12 pages) ,
- Features (1 page) ,
- Instruction manual (12 pages)
Table of Contents
Advertisement
Quick Links
CEILING SPEAKER SYSTEM
TABLE OF CONTENTS
1. SAFETY PRECAUTIONS .......................... 2
2. GENERAL DESCRIPTION ........................ 3
3. FEATURES ................................................ 3
5. INSTALLATION ......................................... 5
FOR MAINTENANCE ............................... 10
Please follow the instructions in this manual to obtain the optimum results from this unit.
We also recommend that you keep this manual handy for future reference.
F-2322C
INSTRUCTION MANUAL
F-2352C
7. REPAINTING THE SPEAKER .................. 11
PROTECTION CIRCUITRY ...................... 11
9. SPECIFICATIONS .................................... 12
Accessories ............................................... 12
Optional Components ................................ 12
F-2322C
F-2352C
Advertisement
Table of Contents

Related Manuals for Toa F-2322C


Summary of Contents for Toa F-2322C
-
Page 1: Table Of Contents
CEILING SPEAKER SYSTEM F-2322C TABLE OF CONTENTS 1. SAFETY PRECAUTIONS ... 2 2. GENERAL DESCRIPTION ... 3 3. FEATURES ... 3 4. NOMENCLATURE AND DIMENSIONS ... 4 5. INSTALLATION ... 5 6. REMOVING THE SPEAKER FOR MAINTENANCE ... 10 Please follow the instructions in this manual to obtain the optimum results from this unit. -
Page 2: Safety Precautions
WARNING CAUTION WARNING • Leave the installation to your TOA dealer because the installation requires expert knowledge. Improper installation may cause the unit to fall, resulting in personal injury and/or property damage. -
Page 3: General Description
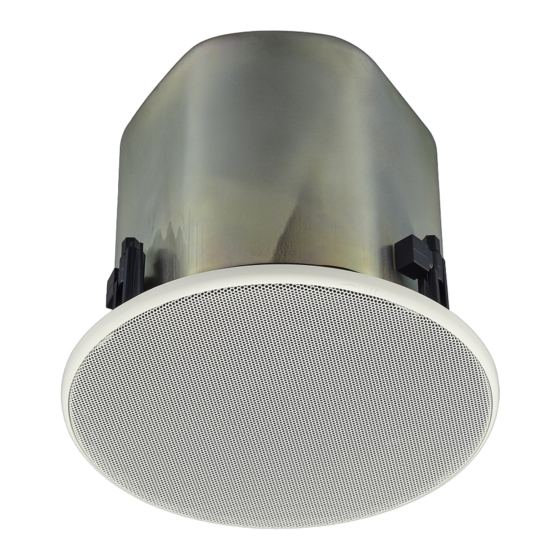
2. GENERAL DESCRIPTION The F-2322C and F-2352C are flush-mounted ceiling speakers that offer wide frequency range and high- quality sound output. The F-2322C employs a full-range speaker element, while the F-2352C features a 2-way speaker configuration. Use of their supplied and optional mounting hardware permits versatile mounting to match a wide range of applications and installation locations. -
Page 4: Nomenclature And Dimensions
4. NOMENCLATURE AND DIMENSIONS • F-2322C [Front] Front grille (accessory) [Ceiling mounting] Ceiling reinforcement ring (accessory) • F-2352C [Front] 41 (1 Front grille (accessory) [Ceiling mounting] Ceiling reinforcement ring (accessory) [Side] 12 ( 200 (7 Mounting hole: ø200 (7 [Side] 229 (9 Mounting hole: ø200 (7... -
Page 5: Installation
5. INSTALLATION The F-2322C and F-2352C ceiling speakers can be mounted in 5 different configurations: • Direct mounting to a ceiling panel Use the supplied ceiling reinforcement ring. • Mounting to a ceiling frame Use the supplied ceiling reinforcement ring in conjunction with the optional HY-TB1 Tile Bar Bridge. - Page 6 (optional) Reinforcement ring placed on ceiling panel HY-TB1 (optional) Ceiling reinforcement ring (accessory) ø200 – ø300 mm " – 11 ") Speaker unit Mounting hole Ceiling reinforcement ring (accessory) These tabs must face upward, away from the hole. Ceiling frame...
- Page 7 Step 4. Attach a safety wire to prevent the speaker from accidentally falling. To attach, tie one end of the supplied safety wire around the speaker's safety wire hook, and tie its snap ring around a secure C-channel bar or suspension pipe.
- Page 8 Step 5. Plug the detachable input connector into the speaker's wiring socket. Step 6. Mount the speaker. Caution Before mounting, check to be sure that the speaker's 3 mounting tabs are turned inside the unit as shown in the figure.
- Page 9 25, 70, or 100 V line. Failure to follow this instruction could result in damage to the speaker or amplifier. Step 8. Attach the front grille. Align the tabs (3 places) on the back side of the grille...
-
Page 10: Removing The Speaker For Maintenance
Rotate the 3 mounting tab axis screws counterclockwise. The mounting tabs rise as they turn, allowing the speaker to be removed. Caution When loosening the mounting tab axis screws, support the speaker by hand to prevent it from falling. Caution Be sure to set the screwdriver's torque for under 4 kgf·cm. -
Page 11: Repainting The Speaker
8. ABOUT THE INPUT OVERLOAD PROTECTION CIRCUITRY Both the F-2322C and the F-2352C feature internal input overload protection circuitry. If an extremely high input level is fed to the unit, the protection circuitry automatically cuts off the signal to the speaker element. -
Page 12: Specifications
Paper pattern ... 1 • Optional Components HY-TB1 (Tile Bar Bridge): HY-TR1 (Trim Ring): HY-AH1 (Anchor Hanging Bracket): Attach this bracket to an anchor bolt when mounting the speaker unit to a HY-BC1 (Back Can): F-2322C Bass reflex type 30 W (High Impedance) Continuous pink noise: 60 W (8 Ω), 30 W (16 Ω)
Need help?
Do you have a question about the F-2322C and is the answer not in the manual?
Questions and answers