Table of Contents
Advertisement
Quick Links
Advertisement
Table of Contents

Subscribe to Our Youtube Channel
Related Manuals for Pelgrim OVS826RVS


Summary of Contents for Pelgrim OVS826RVS
- Page 1 OVS826RVS OVS826MAT Instructions for use Steam oven www.gorenje.com...
- Page 2 We thank you for your trust in purchasing our appliance. This detailed instruction manual is supplied to allow you to learn about your new appliance as quickly as possible. Make sure you have received an undamaged appliance. Should you notice any transport damage, please notify your dealer or regional warehouse where your appliance was supplied from.
-
Page 3: Table Of Contents
CONTENTS WARNINGS BEFORE CONNECTING THE APPLIANCE Safe and correct use of the steam oven INTRODUCTION COMBINED STEAM OVEN Control unit 10 Information on the appliance - data plate (depending on the model) INITIAL 11 BEFORE THE FIRST USE PREPARATION Steam cooking OF THE 12 Filling the water tank APPLIANCE... -
Page 4: Before Connecting The Appliance
BEFORE CONNECTING THE APPLIANCE Carefully read the instructions for use before connecting the appliance. Repair or any warranty claim resulting from incorrect connection or use of the appliance shall not be covered by the warranty. Safe and correct use of the steam oven Leave the appliance at room temperature for After the steam cooking is completed, there some time before connecting it to the power... -
Page 5: Combined Steam Oven
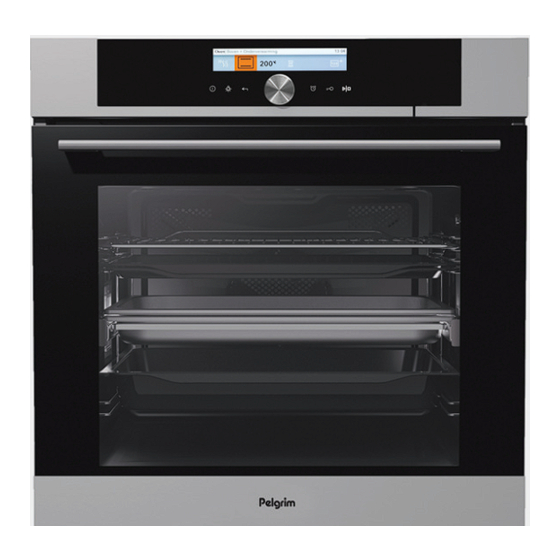
COMBINED STEAM OVEN (DESCRIPTION OF THE OVEN AND ACCESSORIES – DEPENDING ON THE MODEL) The figure represents one of the built-in appliance models. Since the appliances for which these instructions were drawn up may have different equipment, some functions or equipment may be described in the manual that may not be present in your appliances. - Page 6 COOLING FAN The appliance is fitted with a cooling fan that cools the housing and the appliance control panel. EXTENDED OPERATION OF THE COOLING FAN After the oven is switched off, the cooling fan continues to operate for a short while in order to cool the oven.
- Page 7 The grid or the tray should always be inserted into the groove between the two wire profiles. With telescopic extendible guides, first pull out the guides of one level and place the grid or the baking tray onto them. Then, push them in with your hand as far as they will go.
-
Page 8: Control Unit
CONTROL UNIT (depending on the model) ON/OFF KEY OVEN BACK KEY KNOB for LIGHTING ON/ SELECTION and OFF KEY CONFIRMATION Touch briefly to return to previous Select the setting by menu. rotating the knob. Confirm your Touch and hold to selection by pressing return to main menu. - Page 9 KITCHEN TIMER CHILD LOCK START/STOP DISPLAY Touch: START Touch during operation: PAUSE/ STOP NOTE: The keys will respond better if you touch them with a larger area of your fingertip. Each time you touch a key, this will be acknowledged by a short acoustic signal.
-
Page 10: Information On The Appliance - Data Plate (Depending On The Model)
INFORMATION ON THE APPLIANCE - DATA PLATE (DEPENDING ON THE MODEL) A Serial number B Code C Type D Brand E Model F Technical data G Compliance symbols The rating plate indicating the basic information about the appliance is located at the edge of the oven and it is visible when the oven door is opened. -
Page 11: Before The First Use
BEFORE THE FIRST USE Before the first use, remove all components, including any transport equipment, from the oven. Clean all accessories and utensils with warm water and regular detergent. Do not use any abrasive cleaners. Before using the oven the first time, heat it without any food, in the system “Bottom and top heat”, at the temperature of 200 °C for approximately one hour. -
Page 12: Filling The Water Tank
FILLING THE WATER TANK The WATER TANK allows for independent water supply to the steam oven. The tank volume amounts to approx. 1.3 litres (maximum water level – see marking). This amount of water suffices for approximately 3 hours of cooking time with the longest steam cycle (hot air with steam on "high"... -
Page 13: First Use
FIRST USE LANGUAGE SELECTION Upon the first connection of the appliance to the power supply or after a prolonged period of being disconnected, please set the desired language. The default language is English. Confirm each setting by pressing the KNOB. Turn the KNOB and select the desired language. -
Page 14: Testing Water Hardness
TESTING WATER HARDNESS Water hardness test should be carried out before first use. A strip will appear on the display with the sign "Very hard water". Maximum water hardness is set as a factory default. Soak the test paper strip (supplied with the appliance) in water for one (1) second. -
Page 15: Selecting The Main Menus For Baking And Steaming
SELECTING THE MAIN MENUS FOR BAKING AND STEAMING Turn the KNOB and select the name of the menu. Confirm the selection by pressing the KNOB. The NAME of the selected menu appears above. Confirm each setting by pressing the KNOB. A) Auto In this mode, first select the type of dish and then the selected food with automatic setting of the quantity, level of doneness and... - Page 16 A) BAKING BY SELECTING THE TYPE OF FOOD (Auto) Confirm each setting by pressing the KNOB. Turn the KNOB and select the Auto. Confirm your selection by pressing the KNOB. Select the type of dish and the selected food. Confirm your selection.
- Page 17 PREHEATING Cooking procedures for some dishes in the Auto mode also include the preheat function . When you select the food, the following notification will appear: "Selected program includes preheat function." (Confirm your selection with the KNOB.) "Preheating started." Do not insert the food yet. Actual and set temperature will alternate on the display.
- Page 18 B) BAKING BY SELECTING AN OVEN SYSTEM (Pro mode) Confirm each setting by pressing the KNOB. Turn the KNOB and select Pro. Confirm your selection. Select your own basic settings. BASIC SETTINGS 1 Pre-heating 2 System (see table OVEN SYSTEMS) 3 Temperature in the oven ADDITIONAL SETTINGS 4 Duration of baking (see chapter TIMER FUNCTIONS)
- Page 19 OVEN SYSTEMS (depending on the model) DESCRIPTION OVEN SYSTEMS PRESET MIN – MAX TEMPERATURE TEMPERATURE (°C) (°C) TOP + BOTTOM HEAT 30–230 The heaters in the bottom and in the ceiling of the oven cavity will radiate heat evenly into the oven interior. Pastry or meat can only be baked/roasted at a single height level.
- Page 20 DESCRIPTION OVEN SYSTEMS PRESET MIN – MAX TEMPERATURE TEMPERATURE (°C) (°C) BOTTOM HEAT + FAN 30–230 This is used for baking leavened but low-rising pastry and for preserving fruit and vegetables. ROASTING 30–230 In the Auto Roast mode/system, the upper heater will operate in combination with the grill heater and the round heater.
- Page 21 TIMER FUNCTIONS In the basic Pro mode you can select the Timer function. Confirm your selection by pressing the KNOB. Duration of oven operation Delayed start Setting the cooking time In this mode, you can define the duration of oven operation. Set the desired cooking time and confirm the selection (max.
- Page 22 MULTIPHASE COOKING This mode allows you to combine three consequent different manners of food preparation in one baking process. By selecting different settings you can prepare dishes exactly as you wish. In the basic Pro mode, Multiphase cooking and Steam are available.
- Page 23 By touching the START key, the oven first starts operating according to step 1. (The progress bar on the bottom of the display indicates the current step of the baking process). When a certain time expires, step 2 is activated and then step 3 if it was selected.
- Page 24 STEAM INJECTION Steam injection is recommended when cooking: − meat (towards the end of the cooking process): the meat will be juicier and softer, and basting is not required. Meat: beef, veal, pork, venison, poultry, lamb, fish, sausages; − bread and bread rolls: use steam during the first 5–10 minutes of baking. The crust will be crunchy and nicely browned;...
- Page 25 C) STEAM COOKING (Steam – quick access to steam programs) Confirm each setting by pressing the KNOB. Rotate the KNOB and select Steam. Confirm your selection by pressing the KNOB. Choose your own basic settings. Steam system 2 Oven temperature 3 Cooking duration 4 Multiphase cooking (see chapter MULTIPHASE COOKING) Use the preheat function if you wish to heat the oven to the desired temperature as...
- Page 26 SOUS VIDE (STEAM COOKING) Season the food and seal it in a plastic bag suitable for vacuum sealing and sous vide cooking. Place the sealed bag containing the food onto the perforated tray and place it on the middle oven shelf. Rotate the KNOB and select Extras in the main menu.
- Page 27 D) STORING YOUR OWN PROGRAM (MY MODE) When the cooking process is complete, the "Finish" menu will appear. Select the symbol to store your settings into the oven memory. Turn the knob and select a field with asterisks for which you will select a new recipe name.
-
Page 28: Start Of Baking
START OF BAKING Before the beginning of baking, the START/STOP key flashes. Start the baking process by briefly touching the START/STOP key. If you want to change the current settings during baking, turn the KNOB and select the setting or value. Confirm your selection. If the door is opened during the baking process, baking stops and continues once the door is closed again. -
Page 29: Selecting Additional Features
SELECTING ADDITIONAL FEATURES Turn the KNOB and select Extras in the main menu. Confirm your selection. The additional functions menu is displayed. Some functions are not available with some systems; an acoustic signal sounds in such cases. Steam cleaning (steam-clean) This program makes it easier to remove any stains from inside the oven. - Page 30 Regenerate This cooking mode can be used to reheat the food that has already been cooked. As the food is reheated with steam, it does not loose its quality. The flavour and texture are maintained as if the food was freshly cooked.
-
Page 31: Selecting General Settings
SELECTING GENERAL SETTINGS Turn the KNOB and select Settings in the main menu. Confirm your selection. By turning the KNOB you can select a topic. Confirm each selection by pressing the KNOB. General Language – select the language in which you want the text to be displayed. - Page 32 System Appliance information Factory settings Oven light during operation - illumination is turned off when you open the door during the baking process. Oven illumination The oven illumination is activated automatically when you open the door or turn on the oven. When the baking process is finished, the light stays on for about 1 minute.
- Page 33 Roasting with a meat probe (depending on the model) In this mode, set the desired temperature of the food core. The oven operates until the food core reaches the set temperature. Temperature core is measured by the temperature probe. Remove the cap (the socket is in the front upper corner of the oven right wall).
- Page 34 During cooking, the rising temperature of the core will be displayed (the desired core temperature may be adjusted during the cooking process). When the set core temperature is reached, the cooking process will stop. An acoustic signal will be heard which you may turn off by touching any key. After one minute, the acoustic signal will be switched off automatically.
-
Page 35: Maintenance & Cleaning
MAINTENANCE & CLEANING Before you start cleaning the appliance, disconnect it from the power mains and let it cool down. Cleaning and maintenance of the appliance should not be performed by children without appropriate supervision! Aluminium surfaces Aluminium surfaces should be cleaned with non-abrasive liquid detergents intended for such materials. -
Page 36: Conventional Oven Cleaning
CONVENTIONAL OVEN CLEANING You may use the standard cleaning procedure to clean stubborn dirt in the oven (using cleaners or an oven spray). After such cleaning, rinse the cleaner residues thoroughly. Clean the oven and the accessories after each use to prevent the dirt from burning into the surface. -
Page 37: Steam Cleaning Program (Steam Clean)
STEAM CLEANING PROGRAM (STEAM CLEAN) Before running the cleaning program, remove all large chunks of dirt and food residues from the oven cavity. Fill the water tank with water and set the steam cleaning program. In the main menu, select Extras and Steam clean. -
Page 38: Cleaning The Steam System
CLEANING THE STEAM SYSTEM Cleaning depends on the water hardness level. Water hardness °N Number of coloured stripes on the test strip Soft 0–3 dH 4 green stripes Slightly hard 3-7 dH 1 red stripe Medium hard 7-14 dH 2 red stripes Hard 14-21 dH 3 red stripes... -
Page 39: Cleaning The Filter Foam
CLEANING THE FILTER FOAM Any time you clean the water tank or descale the appliance, also clean the filter foam. Open the water tank cover. Remove the inlet pipe from the pipe attachment. Clean the inlet pipe with the filter foam under running water. -
Page 40: Removing And Cleaning Wire And Telescopic Extendible Guides
REMOVING AND CLEANING WIRE AND TELESCOPIC EXTENDIBLE GUIDES Only use conventional cleaners to clean the guides. Undo the screw. Remove the guides from the holes in the back wall. After cleaning, re-tighten the screws on the guides with a screwdriver. -
Page 41: Removing And Inserting The Oven Door
REMOVING AND INSERTING THE OVEN DOOR First, fully open the door (as far as it will go). Slightly lift the two retainers and pull towards you. Slowly close the door to a 45-degree angle (relative to the position of the fully closed door);... - Page 42 SOFT DOOR OPENING (depending on the model) Oven door is fitted with a system that dampens the door opening force, starting at the 75-degree angle. SOFT DOOR CLOSING (depending on the model) Oven door is fitted with a system that dampens the door closing force, starting at the 75-degree angle.
-
Page 43: Removing And Inserting The Oven Door Glass Pane
REMOVING AND INSERTING THE OVEN DOOR GLASS PANE (depending on the model) Oven door glass pane can be cleaned from the inside, but the door must be removed first. Remove the oven door (see chapter REMOVING AND REPLACING THE OVEN DOOR). Slightly lift the brackets on the left and right side of the door upwards (to marker 1 on the bracket) and pull this away... -
Page 44: Replacing The Bulb
REPLACING THE BULB The bulb is a consumable and therefore not covered by warranty. Before changing the bulb, remove the trays, the grid, and the guides. Use a Phillips (cross) screwdriver. (Halogen lamp: G9, 230 V, 25 W) Remove the four screws from the cover panel. -
Page 45: Troubleshooting Table
TROUBLESHOOTING TABLE Problem/error Solution There is no response of Disconnect the appliance from the power mains for a few the sensors; the display is minutes (undo the fuse or switch off the main switch); frozen. then, reconnect the appliance and switch it on. Call a service technician. -
Page 46: Disposal
DISPOSAL Packaging is made of environmentally friendly materials that can be recycled, disposed of, or destroyed without any hazard to the environment. To this end, packaging materials are labelled appropriately. The symbol on the product or its packaging indicates that the product should not be treated as normal household waste. - Page 48 The appliance rating label is located on the inside of the appliance. When contacting the service department, have the complete type number to hand. You will find the addresses and phone numbers of the service organisation on the guarantee card. en (05-19)
Need help?
Do you have a question about the OVS826RVS and is the answer not in the manual?
Questions and answers