Advertisement
Quick Links
Advertisement

Related Manuals for EBA 721-06 LT


Summary of Contents for EBA 721-06 LT
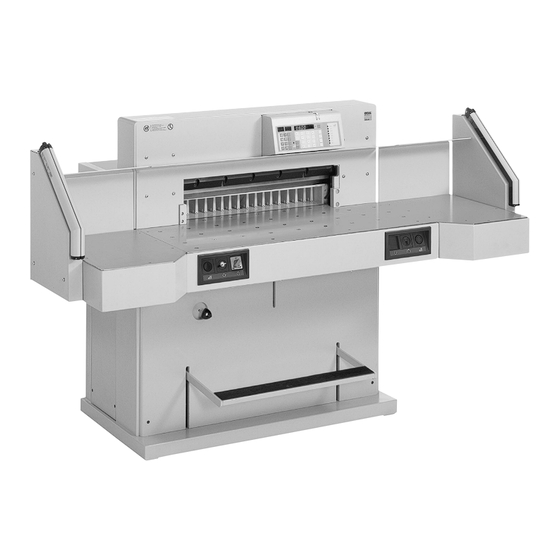
- Page 1 Guillotines GB Operating Instructions EBA 721-06 LT...
- Page 2 • • Ìåðû ïðåäîñòîðîæíîñòè Środki bezpieczeństwa EBA 721-06 LT Bitte lesen Sie vor Inbetriebnahme der Maschine unbedingt diese Betriebsanleitung und beachten Sie die Sicherheitshinweise. Die Betriebsanleitung muss jederzeit verfügbar sein. Please read these operating instructions before putting the machine into operation and observe the safety precautions.
- Page 3 • • • Sicherheitshinweise Safety precautions • • • Consignes de sécurité Veiligheidsvoorschriften • • • Misure di Sicurezza Normas de Seguridad • • • • Säkerhetsföreskrifter Turvallisuusohjeita Sikkerhetsforskriftene • • • Ìåðû ïðåäîñòîðîæíîñòè Środki bezpieczeństwa Keine Bedienung durch Kinder! GB Children must not operate the machine! Pas d‘utilisation par un enfant! Geen bediening door kinderen!
- Page 4 Turvallisuusohjeita Sikkerhetsforskriftene • • • Ìåðû ïðåäîñòîðîæíîñòè Środki bezpieczeństwa EBA 721-06 LT Messer nie lose liegen lassen! Messer nur mit Messerwechselvorrichtung oder im Messertransportkasten befördern! (siehe Seite 29 und 31). Warnung! Verletzungsgefahr! GB Never leave the blade unattended! Do not extract or transport the blade without protection! (See page 29 and 31).
- Page 5 • • • Sicherheitshinweise Safety precautions • • • Consignes de sécurité Veiligheidsvoorschriften • • • Misure di Sicurezza Normas de Seguridad • • • • Säkerhetsföreskrifter Turvallisuusohjeita Sikkerhetsforskriftene • • • Ìåðû ïðåäîñòîðîæíîñòè Środki bezpieczeństwa DK Knivbladet må aldrig efterlades uden opsyn. Forsøg ikke at afmontere eller transportere knivbladet uden beskyttelse! (Se side 29 og 31) FARE! Risiko for legemlig beskadigelse.
- Page 6 • • • Ìåðû ïðåäîñòîðîæíîñòè Środki bezpieczeństwa EBA 721-06 LT Keine harten und splitternden Materialien schneiden! GB Do not cut hard materials or materials which may splinter! La coupe de matériaux trop durs ou risquant des projections est interdite !
- Page 7 • • Safety precautions The machine is designed for cutting stacks of paper to a specified size. This machine is constructed for "one-man operation" only! Disconnect from the mains before starting any service work or before removing the panels! Replacement of blade and cutting stick may be performed only when the main switch is switched off! - 7 -...
- Page 8 • • Safety precautions EBA 721-06 LT All components which may endanger the operator are covered by a guard (A). Do not operate the machine without the following safety devices: • Panels, tightly screwed (A). • Safety beam guard (B).
- Page 9 • • Safety precautions Protect mains cable against heat, oil and sharp edges! Standard machines are factory-set as follows: • Voltage 400 V (220 V) 3 phase • Frequency 50 Hz (60 Hz). Machine does not function • Is the machine switched on? •...
- Page 10 • • Safety precautions EBA 721-06 LT Ensure free access to mains! When not in use for a longer period switch off. (Main switch to "0"). - 10 -...
- Page 11 • Installation • The machine is delivered ready for operation. 6 strong people are required to lift the machine from the pallet. Side tables, left and right, (A) are available as accessories. Attach the side tables to the front table so that the upper surface is level.
- Page 12 • Installation • EBA 721-06 LT Plug into socket. - 12 -...
- Page 13 • Operation • It is forbidden to operate the machine if the operating and safety instructions have not been understood. Please check the safety devices are functioning and complete before use. • All covers have to be mounted (A). • Safety beam guard must be mounted (B).
- Page 14 • Operation • EBA 721-06 LT Position the main switch to "I" (A). Insert the key for the control system and turn it to the right (B). Press button (D) machine will automatically go to 72 cm or 28,346 inches.
- Page 15 • Operation • Optical cutting line indicator: Optical cutting red line (A), indicates the position of the cut. Blade cuts on the front edge (B) of the light beam. Mechanical cutting line indicator: The clamp (C) can be used as cutting line indicator for cutting.
- Page 16 • Operation • EBA 721-06 LT False clamp plate: A clamp plate (A) is fitted to the machine to prevent pressure marks on sensitive material. illuminates. To dismount: • Remove the clamp plate (A) by turning the screwdriver (found in tool box) in the space between the clamp and clamp plate.
- Page 17 • Operation • The clamp moves automatically when cutting is activated. The paper can be pressed in advance, with the foot pedal. Cutting is activated by pressing both buttons (A) on the front table. Symbols for cutting activation: Cutting sequence with automatic clamping. Cutting activation: Press both buttons of the two-handed control system (A) simultaneously and keep them...
- Page 18 • Operation • EBA 721-06 LT Operating elements - Safety two-handed control system pre-clamping and cutting - Backgauge control - Backgauge - Key switch - Main switch - Side lay left and right - Clamp pressure adjustment - Foot pedal...
- Page 19 • Operation • Start machine • Main switch to position "I", insert the key for the control panel and turn it to the right. • Press button backgauge moves to the rear and searches for the reference position, wait until a measurement is shown in the display (72 cm or 28,346 inches).
- Page 20 • Operation • EBA 721-06 LT Eject function If button is pressed the backgauge will advance to the preset measurement, ejecting the material to be cut, then automatically return to the position shown on the display. Adjust the eject-dimension •...
- Page 21 • Operation • Programming This control system enables you to store 99 programs with 99 programmable steps. One step represents one measurement or max. 9 multiple cuts. After entering the program numbers you are able to change between several program steps with the button Program on display = program number.
- Page 22 • Operation • EBA 721-06 LT Entering a program • Press appears on the display. • Enter program number The number will be shown on the display • If measurement is shown on the display program is reserved. • Enter a measurement or advance with the hand-wheel •...
- Page 23 • Operation • Multiple cut program • Press until the multiple cut size is reached usw. max. 9 mal). • Enter multiple cut size. • Store the dimension. g g g g g Example of a program with multiple cut •...
- Page 24 • Operation • EBA 721-06 LT Delete a step • Choose a step number with button • Press button twice. Delete a program • Enter program number • Press button twice. Changing the basic settings Frequently used dimensions are stored in the control system.
- Page 25 • Operation • Working with programs • Press appears on the display. • Enter program number. • Press button dimension is approached. • Insert paper and move by means of the paper knock-up block to the backgauge side lay on the left •...
- Page 26 • • Blade and cutting stick replacement EBA 721-06 LT If the cutting quality decreases: • Check the cutting depth (see page 34). • Check the cutting stick (see page 30). • Replace or grind the blade (see page 26 - 34).
- Page 27 • • Blade and cutting stick replacement Turn the blade depth adjustment (A) to the top until it stops. (Spanner found in tool set (C). Remove spanner Danger! Risk of injury Lower the blade by pressing both cutting buttons (1.). Keep one button pressed and turn off the main switch (2.).
- Page 28 • • Blade and cutting stick replacement EBA 721-06 LT The 3 eccentrics are now exposed and should be turned counter clockwise to position "0" with the special wrench and attachable extension pipe (A) (in the tool set). The slot must correspond to position "0"...
- Page 29 • • Blade and cutting stick replacement Position the main switch to "0" (1.) Remove the 2 blade screws on the elongated holes (2.). Then put the blade changing tool (A) into place and fasten it to the blade (3.). Remove 4 blade screws (1.) Loosen the grips (2.) of the blade changing tool (A) lightly and allow the blade to be taken...
- Page 30 • • Blade and cutting stick replacement EBA 721-06 LT Take out the cutting stick with a small screw- driver. If needed the cutting stick can be turned or exchanged. (The cutting stick can be used eight times). Replacing the cutting stick (not the blade) •...
- Page 31 • • Blade and cutting stick replacement Take the exchange blade carefully out of the blade box and screw it to the blade changing tool (A) • Make sure there is a space ot 10 mm or 0.39 inches! (B). •...
- Page 32 • • Blade and cutting stick replacement EBA 721-06 LT Lightly tighten 4 of the 6 blade screws with washers (1.). Remove the blade changing tool (A) (2.). Lightly tighten the remaining blade screws with washers (3.). Remove all tools and distribute paper along the entire cutting length (1.).
- Page 33 • • Blade and cutting stick replacement Lower the blade by pressing both cutting buttons (1.). Keep one button pressed and turn off the main switch (2.). With the special wrench (A) the 3 eccentrics should be screwed down until the paper is cut along the entire length of the blade (3.) (The blade must remain parallel, not too deep into cutting stick).
- Page 34 • • Blade and cutting stick replacement EBA 721-06 LT Turn main switch to position "I" (1.). Blade will return to upper position. Tighten 6 blade screws (2.) firmly. Paper cutting test. If the last sheet or several sheets are not completely cut, gradually turn...
- Page 35 • • Maintenance and cleaning Danger! • Maintenance work may only be performed by trained staff. • Disconnect the mains before starting any service work or before removing the cover. Grease the backgauge (A) control weekly with a grease gun. Advance the backgauge as far as possible to the front.
- Page 36 • • Maintenance and cleaning EBA 721-06 LT Grease the remaining parts twice a year (see picture). The main switch must be on "0" (B). Disconnect from the mains. Remove the front upper housing (E) taking care of the cable.
- Page 37 • • Possible malfuntions Machine does not function! Is the machine plugged in? Main switch to position "I"? (A) Control system activated? (B) (Turn key to the right) Check the units fuse and the on-site circuit breaker! Release a cut see page 17. - 37 -...
- Page 38 • • Possible malfuntions EBA 721-06 LT The machine does not funktion after being moved to another position. If the machine still does not function then the rotation must be reversed. The machine is wired according to the IEC standards. We recommend that alterations to the rotary direction be made in the socket.
- Page 39 • • Possible malfuntions Machine turns off: • Machine overloaded. Safety button (A) ejects. Reset the safety button (A). • Machine blocked. • Blade is blunt. Eliminate the cause, and push the safety button (A). • Backgauge blocked Safety button (B) ejects. Eliminate the cause, and push the safety button (B).
- Page 40 • • Possible malfuntions EBA 721-06 LT Does not cut through the last sheet: • Turn or turn around the cutting stick (A), readjust the blade by means of blade depth adjustment (B) (see page 34). Poor cutting quality or blade stays in the paper stack.
- Page 41 Possible malfuntions Motor runs but blade does not move downwards. • Security brake has been activated! Inform the Service Team! • www.eba.de "Service" service@krug-priester.com Display illumination off • Is the machine plugged in? (A) • Is the main switch on position "I"? (B) •...
- Page 42 • • Possible malfuntions EBA 721-06 LT No clamp pressure. • Hydraulic oil needs refilling. Contact your dealer. Trouble shooting-light beam Sender Receiver • During normal operation the LED (A) must iluminate orange and LED (B) green. • Display (C) is permanently on orange when the sender and/or receiver require cleaning.
- Page 43 • • Possible malfuntions None of the above mentioned methods helped to solve the problem: Contact Service Team under • www.eba.de "Service" service@krug-priester.com - 43 -...
- Page 44 • • Accessories EBA 721-06 LT Recommended accessories: HSS - Blade • Nr. 9000 141 Cutting stick (6 pieces) • Nr. 9000 039 Blade changing tool • Nr. 9000 514 Paper knock-up block • Nr. 9000 521 Grease gun •...
- Page 45 • • Technical data Technical data: • Power supply: 400V/50Hz/3~, 230V/60Hz/3~ • Cutting length: 720 mm • Cutting height: 80 mm • Table depth: 720 mm • Sound level EN 13023: 72 dB (A) • Minimum space requirement (width x depth x height) 1305/2100 mm x 1500/1600 mm x 1355 mm...
- Page 46 • • Technical data EBA 721-06 LT This machine is approved by independent safety laboratories and is in compliance with the EC-regulations 98/37/EG, 2006/95/EG and 2004/108/EG. Sound level information: The sound level is 72 db (A) as defined by EN 13023.
- Page 47 - Si dichiara che il modello della - Por la presente, declaramos que la - ÄÀÍÍÛÌ ÏÎÄÒÂÅÐÆÄÀÅÌ, ×ÒÎ 721-06 LT - folgenden einschlägigen Bestimmungen entspricht - complies with the following provisons applying to it - sont conformes aux dispositions pertinentes suivantes - voldoet aan de eisen van de in het vervolg genoemde bepalingen - è...
- Page 48 EBA • Made in Germany Document Shredders Guillotines • • • • • EBA Krug & Priester 72336 Balingen Germany www.eba.de...
Need help?
Do you have a question about the 721-06 LT and is the answer not in the manual?
Questions and answers