Table of Contents
Advertisement
Advertisement
Table of Contents

Related Manuals for Electrolux EBA60010X


Summary of Contents for Electrolux EBA60010X
-
Page 1: User Manual
user manual Espresso coffee machine EBA 60010 X... -
Page 3: Table Of Contents
CONTENTS Description of the coffee machine Description of the control panel: touch control Safety instructions Instructions for the first use of the machine Accessories Drawer Making Coffee Hot water Steam 10. Programming the quantity of ground coffee 11. Programming the quantity of coffee poured in the cup 12. -
Page 4: Description Of The Coffee Machine
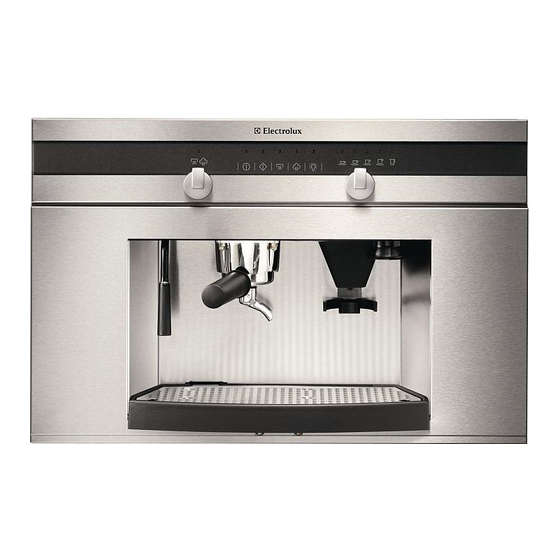
1. DESCRIPTION OF THE COFFEE MACHINE 1. Filter holder ring nut 2. Steam/water nozzle 3. Coffee press 4. Coffee Grinder button 5. Coffee measuring device 6. Grinding regolation knob 7. Coffee beans container 8. Water reservoir 9. Drip tray 10. Brita filter 11. -
Page 5: Description Of The Control Panel: Touch Control
2. DESCRIPTION OF THE CONTROL PANEL: Water temperature indicator ON/stand-by indicator Coffee indicator Water indicator Steam indicator Light indicator LEDs of coffee measures (Small coffee, large coffee, 2 small cups of strong coffee, 2 large cups of weak coffee) Water refill indicator Steam/water knob 10. -
Page 6: Intended Use
3. SAFETY Please read this instruction book before using thè appliance and retain for future reference. These warnings are provided in the interests of your safety, ensure you understand them fully before using the appliance. Intended use • The appliance is intended for use in the home. If the appliance is used for purposes other than those intended or used incorrectiy, no liability can be accepted by thè... - Page 7 FOR INSTALLATION AND SERVICING Keep this instruction manual together with the machine for any future reference. If the machine is sold or transferred to another person, make sure that this instruction manual is given to the new user, so that he/she become familiar recommendations given.
-
Page 8: Instructions For The First Use Of The Machine
The symbol on the product or on its packaging indicates that this product may not be treated as household waste. Instead it shall be handed over to the applicable collection point for the recycling of electrical and electronic equipment. By ensuring this product is disposed of correctly, you will help prevent potential negative consequences for the environment and human health, which could otherwise be caused by inappropriate waste handling of this product. - Page 9 Hardness of water: • Before filling up the water reservo make sure that the decalcifying Brita filt has been soaked in cold water for at lea 30 min. Follow the instructions printed on the filter package. After this operation insert the filter into position inside th water reservoir as it is shown in t figure.
- Page 10 • nsure the mains ON/OFF switch(at rear) is • push the machine back into the housing ntill a “CLICK” can be heard. This indicate that the machine has been locked in position. FILLING UP THE CONTAINER WITH COFFEE BEANS • Press the unlocking levers available under the drip tray and pull the machine as it is shown in the figure.
- Page 11 • Pour approximately 200 g of coffee beans into the container on the top as shown in the figure. • ush the machine back into the housing untill “CLICK” can be heard. This indicate that the machine has been locked in position. WATER REFILL INDICATOR CONTR •...
- Page 12 • Ensuring the water reservoir is full, turn the steam/water knob anti clockwise as shown above. • Switch the coffee machine on by pressing the on-off/stand-by control pressed until the red LED stops flashing and remains lit. This indicates the opera condition of the machine (flashing: STAND-BY;...
- Page 13 • When the water is flowing close the steam/water knob by turning clockwise. (if necessary, repeat the process several times) • When the water temperature light goes out, the machine has reached the correct temperature and it is ready to make coffee. Only the on-off indicator are now lit. RESETTING STANDARD VALUES •...
- Page 14 • All the LEDs will briefly illuminate to indicate the factory values have been reset. .B.: The standard values only concern the quantity of water required for each cup of coffee. Then the measures of ground coffee will not vary. CAUTION –...
- Page 15 • Pull the coffeee machine forward from it’s hausing by sliding it along it’s telescopic runners . • Turning the proper adjusting knob (A-10) will adjust texttureTurning clockwise direction will lead to a fine texture for a stronger coffee. Turning the knob anti-clockwise will lead to a coarse texture for a weaker coffee.
-
Page 16: Accessories
• Once powered and inserted into the cabinet, the machine is in stand-by mode: this will be signaled by the on/off LED blinking. • Keep the on/off button pressed as it is shown in the figure. • As soon as the machine is ready to operate, the LED will be kept on as it is shown in the figure. - Page 17 7. COFFEE • Turn the knob (B-19) to the desired coffee measure. • Turning in a clockwise direction will select the programme immediately on the right of that previously selected chosen before; on the contrary turning anticlockwise will select the programme immediately on the left. USING COFFEE BEANS...
- Page 18 • Insert the filter holder under the coffee measuring pressing the button briefly. The programmed quantity of ground coffee will automatically dispended into the filter. • When the filter has been filled with the desired quantity, press the ground coffee firmly against the press as shown.
- Page 19 • Lock filter holder turning the handle from left to right. • If preparing espresso use the special cup rack inserting it’s feet into the four holes in the drip tray. • Ensure this is stable • Position the cup/s under the nozzle and make sure that the red LED of water temperature is out, or wait until it goes out.
- Page 20 • Press the coffee control as shown coffee will be dispensed into the cup(s) Remove the filter holder from the ring nut and dispose of the used coffee making care as the filter will be hot. • When the two-cup nozzle is used, the two cups od coffee are not always filled at the same level.
- Page 21 • This machine is also designed to operate with coffee pods, these are single portions of roasted coffee • Procede as with ground coffee. After coffee has been made, remove the filter holder from the locking nut and dispose of the used pod. HOW TO PREPARE AN EXCELLENT ESPRESSO •...
-
Page 22: Hot Water
8. HOT WATER • The steam/water pipe can be moved to the back of the cabinet when not in use Use to allow easy access to the filter holder ring nut. Pull forward when required. Do not touch when not •... -
Page 23: Steam
• Close the steam/water knob again. 9. STEAM • Press the steam control once. Both the steam and water temperature indicators are lit. Wait until both these indicators go out. • Pressing the steam control again. If the water temperature indicator is unlit, steam is ready to be dispensed. - Page 24 • Place a jug with the liquid to be heated under the steam nozzle and turn the steam knob in anticlockwise as shawn. • Move the jug around the nozzle, ensuring effective heat distribution troughtout the liquid. Then close the steam knob by turnig clockwise,as shown. •...
-
Page 25: Programming The Quantity Of Ground Coffee
10. PROGRAMMING THE QUANTITY OF GROUND COFFEE • This espresso machine has already been calibrated in factory to dispense the ideal measure of ground coffee for one cup of espresso. • However this quantity of ground coffee can be increased or reduced, then the selected measure is stored. -
Page 26: Programming The Quantity Of Coffee Poured In The Cup
11. PROGRAMMING THE QUANTITY OF COFFEE POURED IN THE CUP • The quantity of coffee can be adjusted as desired. Select the coffee programme required by touring the knob as shown. Grind a measure of coffee in the filter holder. Insert the filter holder in the ring nut, then put one or two cups under the filter holder according to the programme selected. -
Page 27: Programming The Quantity Of Hot Water
• When the desired quantity of coffee has been dispensed press the control again and the coffee measure will be stored automatically. 12. PROGRAMMING THE QUANTITY OF HOT WATER • Place a jug under the steam/water nozzle and turn the steam/water knob anticlockwise, as shown. - Page 28 • Release the control when the water starts to flow; then, once the desired quantity of water is obteined press the control again and this measure will be stored automatically. • Then close the steam/water knob again by turning anticlockwise. 13.
- Page 29 VIENNESE CAPPUCCINO This variation is the result of the age-old Austrian tradition. Prepare a 'weak' espresso on the machine for 30-35 seconds, then add hot milk topped by whipped cream. Serve in a medium-sized cup (midway between an espresso cup and a cappuccino cup).
-
Page 30: Cleaning
14. CLEANING • Clean the stainless stell parts of the machine with a soft cloth without using aggressive detergents. Never use any abrasive sponges nor steel wool to clean the parts of steel. Dry well with a soft cloth. • Remove the drip tray from the machine as it is shown in the figures above. - Page 31 FILTER – FILTER-HOLDER – LOCKING NUT • Always keep filt ers, filter-holder and locking nut clean. Any coffee the taste of the next cups of coffee. Wash filters and filter holder in dishwasher every month. • The steam nozzle should be periodically cleaned. After Preparing milk for cappuccinos etc.
-
Page 32: Installation
• Fill up the water reservoir with 1.5 litres of water adding half a glass of vinegar or citric acid. • Carry out t he same operations as preparing some cups of coffee (refer to the previous Chapter “Coffee”), but without ground coffee or pods, so that only water will flow out of the filter holder until the reservoir is completely empty. - Page 33 • Fix the power cable onto the left side of the cabinet using one of the self-threading screws equipment and the proper cable clamp as it is shown in the figure. • Unscrew the cable clamp available on the machine. •...
- Page 34 • Connect the power cable as it is shown figure. machine is designed for a single phase voltage of 230V The power supply requires only outlets of 13 A fuse and a duble pole isolation switc with at least 3 mm between contacts.
- Page 35 • Fix the U base plate inserti self-threading screws into the 4 front holes of the same plate. Then scruw the telescopic runners to each side with the remaning 8 self-threading screw. • Insert machine housing by coupling the machine to those runners fixed to the sides of the carcass.
-
Page 36: What To Do If
• Slide the machine into the cabinet untill the “click” indicates that it is locked into Position. 6. WHAT TO DO IF... this machine does not work, please make sure that the fault is not due to: no power no water in the reservoir. -
Page 37: Technical Specifications
17. TECHNICAL SPECIFICATIONS s regards the general dimensions of the machine, please see the fig. D • Width • Depth • Height • Capacity of water reservoir • Net weight • Gross weight • Supply voltage • Rated power • Power absorbed by the h •... -
Page 38: After-Sales Service, Spare Parts And Guarantee
We, Electrolu x, undertake that if within 12 months of the date of the purchase this Electrolux appliance or any part thereof is proved to be defective by reason only of faulty workmanship or materials, we will, at our option repa... - Page 39 (*) Calls may be recorde European Guarantee his appliance is guaranteed by Electrolux in each of the countries listed at the back of this user manual, for the period specified in the appliance guarantee or otherwise by law. If you move from one of these countries to another of the countries listed below th appliance guarantee will move with you subject to the following qualifications: •...
- Page 40 within your new country of residence. he provisions of this European Guarantee do not affect any of the rights granted to you by law. www.elect rolux.com...
- Page 44 www.electrolux.com...
Need help?
Do you have a question about the EBA60010X and is the answer not in the manual?
Questions and answers