Table of Contents
Advertisement
Quick Links
Advertisement
Table of Contents

Related Manuals for Diamond MIKA/2-MC


Summary of Contents for Diamond MIKA/2-MC
- Page 1 01/2018 Mod: MIKA/2-MC Production code: MECA-FRYER 2B...
- Page 2 MANUAL FRYERS MECA FRYER...
-
Page 3: Table Of Contents
INDEX CHAPTER DESCRIPTION PAGE General instructions ..........................04 Technical data ........................... 05 1.1.A Bruxelloise Gas Fryers Series 1P, 2P, 3P, 4P, 1PV, 2PV, 3PV, 4PV ..........05 Technical characteristics ........................05 Installation instructions ........................06 Data plate for Belgium ........................06 Compliance with laws and regulations .................... -
Page 4: General Instructions
GENERAL INSTRUCTIONS • Please read the instructions in this user manual carefully; they provide important information for safe installa- tion, use and maintenance of the appliance. • Store this manual safely and within easy reach for future reference. • After unpacking, check the integrity of the unit. In case of doubt, do not operate the unit and call qualified service per- sonnel. -
Page 5: Technical Data
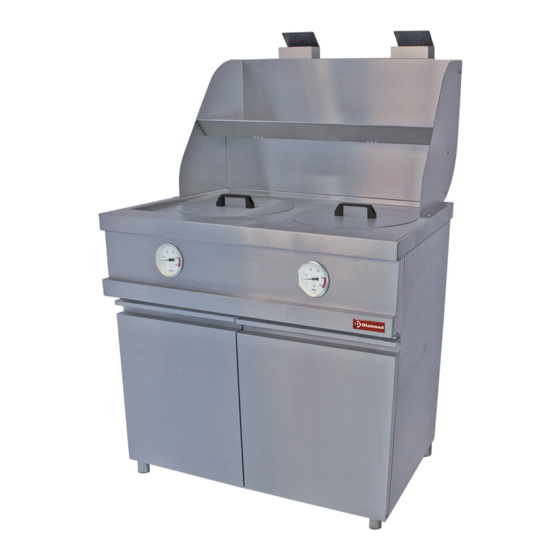
1. TECHNICAL DATA Bruxelloise Gas Fryers Series MODEL B/1P - E/1P B/2P - E/2P B/3P - E/3P Size Type Width 1445 Depth Height Total height 1320 1320 1320 Net weight Swing doors Frying tank Electronic control option Built-in fume hood option Number of tanks Tank Ø... -
Page 6: Installation Instructions
2. INSTALLATION INSTRUCTIONS The unit’s installation and modification for use with other types of gas, as relevant, must be performed by a qua- lified installation technician in accordance with the laws in force. Please refer to the technical data Table II. WARNING ! If the unit is installed against a wall, this wall must withstand temperatures of 80°C and must be made of non-flammable materials. -
Page 7: Installation Place
Installation place - The unit should be installed in a properly ventilated space; it requires an air intake of at least 2 m3/h .kW of thermal capacity. - The unit should be installed in compliance with the safety regulations applicable in the country of installation. Positioning - This unit may be installed individually or mounted together with other units from the same range of products. -
Page 8: Gas Units Type A1
Gas units type A1 These units are not designed to be fitted to a natural flue exhaust outlet. The gas unit should be installed under a standard-compliant draft hood, as it requires an intake of at least 2 m3/h . kW of thermal capacity. -
Page 9: Adjusting The Settings
2.12 Adjusting the settings After all the connections have been made, the unit’s settings can be adjusted. Important: first, make sure that there are no leaks at the joints. 1. Calibrating the burners is limited to the injector, if it not intended for the type of gas that you will use. If the utilised gas is different from the type indicated on the data plate (see p. - Page 10 TABLE 1 : Gas Pressure Values and Categories in Various Countries – per Standard EN 437 (05-’94) Gas type DRUK mbar COUNTRY AND TYPE OF APPLIANCE Switzerland Great Britain - Spain Denmark - Finland Germany Nominal Belgium Austria Czech Republic Portugal - Ireland Norway - Sweden France...
-
Page 11: Conversion For Operation With A Different Type Of Gas
3. CONVERSION FOR OPERATION WITH A DIFFERENT TYPE OF GAS Shut the gas valve upstream of the unit Replacing the nozzle of the main burner - Open the cabinet door and remove the oil containers. - Press the primary air regulator into the venturi tube. - Using a 12 mm spanner, unscrew the nozzle and replace it with a suitable one for the selected gas type, as indicated in Table 2 (p10). -
Page 12: User Instructions
4. USER INSTRUCTIONS Foreword Before starting the unit, carefully wash the tank and the baskets, proceeding as follows : - Fill up the tank with water and detergent. Switch on the unit and bring to a boil. Let the water boil for a few minutes. Drain off the water through the drain cock and rinse the tank thoroughly with clean water. -
Page 13: Turning The Unit Off
Turning the unit off - Turn the thermostat controller to « » - Turn off the main switch. - Turn the gas knob clockwise until reaching “O”. - Leave the ventilation system on for another 10 minutes, then place the lids back on the tanks. Upkeep recommendations To make full use of your fryer, we recommend taking the following precautions: - Do not use metal items or abrasive products for cleaning. -
Page 14: Troubleshooting
Troubleshooting - Everything looks fine, but I get no gas : Is your ventilation system on? Don’t forget to turn it on. NEVER ATTEMPT TO DISMANTLE OR REPAIR THE APPLIANCE YOURSELF! DANGER OF DEATH ! - The pilot burner does not ignite : Is the ignition spark adequate? If not, check whether the ignition cable has become disconnected. -
Page 15: Upkeep And Cleaning
5. UPKEEP AND CLEANING - Clean all the stainless steel components on a daily basis using lukewarm soapy water. Rinse with plenty of water and dry thoroughly. - Never clean stainless steel components using abrasive sponges or steel scrapers; they can damage the plating causing it to oxidise. -
Page 16: View And List Of Pieces
6. VIEW AND LIST OF PIECES 6.1.1 Mechanical fryers... -
Page 17: Recommended Spare Parts List (Mecafryer)
6.1.2 Recommended spare parts list (MecaFRYER) NUMBER INTERNAL CODE 1TANK INTERNAL CODE 2 TANKS INTERNAL ÒÒCODE 3 TANKS DENOMINATION O9015 O9016 O9017 tablette inférieure O9070 O9070 O9070 joue gauche O9070 O9070 O9070 joue droite G139 G139 G139 aimant circulaire XPIED/04 XPIED/04 XPIED/04 pied...
Need help?
Do you have a question about the MIKA/2-MC and is the answer not in the manual?
Questions and answers