Bluetti AC200MAX - Portable Power Station Manual
- User manual (56 pages) ,
- User manual (27 pages) ,
- User manual (17 pages)
Advertisement
- 1 BRIEF INTRODUCTION
- 2 ABBREVIATION
- 3 SAFETY INSTRUCTION
- 4 BLUETTI APP
- 5 IN THE BOX
- 6 FEATURES
- 7 LET'S GET STARTED
- 8 TOUCHSCREEN
- 9 TOUCHSCREEN OPERATION
- 10 CHARGING
- 11 DISCHARGING
- 12 APPLICATION SCENARIO
- 13 EXAMPLES OF LOADS
- 14 AC200MAX + B230 CONNECTION
- 15 ESTIMATION OF OPERATING TIME
- 16 TECHNICAL SPECIFICATIONS
- 17 TROUBLE SHOOTINGS
- 18 FAQ (Frequently Asked Questions)
- 19 DECLARATION
- 20 Documents / Resources
BRIEF INTRODUCTION
For I/O capability, the AC200MAX features higher continuous output power at 2,200W from its pure sine wave inverter, 100W PD3.0 USB-C port, upgraded MPPT controller which now handles up to 900W solar input, and built-in 30A NEMA TT-30 outlet designed for RV crowds especially.
Most significantly, considering customers' feedback, comments, and product upgrade need, the BLUETTI AC200MAX now supports Bluetooth connection and the new BLUETTI Smartphone App (iOS & Android) remote control.
Furthermore, the AC200MAX also supports up to 2 expandable battery packs, using either the BLUETTI B230 or B300. With 2 BLUETTI B300, the capacity of AC200MAX then will expand to a massive 8192Wh to run your every essential needs at home or on the go for hours, days, or even more than a week!
ABBREVIATION
- BMS: Battery Management System
- MPPT: Maximum Power Point Tracking
- SOC: State of Charge
- AC: Alternating Current
- DC: Direct Current
- PV: Solar Panel(s) Charging (Photovoltaic)
- Grid: Home Power Supplied by Utility
- T500: 500W Adapter
- DOD: Depth of Discharge
- ECO Mode: A power-saving setting for the AC200MAX. When it is on, the AC power will automatically turn off over 4 hours low load(≤50W) or no load to save power drain.
SAFETY INSTRUCTION
- DO keep the AC200MAX away from the fire and heat.
- DO operate the AC200MAX in a dry and well-ventilated place. If it gets moisturized or damp, please dry it thoroughly before use.
- DO NOT obstruct fan openings to ensure proper ventilation in use. Otherwise, permanent damage to the AC200MAX may occur.
- DO NOT move the unit while operating as vibrations and sudden impacts may lead to poor connections to the hardware inside.
- Please use the original charger and cables only designed for the AC200MAX. The company shall not be liable for damage caused by third-party equipment, which also may invalidate your warranty.
- Please carefully read the operating instructions of the electrical products to be connected. Failure to operate the electrical products properly may result in accidents or injuries.
- Please use the AC200MAX power station carefully and keep children away from it.
![]()
In case of fire, ONLY dry powder fire extinguisher works.![]()
DO NOT insert foreign objects into any ports of the AC200MAX (AC, DC, or ventilation holes). The power station generates the same potentially lethal AC power as a household wall outlet.![]()
It is hazardous for anyone other than the authorized person to carry out any service or repair operation involving replacing the internal battery or other equipment components.

BLUETTI APP
Search for 'BLUETTI' in the App Store (for iOS devices) or Google Play (for Android devices) to download the BLUETTI App to remotely control your AC200MAX.


The AC200MAX supports Bluetooth control. In order to access the AC200MAX, please launch the BLUETTI App once downloaded and installed, and tap 'Bluetooth CONNECT' to register your BLUETTI AC200MAX.

View the basic information of your AC200MAX on the phone after the unit connects with the App successfully. Press the 'gear icon' to customize the current working mode and parameters of your AC200MAX under 'Settings'.

NOTE: Please keep your phone no more than 5m/16.4ft away from the AC200MAX during the update.
IN THE BOX
Standard Accessories
| No. | Category | Quantity |
| 1 |  AC200MAX Power Station | 1 |
| 2 |  AC200MAX Portable Power Station T500 500W Adapter For AC charging | 1 |
| 3 |  PV Charging Cable (XT90 - MC4 ) For solar charging, up to 15A, 900W. | 1 |
| 4 |  Car Charging Cable (XT90 - Cigarette Lighter Port) Charge AC200MAX by car. | 1 |
| 5 |  Multi-functional Aviation Cable (XT90 - Aviation) Expand the charging methods via PV input port. | 1 |
| 6 |  AC200MAX Portable Power Station User Manual | 1 |
| 7 |  AC200MAX Portable Power Station Warranty Card | 1 |
| 8 |  Certificate of QC PASS | 1 |
Optional Accessories
| No. | Category | Type |
| 9 |  Lead-acid Battery Charging Clamp Charging AC200MAX through lead-acid battery only. DO NOT charge the lead-acid battery via this cable. | Optional Input Cable |
| 10 |  AC Input Connecter (XT90 - DC7909) Charging AC200MAX via second T500 adapter from the PV input port. | |
| 11 |  12V/30A Output Bundle (Aviation - XT60, XT60 - SPC45) Perfect for RV. | Optional Output Accessories |
| 12 |  D300S PV Step Down Module Step down the voltage of solar panels(especially rigid panels) to adapt to AC200MAX solar input limit range. D300S PV Step Down Module Step down the voltage of solar panels(especially rigid panels) to adapt to AC200MAX solar input limit range. | Optional Accessories |
| 13 |  B230 Battery Module Extra 2048Wh capacity, up to 2 B230 can be connected to AC200MAX. | Optional Accessories |
| 14 |  B300 Battery Module Extra 3072Wh capacity, up to 2 B300 can be connected to AC200MAX. | Optional Accessories |
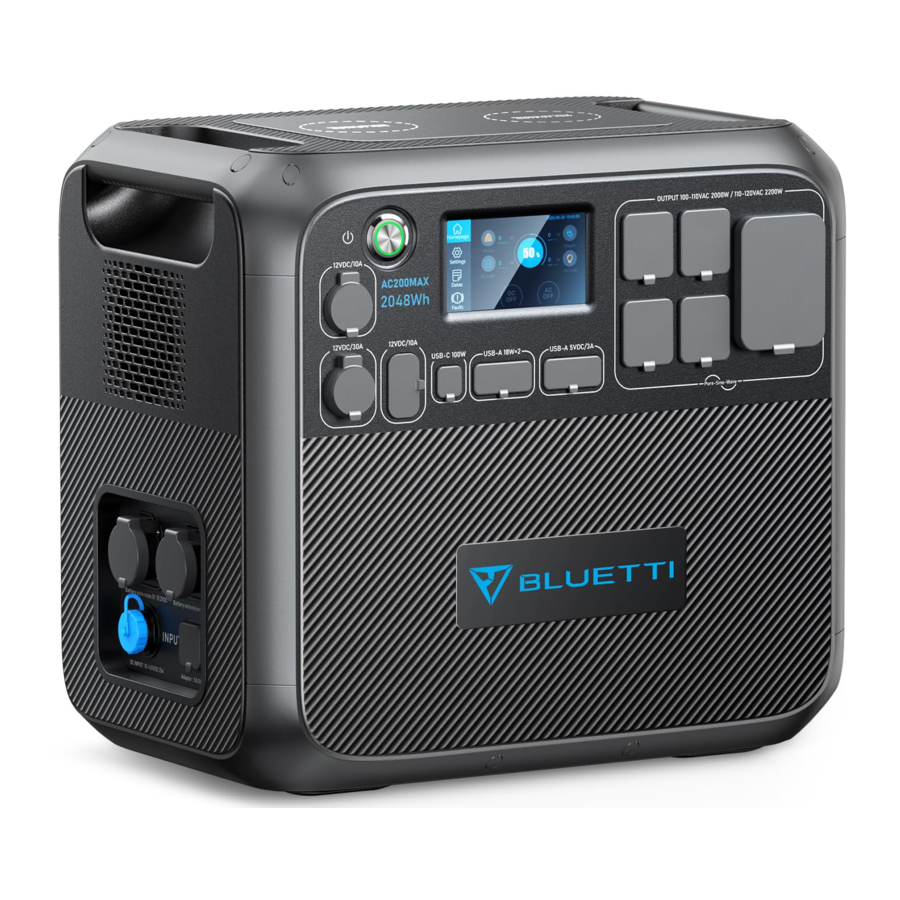
FEATURES

- Power Button
Long/Short press to turn ON/OFF the AC200MAX. - DC 12V/10A cigarette lighter port
Output port for devices with corresponding plug such as vehicle-use vacuum, refrigerator. - DC 12V/30A output
Special 30A output port adapted to most appliances, perfect for RV. - DC 5521 12V/10A output x 2pcs
Traditional ports for routers/cameras, old laptop etc. - USB-C 100W output
Output port to charge most devices at 100W Max, such as Pixel Phone, Macbook Pro. - Battery extension port x 2pcs
The port to connect AC200MAX with B230 or B300 battery pack. - DC input port
The port to connect with solar panels for solar charging, or with extra cables for car, lead-acid battery, and extra T500 adapter charging. - AC input port
Charging via T500 adapter or D050S. - Wireless charging 15W x 2pcs
Place your phone(if wireless charging supported) on the top of the AC200MAX horizontally, and turn on the DC in mainpage on screen. - Interaction LCD Touchscreen
Control the unit with finger touch. - US AC output x 5 pcs(EU/UK AC output x 4pcs)
Standard AC receptacle: wildly used in 100120V areas, generates the almost same AC power as a household wall outlet. Highvoltage area uses special sockets. - US AC TT-30
NEMA TT-30: connector which is the 120V/30A recreational vehicle standard, also known as RV 30. The TT-30 receptacle is commonly available in nearly all RV parks in the United States and Canada. - USB-A 5V/3A output x 2pcs
Classic USB-A ports. - USB-A 18W output x 2pcs
Quick charge USB-A ports.
LET'S GET STARTED

- Startup: short press the power button to turn it on; the indicator light is on.
- Shutdown: press and hold the power button for several seconds, and the indicator light will be off.
| Troubleshooting | The LED indicator lamp status |
| BMS Over-current or short circuit protection | Turn off after the indicator light flashes |
| BMS Startup timeout | The indicator light flashes and does not shut down |
| Normal startup | The indicator light on |
| Normal shutdown | The indicator light off |
- DC power switch and AC power switch are integrated into the interaction LCD screen(Homepage), press 'DC ON/OFF' or 'AC ON/OFF' button on the screen to turn on/off the DC/AC output.
TOUCHSCREEN
Interaction LCD screen(Information Vision) supports below functions:
- View real-time display of voltage, current, power, temperature, and the state of charge and discharge.
- Adjust the output voltage, frequency, charging mode, power consumption mode, and time information in the setting column.
- Operate with fingers due to resistive touchscreen.
- View fault history, BMS, DSP, ARM, HMI hardware version.
TOUCHSCREEN OPERATION
Note:
- The LCD touch screen is a resistive screen. It is recommended to lightly tap or touch the screen with fingers till it "beeps".
- To maximize the lifespan of the LCD screen, please avoid direct sunlight.
- When pressing the power button, the mainpage will display as (Homepage).

- PV/Others charging Info
- BMS Info
- Date/Time
- DC Load Info
- DC ON/OFF Switch
- AC ON/OFF Switch
- Adapter Charging Info
- AC Load Info
- Tap 'Settings' on the homepage to enter the setting section as(Figure 1).
Note: Please enter the setting section to set the date and time according to the local time zone, and check the output voltage, frequency, and other parameters for the first-time startup.

Voltage and Frequency Reference:
JP: 100V/50Hz
US: 120V/60Hz
EU: 230V/50Hz
UK: 230V/50Hz
DC Input Source: Select the right method you choose to charge AC200MAX.
ECO Mode: When it's on, the AC power will automatically turn off over 4 hours low(≤50W) or no load to save power drain.
Press the 'Next' to enter the data setting as (Figure 2):
Backlight Brightness and Sleep Time: Set the proper value as your need for power saving.
Date and Time: 2000-00-00; 00: 00: 00, make adjustments to set it right.

- Return to the Homepage, tap the 'Data' to enter the Data page as(Figure 3).
- Tap the 'product Info' to view the product model, software version, BMS version, etc.
- Tap the 'Inverter & Charger Info' to view input and output information which can also be accessed directly from the shortcut on the homepage.
- Tap the 'BMS Maintenance' to view the battery status, which can also be accessed directly from the shortcut on the Homepage.
- Tap the 'Fault History' to view all fault messages.

- Tap the 'Alarm' on the homepage to view the current error message: the fault indicator will display orange if a fault occurs.

CHARGING
- From AC wall outlet
- Turn the AC200MAX ON and connect the plug of adapter to the wall outlet, the other side to the AC input port. Charging will automatically stop when it reaches 100%(4.6-5.1Hrs).

- Turn the AC200MAX ON and connect the plug of adapter to the wall outlet, the other side to the AC input port. Charging will automatically stop when it reaches 100%(4.6-5.1Hrs).
- From the solar panels
- Connect the solar panels(in series or parallel) with Open Circuit Voltage range 10V-145V.
- Connect the solar panel to AC200MAX via the solar charging cable. (Standard Accessory 3 to Accessory 5)
- Charging: AC200MAX will be activated when the solar charging system is set up successfully.
- The max input current of solar charging: 15.2A ± 0.3A, the over-current ofsolar charging will be wasted.

- Car Charging
- Connect the AC200MAX to the cigarette lighter port of the car via the car charging cable.
- Enter the setting section as Figure 1, set DC input source to 'Others'.
- The input current of car charging requirement: 8.2A

- Generator Charging(gasoline, propane, or diesel)
- Connect the AC adapter input plug to the generator and the output to the AC charging port of AC200MAX.
- Press the power button; the product will start charging. When it gets fully charged, the charging will automatically stop.

- Lead-acid Battery Charging
- Connect the AC200MAX with a lead-acid battery via the charging cable(Accessory 9).
Note: pay attention to distinguishing the positive and negative poles of the battery. The red end indicates the positive pole. - Enter the setting section as Figure 1 to set the DC input source to 'Others' to activate lead-acid battery charging, with the max current of 8.2A.
Note: Accessory 9 is for charging the AC200MAX only. DO NOT use it for other purposes, like charging the lead-acid battery. Any injury or damage caused by failure to follow instructions will NOT be compensated.

- Connect the AC200MAX with a lead-acid battery via the charging cable(Accessory 9).
- Dual Charging
- Set the DC input source to PV to achieve AC + PV Dual Charging.
- Set the DC input source to 'Others' to achieve AC + T500/Lead-Acid Battery Charging.


(AC200MAX Dual Charging System)


DISCHARGING
- Turn on the 12V/30A, 12V/10A/, cigarette lighter, USB-A and USB-C output ports: press the power button, enter the homepage and tap the DC button and confirm.
- Turn off the DC output: tap the DC button and confirm.
- Turn on the AC output: press the power button, enter the homepage, tapthe AC button and confirm.
- Turn off AC Output: tap the AC button and confirm.
APPLICATION SCENARIO
- Outdoor
Car equipment: car fridge, car vacuum cleaner, and other car equipment; Camping equipment: garden electric tools (power tools such as blowers, lawnmowers, electric drills, electric saws), BBQ grills, LED lights, etc. - Indoor
Refrigerator, kitchen devices such as kettle, toaster, blender, coffee maker, rice cooker, laptops, phones, lighting, etc.
EXAMPLES OF LOADS
- Most electrical appliances in the market apply to the specifications of 12V/30A(XT60 or SPC45), 12V/10A, cigarette lighter, USB-A, and USB-C output ports of the AC200MAX. But still the charging of some products may activate the overload protection if it generates an instantaneous power at the moment of starting.
- The AC200MAX can power electrical products with 2200W or less rated power. Though the figure is under 2200W, overload protection will still be activated when the appliance generates a massive instantaneous start-up power. Therefore, it's recommended to apply the AC200MAX to electrical products with lower-rated power.
- If an output over-current, overload, or short circuit occurs, the AC200MAX will turn off the corresponding output port. Then it will automatically start again (at an interval of 20s). Suppose there is still an over-current, overload, or short circuit, the output port will be locked and it then needs manual troubleshooting. If the output repeatedly stops, turn the equipment off. Please get in touch with the seller or maintenance group first for professional help.
- When the battery level drops to 0%, the DC and AC output will automatically turn off, and ONLY when the battery power is recharged to more than 5%, the DC and AC output will be turned on again. Please check the battery level before using the AC/DC output to protect and enhance battery cycle life.
- This AC200MAX supports charging and discharging simultaneously, and please keep the equipment laid flat during use, charging, and discharging.
AC200MAX + B230 CONNECTION
Capacity Expansion
- AC200MAX can expand the capacity by 1-2 B230 battery pack to 4096 - 6144Wh.
- AC200MAX can expand the capacity by 1-2 B300 battery pack to 5120 - 8192Wh. Please refer to bluetti support youtube channel for detailed installation instructions.

- Battery Expansion Instruction
Hot-swappable B230/B300 Expansion Battery Modules are designed to achieve capacity backup with easy plug-on P090A Battery Expansion Cable.

- Press to turn ON/OFF the Expansion Battery Function.
- Switch to LOCK/UNLOCK the cable with AC200MAX.
- Turn On B230 or B300 battery module.


AC200MAX Capacity Extended Mode
ESTIMATION OF OPERATING TIME

2048Wh × DOD × η ÷ (load W) = charging time(unit: h)
Note: DOD is the battery discharge depth, η is the local inverter efficiency,
DOD=90%, η =90%。
TECHNICAL SPECIFICATIONS
| Model No. | AC200MAX | ||||
| Net Weight | 28.1kg (61.9lbs) | ||||
| Dimensions | 420*280*386.5mm (16.5*11.0*15.2in) | ||||
| Charge Temperature | 0-40℃ (32-104 ℉ ) | ||||
| Discharge Temperature | -20-40℃ (-4-104 ℉ ) | ||||
| Working Environment Humidity | 10-90% | ||||
| Capacity | 2048Wh (40Ah) | ||||
| Battery Type | LiFePO4 | ||||
| Standard Battery Voltage | 51.2VDC | ||||
| Category | Rated | Note | |||
| AC Output | |||||
| Power of Output | 100V | 2000W | JP | ||
| 110V | 2200W | ||||
| 120V | 2200W | US | |||
| 220-240V | 2200W | UK,EU | |||
| Over-load | 100V | 2000W<load<2500W,2min; 2500W<load, 8~10S | Error Range: ± 30W; Clear the alarm history and reboot the unit. | ||
| 110V | 2200W<load<2750W,2min; 2750W<load, 8~10S | ||||
| 120V | |||||
| 220-240V | |||||
| Surge | 4800W | 100ms | |||
| Frequency | 50/60Hz ± 0.5Hz Default @60Hz | Frequency can be tweaked to 50 or 60Hz. | |||
| Inverter Efficiency | 90% | / | |||
| Short-circuit Protection | Yes | / | |||
| Over-temperature Protection | 80℃± 2 | Recover Temp: 75℃± 2(for hardware) | |||
| AC & DC will be turned off when SOC reaches 0% | |||||
| DC Output | |||||
| Cigarette Lighter Port *1 | Voltage | 12V | Share 10A current with 2* | ||
| Current | 10A | DC5521 ports. | |||
| Over-load Power | 145W | 2s, Turn off output function. | |||
| Shortcircuit Protection | Yes | Turn off all DC output ports. | |||
| DC5521 *2 | Voltage | 12V | Share 10A current with | ||
| Current | 10A | cigarette lighter port. | |||
| Over-load Power | 145W | 2s, Turn off output function. | |||
| Shortcircuit Protection | Yes | Turn off all DC output ports. | |||
| RV *1 | Voltage | 12V | / | ||
| Current | 30A | ||||
| Over-load Power | 400W | 2s, Turn off output function. | |||
| Shortcircuit Protection | Yes | Turn off all DC output ports. | |||
Note:
| |||||
| USB-A *2 | Voltage | 5V | / | ||
| Current | 3.0A | 3A for both | |||
| Shortcircuit Protection | Yes | Recover automatically | |||
| USB-A Quick *2 | Voltage | 5-12VDC | Support QC3.0 | ||
| Current | 3A * 2 | 18W * 2, MAX | |||
| Short-circuit Protection | Yes | / | |||
| Type-C *1 | Standard | Support PD3.0 (Max.100W) | / | ||
| Specs | 5VDC,3A,15W Total | / | |||
| Short-circuit Protection | Yes | / | |||
| Wireless Charging *2 | Standard | Support QI protocol | Please place the device | ||
| Power | 5/7.5/10/15W * 2 | supporting wireless charging on the charging pad horizontally. | |||
| Solar Input | |||||
| Power of Input | 900W | / | |||
| Over-voltage | 145VDC | / | |||
| Protection MPPT Voltage Range | 10-145VDC | / | |||
| Current | 15A | / | |||
| MPPT Quantity | 1/1 | / | |||
| T500 Adapter charging (On PV input port) | 500W | / | |||
| 8A | / | ||||
| Car Charging | 11.5-14.5V | Set DC input source on screen: Others 12V Lead-acid Battery: 11.5V ± 0.2V;24V Leadacid Battery: 23V ± 0.2V | |||
| 23-29V | |||||
| 8A | |||||
| Note: PV Input, Car Charging and additional T500 shares the same Aviation Port. | |||||
| T500 AC Adapter | |||||
| Input Voltage | 100-240VAC | / | |||
| Voltage Range | 58.8V | / | |||
| Max. Charging Power | 500W | / | |||
Note:
| |||||
| BLUETTI APP(Bluetooth) | |||||
| Firmware Update | 5m/16.4ft | / | |||
| Wireless Connect | 10m/32.8ft | / | |||
TROUBLE SHOOTINGS
| Error Code | Description |
| 001 | PV Over Voltage |
| 004 | DC Output Short Circuit |
| 005 | Adapter Over Voltage |
| 006 | Adapter Low Voltage |
| 007 | Adapter Relay Error |
| 008 | Adapter Over Current |
| 010 | USB/TYPE-C/PD Over Current |
| 011 | 12V/10A Over Current |
| 012 | 12V/30A Over Current |
| 014 | DC Start Failure |
| 015 | DC Output Relay Error |
| 016 | BUS Start Failure |
| 017 | Inverter Start Failure |
| 018 | BUS Low Voltage |
| 019 | BUS High Voltage |
| 020 | Inverter Low Voltage |
| 021 | Inverter High Voltage |
| 022 | Inverter Low Frequency |
| 023 | Inverter High Frequency |
| 025 | Battery High Voltage |
| 026 | Battery Low Voltage |
| 027 | Battery Unconnected |
| 028 | Fan Error |
| 029 | NTC Error |
| 030 | Calibration Error |
| 031 | Inverter Over Load |
| 032 | Inverter Short Circuit |
| 033 | DSP Communication Error |
| 034 | BMS Communication Error |
| 035 | EEPROM Read_write Error |
| 036 | Parameters of Control Module Error |
| 041 | BMS Temperature Error |
| 042 | BMS Over Voltage |
| 043 | BMS Low Voltage |
| 044 | BMS Over Current |
| 045 | BMS Pre-charge Failure |
| 046 | BMS Output Short Circuit |
| 051 | AC Output Locked |
| 053 | USB/TYPE-C/PD Locked |
| 054 | 12V10A Locked |
| 055 | 12V30A Locked |
FAQ (Frequently Asked Questions)
- How to claim the warranty?
Please write your after-sales requirements on the warranty card and send it to the vendor. - Can the unit be upgraded?
When AC200MAX connects with BLUETTI App via Bluetooth, the firmware including ARM, DSP, HMI, and BMS can get upgraded online through OTA. - Can it charge and discharge at the same time?
Yes, it supports pass-through charging. Please keep the equipment laid flat during use, charging, and discharging. - How to store the AC200MAX?
We recommend charging the unit to 60-80% SOC every 3 - 6 months to extend the battery life.
DECLARATION
- Please note that specifications and appearance are subject to improvement without prior notice.
- The company shall not be liable for any damage caused by force majeure, such as fires, typhoons, floods, earthquakes, or the user's intentional negligence, misuse, or other abnormal conditions.
- The company shall not be liable for any accidents or damages caused by failure to follow the precautions in the instruction manual.
- This product is not suitable for relevant equipment or machines involving personal safety, such as automatic energy devices, Hi-Fi player devices, emergency medical devices, etc., or for appliances requiring demanding power reliability and security, such as aerospace equipment, trunk communication equipment, nuclear control equipment, and medical equipment. Please confirm the applicability of this product in advance.

Documents / Resources
References
Download manual
Here you can download full pdf version of manual, it may contain additional safety instructions, warranty information, FCC rules, etc.
Advertisement


Need help?
Do you have a question about the AC200MAX and is the answer not in the manual?
Questions and answers