Bose ProFlight Series 2 - Aviation Headset Manual
- Quick start manual (4 pages) ,
- Frequently asked questions manual (15 pages) ,
- Assembly instructions (2 pages)
Advertisement
- 1 WHAT'S IN THE BOX
- 2 IMPORTANCE OF PROPER FIT
- 3 HEADSET CONTROLS
- 4 ACOUSTIC NOISE CANCELLATION
- 5 OPERATION SWITCHES
- 6 MICROPHONE PLACEMENT
- 7 BATTERIES
- 8 AIRCRAFT CONNECTORS
- 9 STATUS LIGHTS
- 10 BLUETOOTH CONNECTIONS
- 11 MANAGING MULTIPLE BLUETOOTH CONNECTIONS
- 12 BLUETOOTH FUNCTIONS
- 13 CARE AND MAINTENANCE
- 14 LIMITED WARRANTY
- 15 TROUBLESHOOTING
- 16 Documents / Resources
WHAT'S IN THE BOX
CONTENTS

NOTES:
- For control module options, see later sections.
- For aircraft connector types, see later sections.
- If any part of the product is damaged, don't use it. Contact your authorized Bose dealer or Bose customer service.
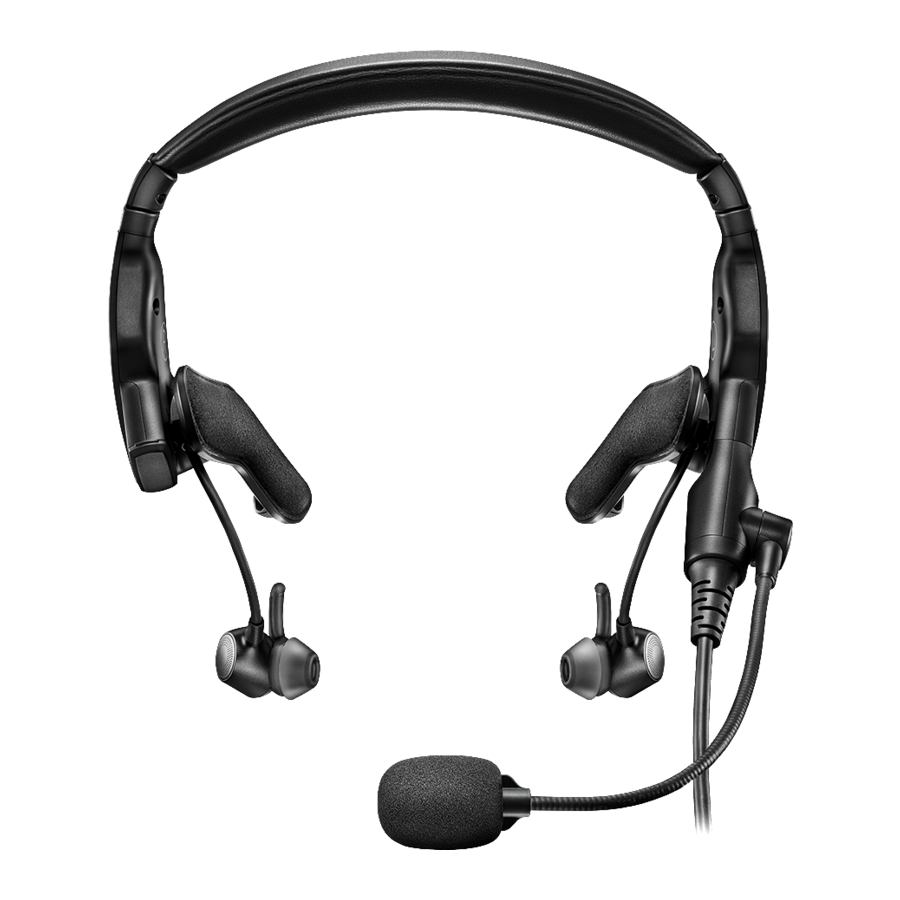
HEADSET COMPONENTS

CONTROL MODULE OPTIONS
There are two options for the control module:
- Control module with Bluetooth capability
- Conventional control module

IMPORTANCE OF PROPER FIT
FIT THE HEADBAND
Proper fit is important both for comfort and optimal noise cancellation performance.
- Using the left
![]() and right
and right ![]() icons on the headband to orient the headset properly, rotate the side pads into position.
icons on the headband to orient the headset properly, rotate the side pads into position.
![]()
- Place the headset on your head.
- Adjust the headband so the side pads rest above your ears.
![]()
 and right
  icons on the headband to orient the headset properly, rotate the side pads into position.

CHOOSE THE CORRECT STAYHEAR+ TIPS
For optimal audio performance, it is important to choose the correct size StayHear+ tip. Select the size that gives you the best comfort and fit in each ear. To determine the best fit, you may need to try all three sizes. You may need a different size for each ear.
NOTE: Without a properly fitting tip, the noise reduction and audio performance of the headset will be degraded. To test the fit, try speaking aloud wearing the headset while it's powered off. Make a low-pitched "eee" sound. Your voice should sound amplified and balanced in both ears, similar to when you plug your ears with your fingers. If not, try another tip size.
Each StayHear+ tip and earbud is marked with either an L or an R. Be sure to attach the left tip to the left earbud and the right tip to the right earbud.

FIT THE EARBUDS TO YOUR EAR
The StayHear+ tip allows the earbud to rest comfortably and securely in your ear. The tip wing fits just under your ear ridge.
- Insert the earbud so the StayHear+ tip rests gently in the opening of the ear canal.
- Tilt the earbud back and tuck the tip wing under the ear ridge until it is secure.


TIP: If the StayHear+ tips don't fit securely, choose a different size.
Single earbud use
When you want to use the headset with one earbud, you can stow the other earbud using the earbud storage hook on the back of the side pad.

CHANGE THE STAYHEAR+ TIPS
- Holding the earbud, gently grasp the attached StayHear+ tip and peel it away from the earbud.

![]()
To prevent tearing, grasp the StayHear+ tip by its base. Do NOT pull on the tip wing. - Align the opening of the new StayHear+ tip with the earbud nozzle and rotate the tip onto the nozzle. Press the base of the tip until it clicks securely into place.


ADJUST THE MICROPHONE
NOTE: By default, the reversible microphone ships from the factory attached to the left side of the headset. If you want to move the microphone to the other side of the headset, see "Microphone Placement".
- Grasp the microphone base, and adjust the boom so the microphone is level with your mouth.
![]()
Microphone placement is important for clear communication. It can rotate 300°. Do NOT force the microphone beyond the intended rotation or damage could occur.

- Position the microphone so it is 0.5" (12.7 mm) from your lips, and the white surface on the base is facing your mouth.
NOTES:- If necessary, twist the microphone base to rotate the microphone into position.
- The microphone should not be touching your lips.

- Test the headset before flight.


CONDITIONS RELATED TO FIT
In very loud conditions, such as during takeoff, you may experience a brief reduction in noise cancellation as the headset compensates for a momentary pressure change. If this continues when the sound level returns to normal, see "Acoustic Noise Cancellation". If it persists, see "Troubleshooting".
A low rumbling sound or frequent, brief losses of noise cancellation may indicate an improper fit or blocked earbud ports. See "Choose the correct StayHear+ tips" for information on proper fit or "Clean the headset" for instructions on removing blockages.
During a long flight, you may feel a slight pressure point, which can be relieved by adjusting the headband position.
SECURE CLOTHING CLIP AND CONTROL MODULE HOLDER
The cable clips and control module holder secure the cable and control module to your clothing, a safety harness, sun visor rail, or aircraft headset hook for quick and easy access.
Clothing clip
Press the side button to release and reposition the clip along the cable.

Control module holder
Pull the strap over the control module to secure it in place.

HEADSET CONTROLS
POWER ON
Press the Power button  .
.

The Power light glows amber then blinks according to the power level. See "Power light".
NOTE: The first time you power on your headset, noise cancellation is fully enabled. See "Acoustic Noise Cancellation".
POWER OFF
Press and hold for three seconds, then release.
When powered off, the headset provides passive audio communications.
ACOUSTIC NOISE CANCELLATION
Acoustic Noise Cancellation reduces unwanted noise providing a clearer, more lifelike audio performance. You can choose your noise cancellation based on your listening preferences and environment.
NOTE: When you receive a call, the headset remains at the current noise cancellation level.
ACOUSTIC NOISE CANCELLING FUNCTIONS
The Acoustic Noise Cancelling switch is located on the front of the control module.

| FUNCTION | POSITION | DESCRIPTION |
| High |  | Maximum quiet and noise cancellation across the entire spectrum. Best signal-to-noise ratio for radio and intercom communications in loud aircraft. |
| Medium |  | Consistent noise reduction across a wide range of frequencies. Best for clear and comfortable noise cancellation in typical jet aircraft. |
| Low |  | Best for improved interpersonal communication outside of the intercom. |
TAP CONTROL FOR TALK-THROUGH COMMUNICATION
When you need to focus on interpersonal communication coming from a specific direction, you can automatically set noise cancelling to Low on a single earbud by firmly double-tapping the earbud.
NOTES:
- By default, Tap Control is set to Off.
- Tap Control is available only when the Acoustic Noise Cancelling switch is in the High or Medium position.
- Make sure the Acoustic Noise Cancelling switch is in the High or Medium position.
![]()
- Set the Tap Control switch to On.
See "Change the operation switches".
![]()
- Firmly double-tap the earbud.
![]()


NOTE: Tap Control is not a touch control feature. You must firmly double-tap the earbud in order to activate the feature.
Reset Tap Control
To reset Tap Control and set noise cancelling in both earbuds to the Acoustic Noise Cancelling switch level, double-tap the earbud with Tap Control active or move the switch to another position.
OPERATION SWITCHES
OPERATION SWITCH FUNCTIONS
The operation switches are located in the control module battery compartment.
NOTE: Some operation switches are not available on all models.

| FUNCTION | POSITION | DEFAULT | DESCRIPTION |
| Reserved |  | A | Reserved for future use. |
| Auto on |  | On | Power on automatically when connected to aircraft power. NOTES:
|
| Aircraft audio |  | Normal | Set sensitivity/volume of intercom audio. NOTE:Low is -8dB. |
| Intercom |  | Mono | Process audio as mono or stereo. Available for configurations that support two-channel or stereo intercom systems only. |
| Auto off |  | On | Power off automatically after 3 to 45 minutes of inactivity. NOTES:
|
| Tap control |  | Off | Don't respond to Tap Control interaction. |
CHANGE THE OPERATION SWITCHES
- Power off the headset.
- On the back of the control module, press down firmly on the finger indent and slide the cover down.
![]()
The battery cover is tethered to the control module. Do NOT attempt to detach it.

- Remove the batteries.
- Using a pen or a small, flat-tipped screwdriver, gently move the switch.
- Insert two alkaline AA batteries, observing proper polarity.

![]()
If the batteries don't fit correctly, do NOT force them in. Forcing an improper connection will cause permanent damage to the control module. - Close the battery cover, press firmly down on the finger indent, and slide the cover into place.


MICROPHONE PLACEMENT
By default, the reversible microphone assembly ships from the factory attached to the left side of the headset, however, in some configurations it may ship separately. It can be easily attached to the left or right side of the headset.

MOVE THE MICROPHONE
To move the microphone assembly from the left side of the headset to the right side:
- Locate the left
![]() and right
and right ![]() icons on the headband to orient the headset properly.
icons on the headband to orient the headset properly. - On the left side, rotate the side pad.
![]()
- Push the release button, and gently pull the microphone assembly from the connector socket.

- On the right side, push the release button, and gently pull the terminator cover from the connector socket.

- On the left side, align the release button to the release button opening, and insert the terminator cover into the base of the connector socket.
![]()
- Slide the terminator cover into the connector socket until the release button is secure.
![]()
Do NOT force the terminator cover into the connector socket.
NOTE: If the terminator cover is not securely installed, there will be no audio coming from that earbud. - On the right side, align the release button to the release button opening, and insert the microphone connector into the base of the connector socket.
![]()
- Slide the microphone connector into the connector socket until the release button is secure.
![]()
Do NOT force the microphone connector into the connector socket. - Test the headset before flight.


BATTERIES
REPLACE THE BATTERIES
When the battery light blinks red, the batteries must be replaced.
NOTE: For aircraft-powered headsets, batteries are not required for operation if aircraft power is available. See "Aircraft Connectors".
- Power off the headset.
- On the back of the control module, press down firmly on the finger indent and slide the cover down.
![]()
The battery cover is tethered to the control module. Do NOT attempt to detach it.

- Remove the batteries.
- Insert two alkaline AA batteries, observing proper polarity.

![]()
If the batteries don't fit correctly, do NOT force them in. Forcing an improper connection will cause permanent damage to the control module. - Close the battery cover, press firmly down on the finger indent, and slide the cover into place.

New alkaline AA batteries supply up to 45 hours of power for the headset. Battery life varies with the ambient noise level of the aircraft, temperature, ear tip condition, Bluetooth use, and age of the batteries.

AIRCRAFT CONNECTORS
Aircraft connectors are available in several standard aircraft connector options.
| POWER TYPE | CONNECTOR OPTIONS |
| Battery power only. | Dual plug (general aviation) |
| Flex Power - Aircraft power or battery power. No battery needed when connected to aircraft power. NOTE: This version is often called Flex powered and comes with an Auto On function. | 5-pin XLR NOTES:
|
NOTE: Contact Bose customer service for more information about these connectors.
DUAL PLUG
The battery (only) powered version of the headset has two general aviation aircraft connectors that insert into specific jacks on the aircraft control panel. The microphone connector is shorter, thinner and has a slightly different shape than the intercom connector.

Connect to the aircraft
- Insert the thicker intercom connector into the audio jack on the aircraft control panel.
- Insert the thinner microphone connector into the microphone jack on the aircraft control panel.


Disconnect from the aircraft
Gently pull back on each connector to remove the connector from the aircraft control panel.
5-PIN XLR, 6-PIN LEMO, AND 7-PIN XLR
The 5-pin XLR, 6-pin Lemo, and 7-pin XLR aircraft connectors insert into the aircraft control panel and provide the headset with aircraft power and intercom audio.

Connect to the aircraft
- Align the connector to the connector keyway by matching the narrow bar on the connector to the slot on the connector.
- Firmly insert the connector into the connector jack on the aircraft control panel.
![]()

Disconnect from the aircraft
5-pin XLR and 7-pin XLR
- Press the button/latch on the aircraft control panel to release the connector, if necessary.
- Gently pull back to remove the connector from the aircraft control panel.
![]()

6-pin Lemo
- Pull back on the sleeve near the end of the connector.
![]()
You must pull back on the sleeve before you pull out the connector. Forcing the connector out will damage the cable and/or the aircraft control panel. - Continue gently pulling back to remove the connector from the aircraft control panel.
STATUS LIGHTS
The Bluetooth and Power lights are located on the front of the control module.
BLUETOOTH LIGHT
NOTE: This section applies to Bluetooth headsets only.
Shows the connection status of a mobile device.

| LIGHT ACTIVITY | SYSTEM STATE |
| Blinking purple (in sync with Power light) | Ready to connect |
| Blinking blue (alternating with Power light) | Connecting |
| Blinking blue (in sync with Power light) | Connected |
NOTE: To dim the Bluetooth and Power lights, double-press .
POWER LIGHT
Shows the power source and level.

| POWER SOURCE | LIGHT ACTIVITY | SYSTEM STATE |
| Aircraft | Slow blinking green | Power On |
| Battery | Blinking green | Power On—batteries high (8 hours or more ) |
| Battery | Blinking amber | Power On—batteries low (2 to 8 hours remaining) |
| Battery | Blinking red | Power On—batteries low (2 hours or less remaining) NOTE: In Bluetooth headsets, when the batteries reach this level, the Bluetooth feature is disabled to conserve remaining power. You hear a tone, indicating that your Bluetooth device is disconnecting and the Bluetooth feature is turning off. |
| Aircraft or battery | None | Power Off or batteries depleted |
NOTE: To dim the Power and Bluetooth lights, double-press .
New alkaline AA batteries supply up to 45 hours of power for the headset. Battery life varies with the ambient noise level of the aircraft, temperature, ear tip condition, Bluetooth use, and age of the batteries.
BLUETOOTH CONNECTIONS
Bluetooth wireless technology lets you stream audio from mobile devices such as smartphones, tablets, and laptop computers. Before you can stream audio from a device, you must connect the device with your headset.
NOTE: This section applies to Bluetooth headsets only.
CONNECT USING THE BLUETOOTH MENU ON YOUR MOBILE DEVICE
- Make sure the Bluetooth priority switch is in the Mute or Mix position. See "Bluetooth audio priority".
NOTE: If the Bluetooth priority switch is set to Off, Bluetooth is disabled. - Press and hold the Bluetooth/Multi-function button
![]() for one second. The Bluetooth light blinks purple.
for one second. The Bluetooth light blinks purple. - On your mobile device, enable the Bluetooth feature.
TIP: The Bluetooth feature is usually found in the Settings menu. - Select the headset from the device list.

Once connected you hear a tone, and the Bluetooth light blinks blue.

NOTES:
- After 5 minutes of inactivity, the headset automatically exits pairing mode, and the Bluetooth light turns off. To turn the Bluetooth feature back on, press
![]() .
. - Each time you turn on the Bluetooth feature, the headset attempts to reconnect with the two most recently connected Bluetooth devices. If the device(s) are turned off or out of range, the headset returns to pairing mode after 5 minutes.
See "Reconnect a mobile device".
CONNECT YOUR MOBILE DEVICE USING THE BOSE CONNECT APP
Download the Bose Connect app, and follow the on-screen connection instructions.

Once connected you hear a tone, and the Bluetooth light blinks blue.
BLUETOOTH AUDIO PRIORITY
The aircraft intercom system (ICS) is always the headset's primary audio source. When the headset is plugged in to the aircraft, intercom signals are always heard and cannot be muted by the headset. You can configure how you hear the device audio with the intercom.
NOTE: Bluetooth audio will never override the intercom.
The Bluetooth priority switch is located on the front of the control module.

| FUNCTION | POSITION | DESCRIPTION |
| Mute |  | When an intercom signal is detected, Bluetooth audio is temporarily muted until intercom audio ceases. |
| Mix |  | When an intercom signal is detected, Bluetooth audio is mixed with intercom audio. You hear a maximum of two audio sources; the intercom plus 1 Bluetooth device. |
| Off |  | Only intercom audio is active. Bluetooth functionality is disabled. NOTES:
|
NOTES:
- When Mute or Mix are selected, incoming and outgoing phone calls automatically mute all other secondary audio sources.
- During a phone call, the intercom and the phone call are heard as mixed.
DISCONNECT A MOBILE DEVICE
Press and hold the Bluetooth/Multi-function button  for five seconds to turn the Bluetooth feature off.
Move the Bluetooth priority switch to the Off position.
Use the Bose Connect app to disconnect your mobile device.
TIP: You can also use Bluetooth settings to disconnect your device. Disabling the Bluetooth feature disconnects all other devices.
RECONNECT A MOBILE DEVICE
When powered on, the headset tries to reconnect with the two most recently-connected devices.
NOTE: The devices must be within range (30 ft. or 9 m) and powered on.
RECOVER A LOST CONNECTION
When your connected mobile device moves out of range, the connection is lost. The headset automatically attempts to reconnect. If the headset is unable to reconnect, it returns to pairing mode. After five minutes of inactivity, the Bluetooth feature turns off.
- Move the device back into range.
- Press the Bluetooth/Multi-function button
![]() to reconnect.
to reconnect.
MANAGING MULTIPLE BLUETOOTH CONNECTIONS
You can pair additional devices to your headset. These Bluetooth connections are controlled with the Bluetooth/Multi-function button . Before connecting an additional mobile device, make sure this feature is enabled.
TIP: You can also easily manage multiple connected devices using the Bose Connect app.
NOTE: This section applies to Bluetooth headsets only.
CONNECT AN ADDITIONAL MOBILE DEVICE
You can store up to eight paired devices in the headset pairing list, and your headset can be actively connected to two devices at a time.
To connect an additional device, use the Bluetooth menu on your device or download the Bose Connect app.
NOTES:
- Only one device can be heard at a time.
- Bluetooth audio will never override the intercom.
SWITCH BETWEEN CONNECTED DEVICES
- Pause audio on your first device.
- Play audio on your second device.
CLEAR THE HEADSET PAIRING LIST
- Press and hold
![]() and — simultaneously for seven seconds, or until the Bluetooth light blinks purple in sync with the Power light.
and — simultaneously for seven seconds, or until the Bluetooth light blinks purple in sync with the Power light. - Delete the headset from the Bluetooth list on your device.
All devices are cleared, and the headset is ready to connect.
See "Bluetooth Connections".
BLUETOOTH FUNCTIONS
NOTE: This section applies to Bluetooth headsets only.
BLUETOOTH VOLUME FUNCTIONS
The Bluetooth volume controls are located on the side of the control module.

| FUNCTION | WHAT TO DO |
| Bluetooth volume up | Press +. |
| Bluetooth volume down | Press —. |
CALL FUNCTIONS
The Bluetooth/Multi-function button is located on the front of the control module.

| FUNCTION | WHAT TO DO |
| Make a call | Dial from your connected phone. The call automatically transfers to the headset. |
| Answer a call | Press You hear a short beep before you hear the incoming call. |
| End a call | Press You hear two short beeps indicating the call has ended. |
| Decline an incoming call | Press and hold You hear two short beeps indicating the call has been declined. |
| Answer a second incoming call and put the current call on hold | While on a call, press the Bluetooth/Multi-function button You hear a short beep before you hear the second call. |
| Decline a second incoming call and stay on current call | While on a call, press and hold You hear two short beeps indicating the call has been declined. |
| Switch between two calls | With two active calls, double-press You hear a short beep before you hear the incoming call. |
| Redial the last number | When there are no active or incoming calls, double-press . |
| Transfer audio to the mobile device | While on a call, press and hold The audio is transferred to the mobile phone while the Bluetooth connection remains active. |
| Activate voice control | When there are no active or incoming calls, press . |
| Mute/unmute a call | While on a call, press + and — simultaneously. You hear two short beeps indicating the call has been muted/unmuted. |
NOTES:
- If you are on a call and unplugged from the intercom, the headset powers off approximately three minutes after the call is ended.
- To use the headset when unplugged from the intercom (to listen to audio or to make or receive calls), Bose recommends to disable the Auto Off feature for uninterrupted functionality. See "Operation Switches".
- Some functions may not be available for some mobile devices. Refer to your device owner's guide for more information.
CARE AND MAINTENANCE
STORE THE HEADSET
- Place the headset in the carry case for easy, convenient storage.
- Store the headset in a ventilated area away from direct sunlight.
- Remove the batteries before storing the headset for extended periods.

- Rotate the microphone up to the headband.
- Adjust the headband.
- Rotate the side pads.
- Place the headset in the case.
- Wrap the control module cable around the perimeter of the case.
- Place the control module in the center of the headband.
- Wrap the remaining cable around the perimeter of the case.
NOTE: Attach the carry case clip to hang the case in the aircraft.

CLEAN THE HEADSET
Your headset may require periodic cleaning.
| COMPONENT | CLEANING PROCEDURE |
| Headset | Wipe the outside surfaces of the headband, headband cushion, side pads, connectors, and plastic parts using a soft, damp cloth (water only) and mild soap.
|
| StayHear+ tips |
|
| Microphone windscreen |
|
SERIAL NUMBER LOCATION
The serial number is located on the side pad. To view the serial number, gently grab and peel the side pad cushion from the left edge away from the side pad.

Refer to this serial number when you register your product or contact Bose for technical support.
REPLACEMENT PARTS AND ACCESSORIES
Through normal use, parts like windscreens and ear tips may require periodic replacement. Replacement parts and accessories can be ordered through Bose customer service.
Visit: worldwide. Bose.com/Support/ProFlight2
Side pad cushion
- Gently grab and peel the side pad cushion away from the side pad.
![]()
- Align the new side pad cushion to the side pad.
![]()
- Press the Velcro to secure the side pad cushion in place.


Headband cushion
Replace the cushion after regular care and maintenance fails to restore the cushion to its original size and shape.
- Gently grab and peel the headband cushion away from the headband.
![]()
- Place the new headband cushion under the headband with adhesive facing rear.
![]()
- Fold the adhesive flap over the headband.
![]()
- Peel away the adhesive backing, fold top flap, and adhere the top to the adhesive.

- Insert the left and right tabs into the plastic cap.
![]()


StayHear+ tips
Replace tips every six months or every 350 hours of use, depending on how often you fly. See "Change the StayHear+ tips". You may have to replace them more often, if you:
- Subject the headset to severe temperature extremes such as parking your airplane outside in severe cold or heat.
- Put excess strain on the tips because of improper storage.
To extend the life of the StayHear+ tips, clean them regularly. See "Clean the headset".
Microphone windscreen
- Gently grab the microphone base and peel the windscreen away from the microphone.
![]()
- Slide the windscreen off the microphone.
- Slide the new windscreen on the microphone.
![]()
- Make sure it fits completely over the microphone.
- Press the sides of the windscreen to secure into place.
![]()


Batteries
See "Batteries".
Microphone or terminator cover
See "Microphone Placement".
LIMITED WARRANTY
The headset is covered by a limited warranty. Details of the limited warranty are provided on the product registration card that is in the carton. Please refer to the card for instructions on how to register. Failure to do so will not affect your limited warranty rights.
- Contact the Bose organization in your country/region (visit global. Bose.com for Bose contact information in your country/region) for specific return and shipping instructions.
- Label and ship the product, freight prepaid, to the address provided by the Bose organization in your country.
- Place any necessary return authorization number prominently on the outside of the carton. Cartons not bearing a return authorization number, where required, will be refused.
TROUBLESHOOTING
TRY THESE FIRST
If you experience problems with your headset, try these solutions first:
- Power on the headset.
- Check the state of the status lights.
- Make sure the earbud is fully inserted and securely sealed.
- For Bluetooth headsets:
- Make sure your mobile device supports Bluetooth 2.1 and greater.
- Increase the volume on your Bluetooth device and audio or music app.
- Try connecting another Bluetooth device.
OTHER SOLUTIONS
If you could not resolve your issue, see the table below to identify symptoms and solutions to common problems. If you are unable to resolve your issue, contact Bose customer service.
Visit: worldwide. Bose.com/contact
Acoustic Noise Cancelling
| PROBLEM | WHAT TO DO |
| Communication, but no noise cancellation in either ear | If using aircraft power, check the aircraft fuse or circuit breaker. If using battery power, make sure the batteries are fresh and correctly installed. See "Batteries". If using aircraft power, make sure the connector is firmly seated in the control panel and the control panel has power. See "Aircraft Connectors". Power off, then power on the headset. See "Headset Controls". NOTE: Don't press the Power button |
| No active noise cancellation and no communication | If using battery power, make sure the batteries are fresh and correctly installed. See "Batteries". If using aircraft power, make sure the connector is firmly seated in the control panel and the control panel has power. See "Aircraft Connectors". Power off, then power on the headset. See "Headset Controls". NOTE: Don't press the Power button Use the headset in a different seat location. Remove microphone assembly from the headset, and check for damage to the connector or pins. See "Move the microphone". |
Intercom communications
| PROBLEM | WHAT TO DO |
| Noise cancellation active, but no incoming audio | Make sure the volume controls are not set too low on the control module or the intercom. Make sure the aircraft connectors are securely inserted into the aircraft control panel. See "Aircraft Connectors". Use a different seat location in the aircraft. |
| Low volume of incoming communications | Make sure the volume controls are not set too low on the control module or the intercom. Make sure the Intercom operation switch is correctly set for your intercom system. See "Operation Switches". Make sure all headsets sharing the intercom have the Intercom operation switch in the correct position. See "Operation Switches". Unplug all other headsets and see if the volume can be adjusted to an acceptable level. |
| Intermittent communication | Make sure the aircraft connectors are securely inserted into the aircraft control panel. See "Aircraft Connectors". Use a different seat location in the aircraft. |
| Reduced volume in one ear only | Make sure the volume controls are not set too low on the control module or the intercom. Make sure the Intercom operation switch is correctly set for your intercom system. See "Operation Switches". |
| No stereo separation or communications in one ear only | Make sure the Intercom operation switch is correctly set for your intercom system. See "Operation Switches". Make sure the terminator cover is securely installed. See "Move the microphone". Depending on how your audio jacks are wired, there may be only one channel of audio supplied to the headphone jack. If the Intercom (MON-ST) operation switch is set to ST and you only hear communications on one side, set the operation switch to MON to play audio on both sides. 5-pin XLR models are mono audio only. |
Audio
| PROBLEM | WHAT TO DO |
| Reduced noise cancellation, intermittent clicking sounds, or communication distortion in a loud environment | Make sure the StayHear+ tips are clean and free of debris. See "Clean the headset". Remove the microphone, then attach again. See "Move the microphone". If the headset emits any loud noise and related loss of communications while in the Acoustic Noise Cancelling mode, turn the power off. The headset will continue to provide communications in the passive noise reducing mode. |
| Squealing or whistling sound when the headset powers on | Make sure the headset orientation is correct. Use the Left Make sure the StayHear+ tips are firmly seated on the earbuds. Make sure the earbuds are fully seated in your ears. See "Fit the earbuds to your ear". Make sure the proper sized StayHear+ tips are being used. See "Choose the correct StayHear+ tips". Make sure the earbud openings are clean and free of debris. |
| Low rumbling sound with the headset turned on in a quiet environment | Make sure the earbuds fit correctly. See "Choose the correct StayHear+ tips". Make sure the StayHear+ tips are clean and free of debris. See "Clean the headset". |
| Crackling sound audible with headset turned on in a loud environment, or noise cancelling is intermittent | Make sure the headset orientation is correct. Use the Left Make sure the earbuds fit correctly. See "Choose the correct StayHear+ tips". Make sure the StayHear+ tips are clean and free of debris. See "Clean the headset". Remove the microphone, then attach again. See "Move the microphone". If using battery power, check if the battery is low. See "Power light". If using aircraft power, make sure the voltage powering the headset is no less than 10 VDC. |

If the headset emits any loud noise and related loss of communications while in the Acoustic Noise Cancelling mode, turn the power off. The headset will continue to provide communications in the passive noise reducing mode.
Microphone
| PROBLEM | WHAT TO DO |
| No sound to the microphone | Make sure the white surface on the microphone is facing your mouth. See "Adjust the microphone". Make sure the microphone is fully connected to the headband. See "Microphone Placement". Check the Squelch level on the intercom. The Squelch level may need to be adjusted. Try another intercom position in the aircraft. For Bluetooth phone calls, make sure the batteries are fresh and correctly installed. See "Batteries". NOTE: For Bluetooth headsets only. |
Bluetooth audio source
NOTE: This section applies to Bluetooth headsets only.
| PROBLEM | WHAT TO DO |
| No audio from the Bluetooth source to the headset while on a call | Make sure the Bluetooth priority switch is in the Mute or Mix position. See "Bluetooth audio priority". Turn on and off Bluetooth on the mobile device. See "Connect using the Bluetooth menu on your mobile device". Make sure the Bluetooth feature is on, and the Bluetooth light is flashing. See "Bluetooth light". Make sure the headset and device are in range (30 ft. or 9 m). Make sure the mobile device is connected properly and the headset is ready to pair. See "Bluetooth Connections". Make sure the Bluetooth volume is not set too low on the control module. See "Bluetooth volume functions". |
| Headset does not pair with a device | Turn on and off Bluetooth on the mobile device. Make sure the Bluetooth feature is on, and the Bluetooth light is flashing. See "Bluetooth light". Make sure the Bluetooth priority switch is in the Mute or Mix position. See "Bluetooth audio priority". Clear the headset pairing list and connect again. Delete the headset from your device's Bluetooth device list and pair again. |
| Cannot answer/end a call | Make sure your mobile device is connected to the headset. Turn your device off and on. Connect again. |
| Headset does not reconnect to a previously connected device | Make sure the headset and device are in range (30 ft. or 9 m). Make sure the Bluetooth priority switch is in the Mute or Mix position. See "Bluetooth audio priority". Make sure the Bluetooth feature is on, and the Bluetooth light is flashing. See "Bluetooth light". On your mobile device, make sure the Bluetooth feature is on. Delete the headset from your device's Bluetooth device list and pair again. |
Auto on/off
NOTE: This function is not available for Dual plug connectors.
| PROBLEM | WHAT TO DO |
| Headset does not power on automatically | Make sure the Auto on operation switch is set to ON. See "Operation Switches". Check the aircraft specifications to see if the jack is getting power from the aircraft's electrical system. |
| Headset does not power off automatically | Make sure the Auto off operation switch is set to ON. See "Operation Switches". Disconnect the headset from the aircraft. Then power on the headset and wait 15 minutes. It may take up to 9 minutes for the headset to power off when not in use immediately after initial power up. If the headset has not powered off after 15 minutes, contact Bose customer service. |

Documents / Resources
References
Download manual
Here you can download full pdf version of manual, it may contain additional safety instructions, warranty information, FCC rules, etc.
Advertisement


Need help?
Do you have a question about the ProFlight Series 2 and is the answer not in the manual?
Questions and answers