
Related Manuals for Bose SOUNDCOMM B30


Summary of Contents for Bose SOUNDCOMM B30
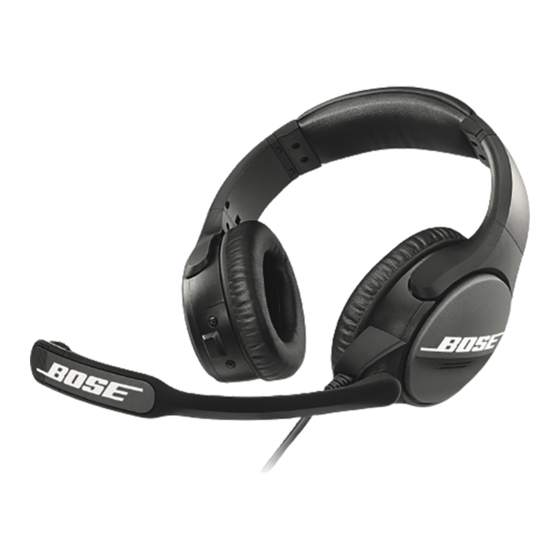
- Page 1 B O S E S O U N D C O M M ® ™ B30 headset Single earcup Dual earcup O W N E R ’ S G U I D E...
- Page 2 - Turn the volume down on your device before placing the headset on your ears, then turn the volume up gradually until you reach a comfortable listening level. • DON’T use the headset if it emits a loud squeal or other loud noise. Contact Bose technical support if the headset emits any loud or unusual noise.
- Page 3 (2) this device must accept any interference received, including interference that may cause undesired operation CAN ICES-3 (B)/NMB-3(B) ©2016 Bose Corporation. No part of this work may be reproduced, modified, distributed or otherwise used without prior written permission. E N G L I S H - 3...
-
Page 4: Table Of Contents
C O N T E N T S Getting Started Components ........................Preparing the Headset for Use Installing the batteries ....................Attaching the control module to the radio or intercom belt pack (optional) ................. Connecting the control module to the belt pack ..........10 Detaching the control module from the belt pack .......... - Page 5 C O N T E N T S Care and Maintenance Cleaning the headset ..................... 15 Headband cushion ....................15 Earcup inner screen (scrim) .................. 15 Microphone windscreen ..................15 Replacing parts ........................16 Side pad replacement (single earcup) .............. 16 Microphone windscreen replacement ...............
-
Page 6: Getting Started
G E T T I N G S TA R T E D Components SoundComm™ B30 Headset (single earcup or dual earcup) Microphone Carry case Control module 2 AA alkaline batteries 4-pin or 5-pin XLR connector Belt pack bracket (2) (optional) 6 - E N G L I S H... -
Page 7: Preparing The Headset For Use
P R E P A R I N G T H E H E A D S E T F O R U S E Installing the batteries 1. Insert two AA alkaline batteries into the compartment as shown. 2. Tighten the battery cap until snug. Note: Replace batteries with AA alkaline batteries only. -
Page 8: Attaching The Control Module To The Radio Or Intercom Belt Pack (Optional)
P R E P A R I N G T H E H E A D S E T F O R U S E Attaching the control module to the radio or intercom belt pack (optional) 1. On the back of the radio or intercom belt pack, loosen the two screws and remove the wire belt clip. - Page 9 P R E P A R I N G T H E H E A D S E T F O R U S E 4. Re-install the two screws, and tighten until snug. Note: If the connection does not feel secure, the screws may be too short. Use the screws provided with the belt pack bracket (available separately).
-
Page 10: Connecting The Control Module To The Belt Pack
P R E P A R I N G T H E H E A D S E T F O R U S E Connecting the control module to the belt pack 1. Line up the pins on the belt pack connector with the holes in the XLR connector. 2. -
Page 11: Detaching The Control Module From The Belt Pack
P R E P A R I N G T H E H E A D S E T F O R U S E Detaching the control module from the belt pack 1. On the XLR connector, press down on the metal tab and gently pull the cable away from the belt pack. -
Page 12: Using The Headset
U S I N G T H E H E A D S E T Acoustic Noise Cancelling noise reduction ™ Use the power switch on the control module to turn noise reduction on and off. Note: When the power is off, the headset still provides audio and communications. To conserve battery life, turn the switch off when the headset is not in use. -
Page 13: Wearing The Headset
U S I N G T H E H E A D S E T Wearing the headset Left and right earcup markings The inside of each earcup (scrim) is clearly marked with an L (left) or an R (right). Be sure to wear the headset in the correct orientation. -
Page 14: Microphone Placement
2. Pull the microphone in toward your lips. Position the microphone with its talk side facing in. The microphone should be 1/2 inch from your lips. 1/2 inch 3. Make sure the microphone windscreen is facing your lips and the Bose® logo is facing out. Do not purse your lips. Storing the headset The headset should be stored in the supplied carry case as shown. -
Page 15: Care And Maintenance
20. Microphone windscreen Wipe with damp cloth and mild soap. Contact Bose technical support for a replacement windscreen using the contact information on page 20. WARNING: Do not attempt to disassemble or service the inside of the earcups or other parts of the headset. -
Page 16: Replacing Parts
Replacing parts Through normal use, some parts may require periodic replacement. Replacement parts can be ordered directly from Bose® technical support. See “Contact information” on page 20. WARNING: Do not attempt to disassemble or service the inside of the earcups or other parts of the headset. -
Page 17: Ear Cushion Replacement
C A R E A N D M A I N T E N A N C E Ear cushion replacement As a general rule, ear cushions should be replaced every 3 — 6 months. You may have to replace them more often if you: •... -
Page 18: Locating The Headset Serial Number
C A R E A N D M A I N T E N A N C E Locating the headset serial number Your Bose® SoundComm™ B30 headset is identified by a unique headset serial number located on the left underside of the headband. Reference this serial number when you register your product or contact Bose for technical support. -
Page 19: Technical Information
C A R E A N D M A I N T E N A N C E Technical information Headset impedance Single earcup: 164 ohm Dual earcup: 82 ohm Headset sensitivity @ 1mW @1kHz Single earcup: 108 dB SPL Dual earcup (per ear-cup): 105 dB SPL Microphone type: 150 ohm Dynamic Noise-Cancelling Weight (not including cable) -
Page 20: Warranty
C A R E A N D M A I N T E N A N C E Warranty Details of the limited warranty are provided on the warranty/product registration card included in the product carton. Contact information Bose technical support Phone: 800-390-2073 Email: SoundComm_Support@Bose.com Support hours: Monday –... -
Page 21: Troubleshooting
• Check the batteries in the belt pack. DON’T use the headset if it emits a loud squeal or other loud noise. Contact Bose® technical support if the headset emits any loud or unusual noise. No audio/ • Check the volume setting on the belt pack. - Page 22 • Make sure the headset ear cushions, internal ear cup foams, and scrims are dry. If not, air dry and retry the headset. If problem persists, contact Bose technical support. DON’T use the headset if it emits a loud squeal or other loud noise. Contact Bose technical support if the headset emits any loud or unusual noise.
- Page 23 E N G L I S H - 2 3...
- Page 24 ©2016 Bose Corporation, The Mountain, Framingham, MA 01701-9168 USA AM773320 Rev. 00...
Need help?
Do you have a question about the SOUNDCOMM B30 and is the answer not in the manual?
Questions and answers